How to download financial data with R

Hadrien Puche

Any financial analysis starts with data. Whether you want to analyze a stock, build a portfolio, measure risk, create a valuation model or develop trading strategies, the first step is always the same: obtaining financial data.

You could download data manually from websites such as Yahoo! Finance or Investing.com, but this quickly becomes tedious and time-consuming. It also limits the amount of data you can work with.

R allows us to automate this process and retrieve large amounts of financial information in just a few lines of code.

In this article, Hadrien PUCHE (ESSEC Business School, Grande École Program, Master in Management, 2023-2027) will help you to:

  • Download historical stock prices and market indices with R
  • Explore, clean, and visualize xts time-series data
  • Compute basic statistics and historical distributions
  • Compare multiple securities
  • Build the foundation needed for more advanced financial analysis

But first, what financial data can we actually download?

Financial professionals use many different categories of data across individual assets as well as portfolios and funds.

Market data (Easily downloadable for free via Yahoo! Finance)

  • Individual asset prices (e.g., individual stocks, corporate bonds)
  • Portfolios and funds (e.g., ETFs, mutual funds)
  • Currency exchange rates (e.g., EUR/USD)
  • Market indices (e.g., S&P 500)

Macroeconomic data (Available via the St. Louis Fed – FRED)

  • Inflation and Consumer Price Index (CPI)
  • Interest rates and bond yields
  • GDP growth and unemployment

Not all data sources are freely available. Many professional investors rely on paid platforms such as Bloomberg or FactSet to access fundamental accounting data (revenue, cash flows) and alternative data (satellite imagery, sentiment). Fortunately, market prices and macroeconomic indicators can easily be accessed for free using R for research and learning purposes.

While you can download macroeconomic data using specialized packages like fredr, we will keep things simple in this article and focus purely on extracting and modeling market prices using the open-source quantmod package.

A step-by-step guide

Follow the next steps to download your first financial dataset with R.

Step 1: Instal the required packages

If you have not yet installed R, refer to the setup guide published earlier in this series to configure your execution environment (RStudio).

Once your environment is ready, install the required packages by running this in your console (you only need to do this once):

install.packages(c("quantmod", "PerformanceAnalytics"))

Here is what these packages do:

  • quantmod: Short for Quantitative Financial Modelling Framework, it is a widely used R package for downloading and analyzing financial market data, including data from Yahoo! Finance.
  • xts: Short for eXtensible Time Series, this package is automatically installed with quantmod. It provides data structures specifically designed for time-indexed data.
  • PerformanceAnalytics: A package of econometric functions used to calculate returns and risk metrics.

Step 2: Import your R packages

Most financial analysis scripts begin by loading the packages required for the analysis using the library() function.

Create a new R script file. You can also save it wherever you want. Paste the following script and run it (as a reminder, you need to select the code you want with your mouse before running it):

library(quantmod)
library(PerformanceAnalytics)

Step 3: Download your first data

To download financial data, we use ticker symbols, which identify securities or market instruments within a given exchange or data provider. For example, AAPL represents Apple.

We will use the getSymbols() function. By passing arguments to the function, we can customize the output. Setting auto.assign = FALSE assigns the dataset directly to a variable that we can name aapl_data.

Let us download daily data for Apple’s stock price over the last five years (from 01/01/2019 to 31/12/2024 at that time)t.

# Download historical Apple stock data
aapl_data <- getSymbols("AAPL", src = "yahoo", from = "2019-01-01", to = "2024-01-01", auto.assign = FALSE)
 
# Display the first 5 rows
head(aapl_data, 5)

You will obtain this xts table with the following columns:

  • Open: opening price at the beginning of the trading day
  • High: highest price during the trading day
  • Low: lowest price during the trading day
  • Close: closing price at the end of the trading day
  • Volume: transaction volume during the trading day
  • Adjusted: closing price adjusted for stock splits and dividends
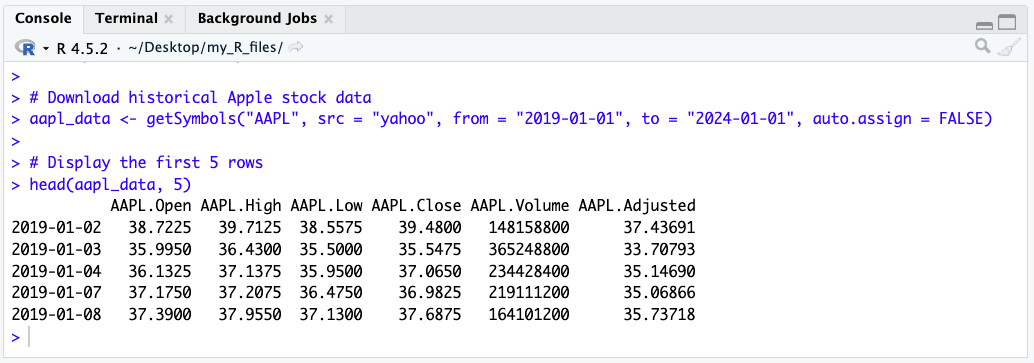
A screenshot from RStudio showing the output table of the getSymbols query

To keep things simple for this guide, we will focus strictly on the raw Close price. quantmod provides a convenient helper function called Cl() that instantly extracts just the closing price column from the dataset.

# Extract only the closing price
aapl_close <- Cl(aapl_data)
head(aapl_close, 3)

Add this code to your script, then highlight it with your mouse, and press run. Your RStudio should now display this:
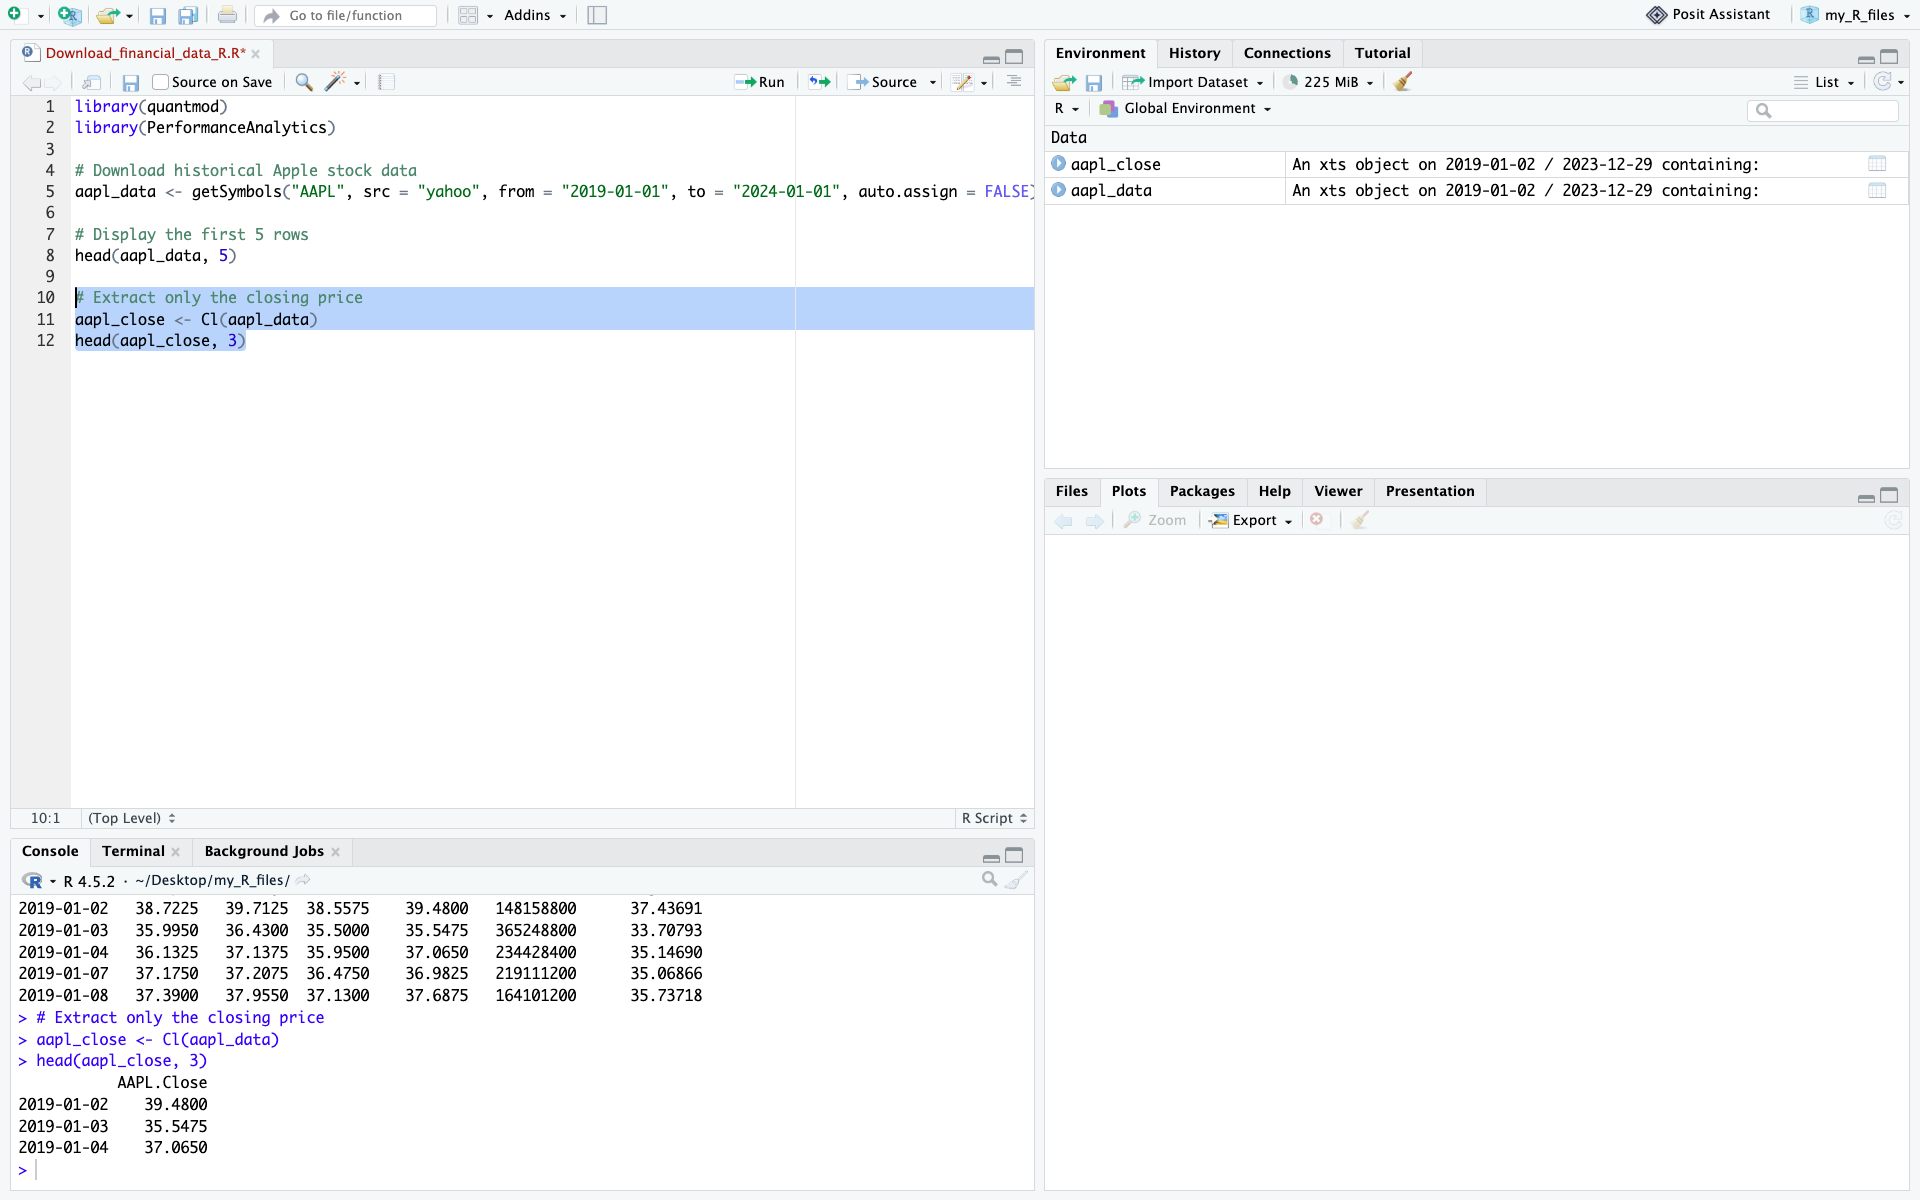
A screenshot from RStudio showing the new output

Step 4: Use more precise queries for historical context

As financial analysts, we routinely extract specific timeframes to understand how assets behave under macroeconomic stress. Because our data is stored as an xts object, R makes it incredibly easy to slice time-series data using date ranges.

For example, examining the COVID-19 market shock in early 2020 provides a useful illustration of extreme market volatility. Let’s isolate Apple’s stock specifically during the COVID-19 market shock and initial recovery (January to June 2020):

# Isolate the COVID-19 crash using xts date subsetting (YYYY-MM-DD/YYYY-MM-DD)
covid_crash <- aapl_close["2020-01-01/2020-06-30"]
 
# Plot the isolated data
plot(covid_crash, main = "AAPL Stock Price - COVID-19 Crash & Recovery", col = "red", lwd = 2)
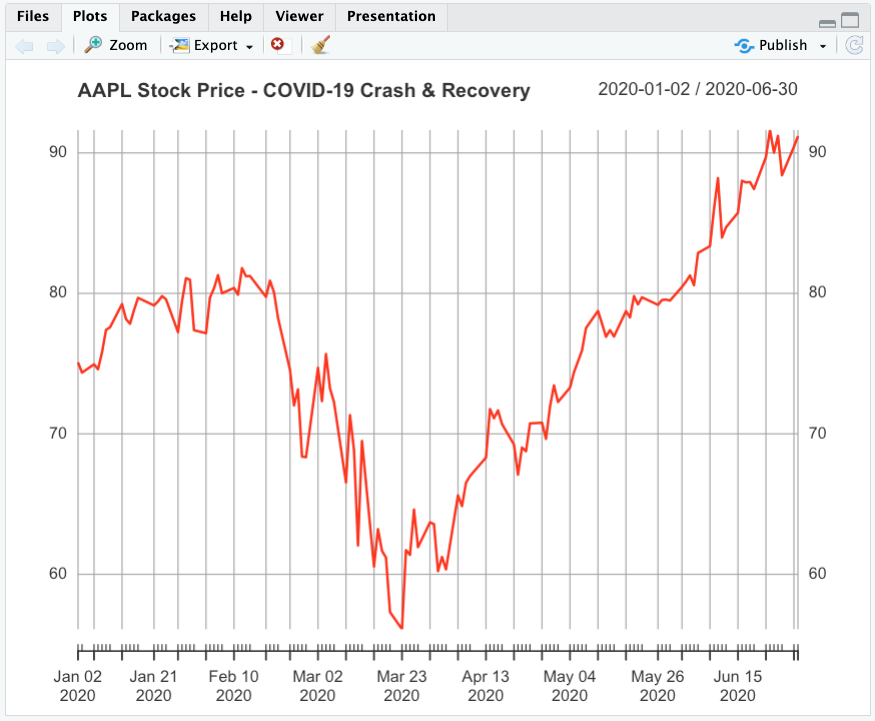
The output of the previous code cell showing the COVID crash

Step 5: Download the data for multiple stocks at the same time

Downloading multiple stocks is necessary for financial analysis that often requires comparing securities, analyzing sectors, or building a portfolio. Instead of issuing separate requests and risking misaligned dates, we can fetch all tickers at once.

Let’s download the data for six of the largest US banks: JPMorgan Chase, Bank of America, Wells Fargo, Citigroup, Goldman Sachs, and Morgan Stanley. Analyzing this sector is a classic way to measure the impact of interest rates on the broader economy.

# Define the major US bank tickers
bank_tickers <- c("JPM", "BAC", "WFC", "C", "GS", "MS")
 
# Download data into the global environment
getSymbols(bank_tickers, src = "yahoo", from = "2019-01-01", to = "2024-01-01")
 
# Extract only the closing prices and merge them into a single matrix
bank_prices <- merge(Cl(JPM), Cl(BAC), Cl(WFC), Cl(C), Cl(GS), Cl(MS))
 
head(bank_prices, 3)

The result is an xts object in which each column represents a stock and each row corresponds to a trading date.
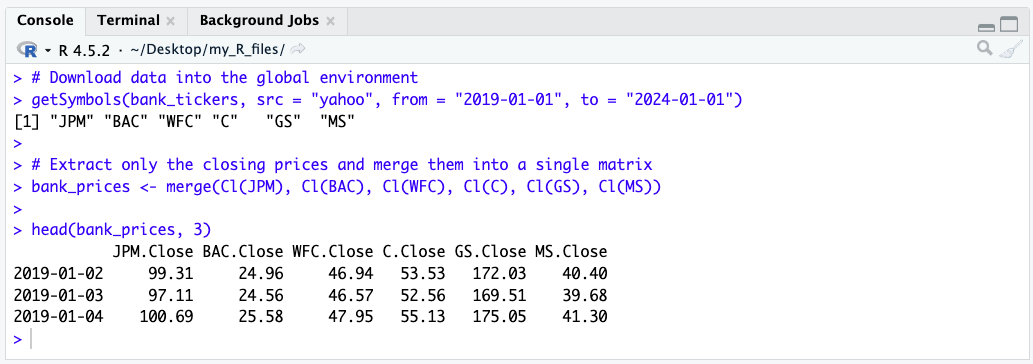
Screenshot of the output of the previous cell showing the US Banks matrix

This table format is ideal for portfolio analysis and benchmarking. To save it for external use, you can export it as a CSV file:

# Save the data frame as a CSV file
write.csv(as.data.frame(bank_prices), file = "us_banks_data.csv")

Now that you have successfully downloaded your financial data, let’s see how you can clean it and then use it.

Inspecting and cleaning the dataset

Financial datasets may contain missing values (NA) for various reasons, including trading suspensions, differences in trading calendars, listing dates, or data-provider issues. Missing observations should be identified before computing returns or risk measures, as they may affect subsequent calculations. For this introductory example, we simply remove rows containing missing values using na.omit(). In applied financial analysis, however, the appropriate treatment depends on the source of the missing data and the objective of the analysis.

In R, we can easily remove any rows containing missing data using the na.omit() function.

# Check for missing values (returns the total count)
sum(is.na(aapl_close))

# Clean missing values by dropping rows with NAs
aapl_close <- na.omit(aapl_close)

# View the last few rows of the cleaned data
tail(aapl_close, 5)
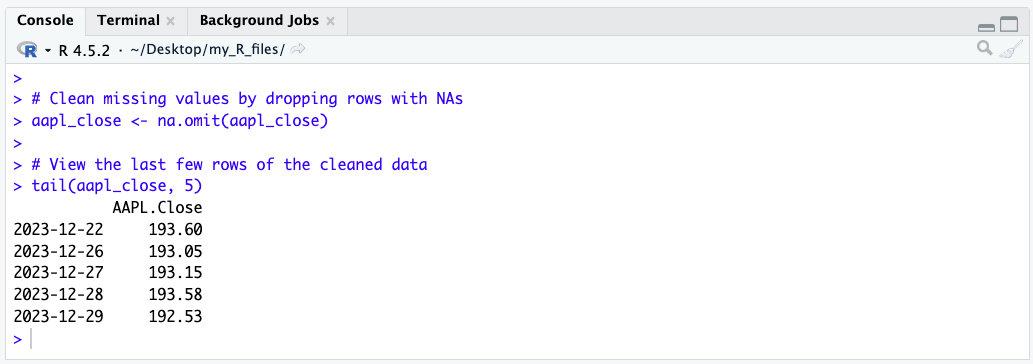
A screenshot from RStudio showing the output of the tail function

Vizualizing your data

Let’s create our first chart to visualize the evolution of Apple’s stock price using the chartSeries() function, which is built specifically for financial time series.

chartSeries(aapl_close, 
            name = "Apple Stock Price", 
            theme = chartTheme("white"), 
            TA = NULL) # TA = NULL removes technical indicators for a clean chart
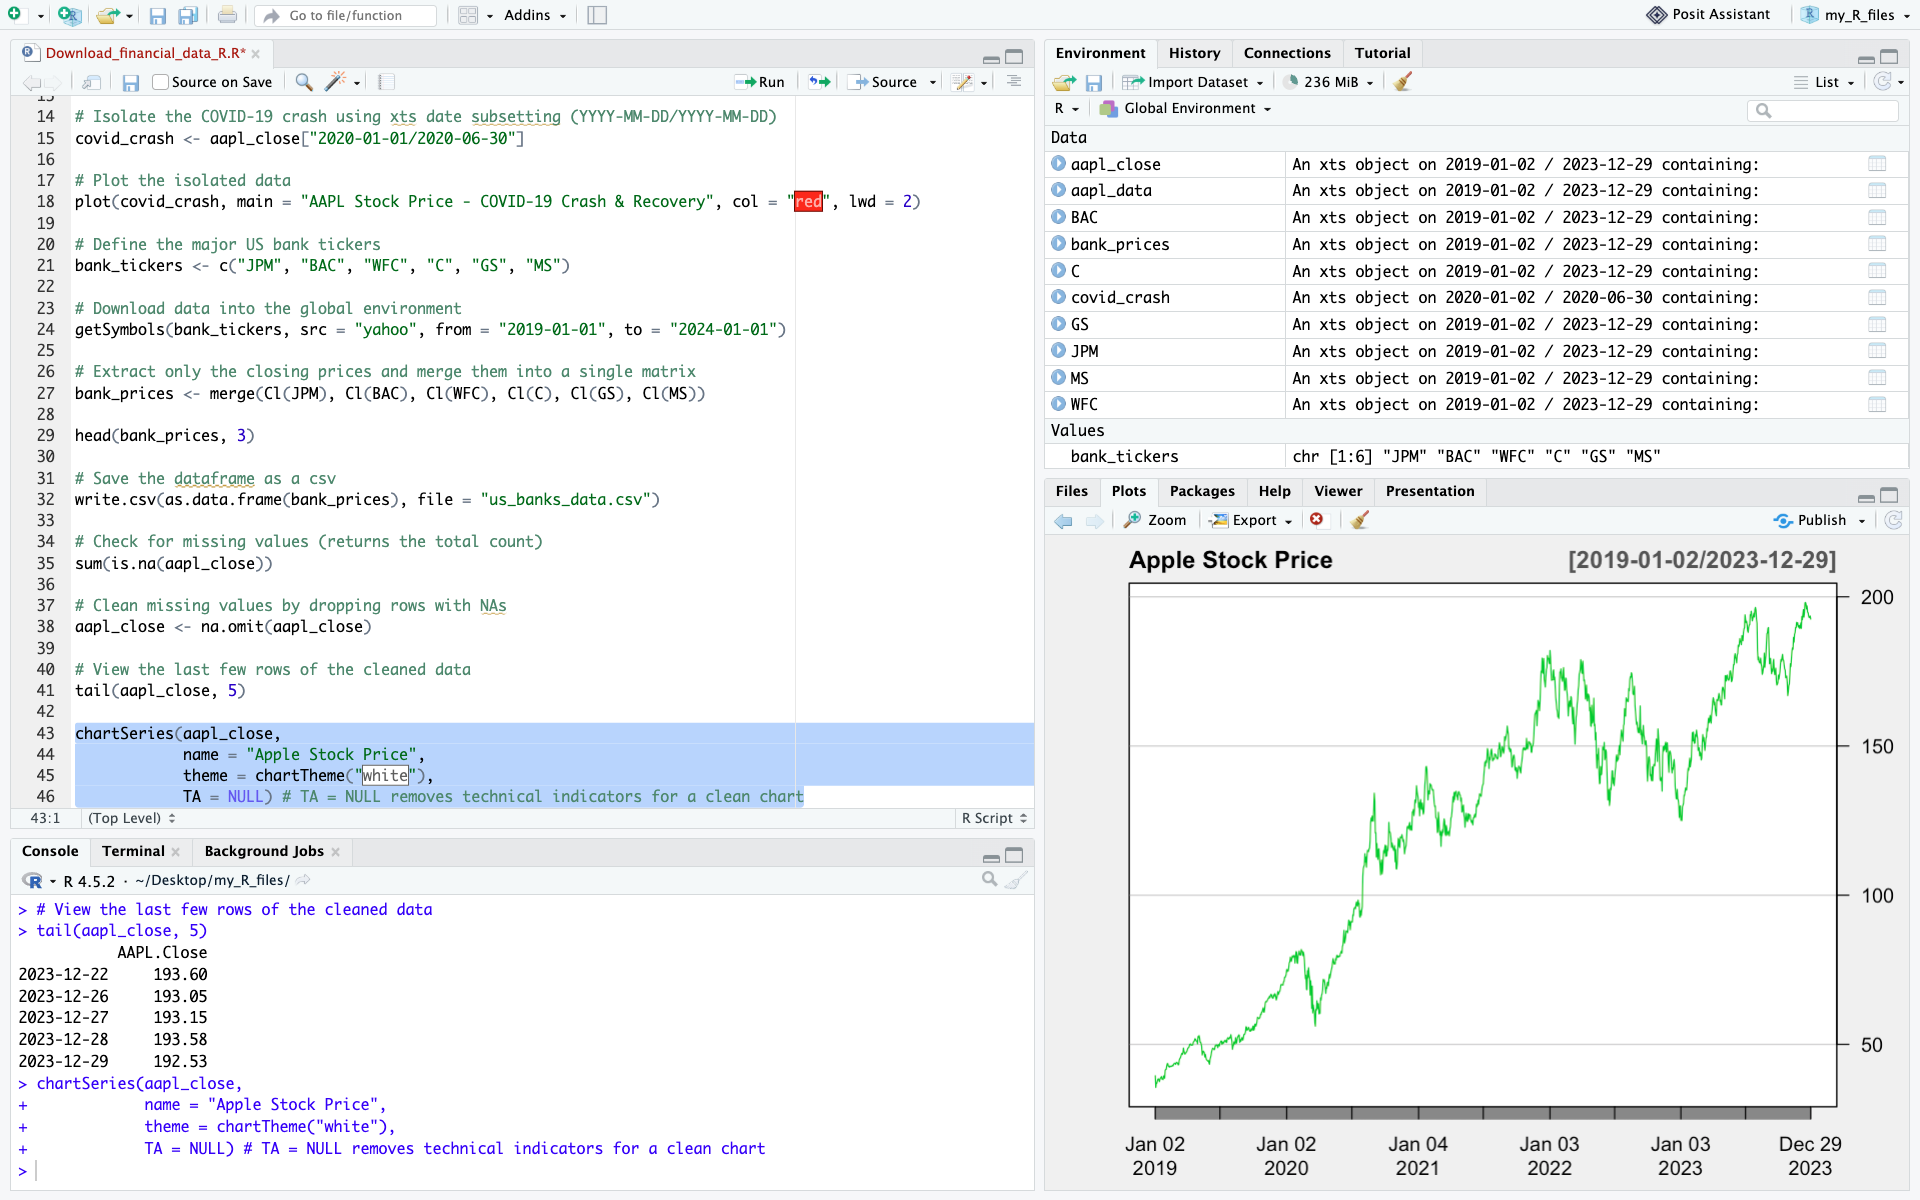
A screenshot of RStudio with the stock price visualization chart output

We have now:

  • Downloaded market data from Yahoo! Finance
  • Extracted the closing price and cleaned the data
  • Created a time-series plot to visualize stock prices

These core steps form the basis of empirical financial research and quantitative models.

Computing basic statistics and historical distributions

To evaluate stock performance and risk, we compute basic descriptive statistics. First, we calculate daily returns using the Return.calculate() function from the PerformanceAnalytics package.

# Calculate daily percentage returns (and remove the first NA row)
aapl_returns <- Return.calculate(aapl_close)
aapl_returns <- na.omit(aapl_returns)
 
# Compute summary statistics
mean_return <- mean(aapl_returns)
volatility <- sd(aapl_returns)
skew <- skewness(aapl_returns)
kurt <- kurtosis(aapl_returns)

print(paste("Mean Daily Return:", round(mean_return, 5)))
print(paste("Daily Volatility (Std Dev):", round(volatility, 4)))

Plotting historical distributions

Histograms display the frequency distribution of daily returns, helping us inspect distribution symmetry and tail risks.

# Return distribution histogram
hist(aapl_returns, breaks = 50, col = "salmon", main = "Historical Daily Return Distribution", xlab = "Daily Return")
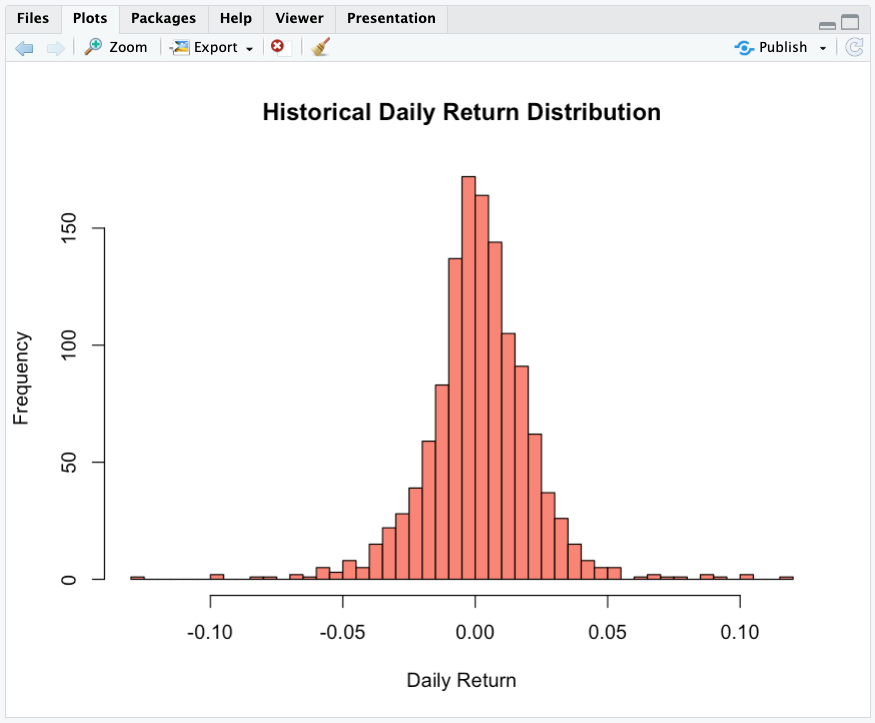
The output of the previous cell – distribution histogram

Normalizing stock prices and computing returns

All stocks have different nominal prices. If Tesla trades at $350 and Nvidia at $220, it does not mean that Tesla performed better. To establish an accurate comparison, we execute two fundamental computations:

  1. Price normalization: We normalize all historical time series to a base index of 100, ensuring a standardized starting point.
  2. Return calculation: We compute periodic returns to measure performance independently of the nominal price level.
# Clean any missing data
bank_prices <- na.omit(bank_prices)

# Harmonize prices to Base 100 (Divide every row by the first row, multiply by 100)
normalized <- sweep(bank_prices, MARGIN = 2, STATS = as.numeric(bank_prices[1,]), FUN = "/") * 100
 
# Plot the performance comparison
plot(normalized, legend.loc = "topleft", main = "Performance Comparison (Base = 100)", ylab = "Growth of $100")
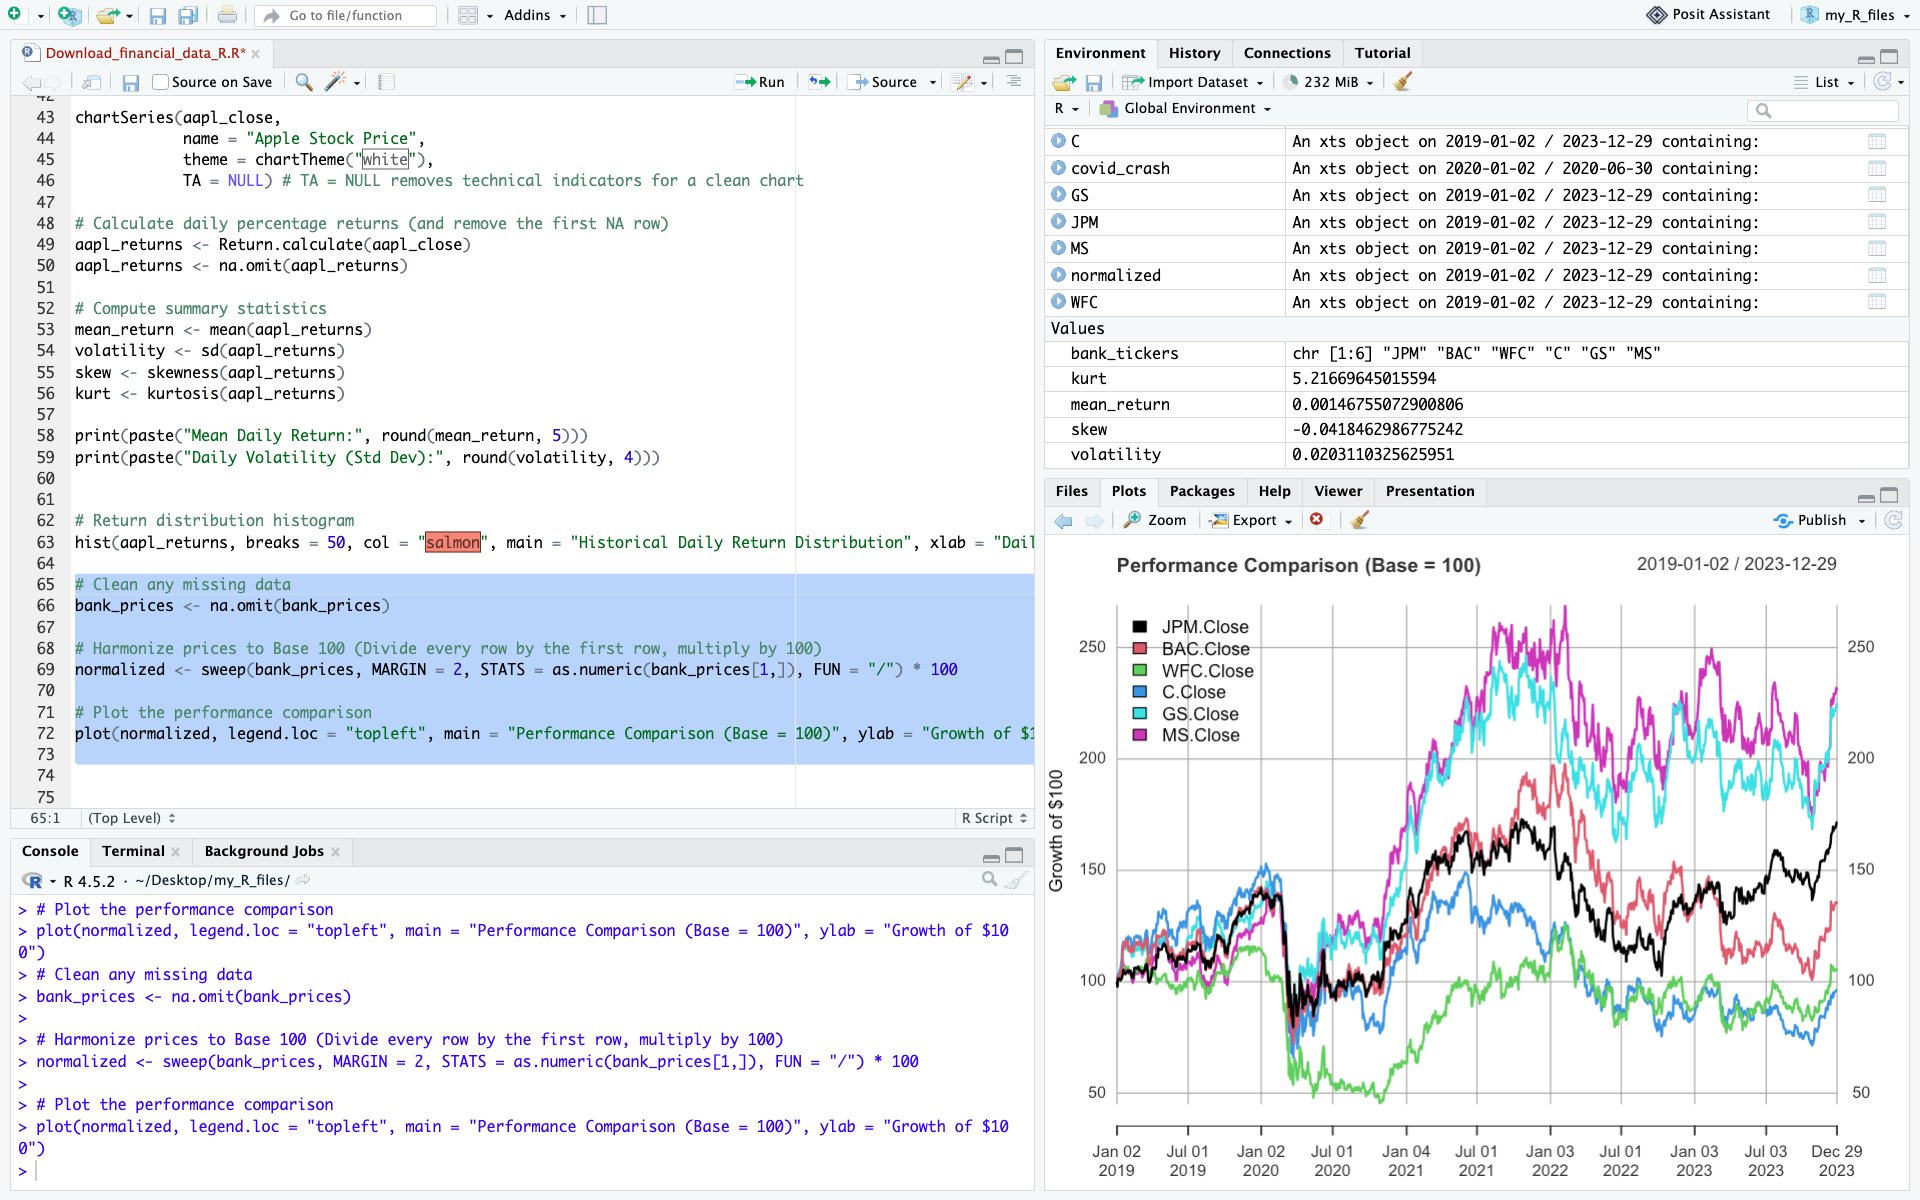
The output of the previous cell showing normalized prices

We can also compute daily returns across all stocks in one line:

bank_returns <- na.omit(Return.calculate(bank_prices))
head(bank_returns, 3)

This is a standard technique used by portfolio managers and equity analysts to compare growth trajectories.

Common pitfalls

When working with market data in R, beginners often run into the same issues:

  • Using the wrong ticker symbol
  • Comparing stocks without normalizing prices (Base 100)
  • Forgetting that markets are closed on weekends and holidays
  • Failing to clean and handle missing values (NA) using na.omit()
  • Using raw closing prices when adjusted prices are required: for long-term performance analysis, adjusted prices are generally preferable because they account for stock splits and dividends.

Overall, don’t forget to always inspect and clean your data before starting your analysis.

Exercises

Exercise 1: Basic data retrieval and price visualization (RACE)

Ferrari N.V. (RACE) presents an interesting case study in market dynamics: it is a car manufacturer that acts as a high-end luxury franchise. Its deliberate production scarcity, multi-year order backlogs, and immense pricing power decouple it from typical automotive boom-and-bust cycles.

Using the ticker symbol RACE, download the last five years of daily market data.

Your tasks:

  • Use the appropriate R functions to display the first 5 rows and the last 5 rows of the dataset to verify data integrity.
  • Extract the closing price and generate a line chart plotting the price over the entire 5-year period. Observe how its price trajectory reflects Ferrari’s distinctive positioning at the intersection of the automotive and luxury industries.

Exercise 2: time-series extraction and volume analysis on Tesla (TSLA)

Tesla is renowned for its high historical volatility and massive retail trading interest. The 2022-2024 window was particularly eventful for growth and electric vehicle stocks, marked by shifting supply chains and a rapid rise in interest rates.

Using the ticker symbol TSLA, extract the market data for the precise calendar period from January 1, 2022, to December 31, 2024 (using the from and to parameters).

Your tasks:

  • Identify the peak (highest closing price) and the trough (lowest closing price) over this period using the max() and min() functions.
  • Extract the Volume column (using Vo()) and calculate the average daily trading volume, a fundamental metric used by analysts to assess market liquidity.

Exercise 3: Comparative performance and risk profiling on Chinese tech companies

Chinese technology stocks often experience unique market cycles driven by distinct domestic regulatory environments and macroeconomic factors. Using the last five years of daily market data, compare the performance and risk characteristics of the following three US-listed ADRs:

  • Alibaba (BABA)
  • Baidu (BIDU)
  • PDD Holdings (PDD)

Questions:

  1. Which stock achieved the highest total cumulative return?
  2. Which stock was most volatile (highest standard deviation of daily returns)?
  3. Which one offered the best risk-adjusted profile over the period? Use the harpe ratio or any risk-adjusted measure

Download the solutions

To help you check your work and experiment further, you can download the complete R Script containing the full code, charts, and commentary for all exercises.

Download Solutions (.r Script)

What’s next?

Now that you know how to download financial data, compute returns, and analyze basic performance and risk measures in R, you are ready to delve into more advanced quantitative and corporate finance topics.

If you want to learn more about other programming languages, check out these two articles to learn how to install Python on your computer and use it to download financial data:

   ▶ Hadrien PUCHE How to Install and Run Python on Your Computer (A Step-by-Step Guide)

   ▶ Hadrien PUCHE How to download and model financial data with Python

About the Author

This article was written in September 2026 by Hadrien PUCHE (ESSEC Business School, Grande École Program, Master in Management, 2023-2027).

   ▶ Discover all posts by Hadrien PUCHE
How to install and run R on your computer (a step-by-step guide)

Hadrien Puche

Understanding and writing R code can be a valuable skill for your career. While general-purpose programming languages such as Python are more widely used, R is particularly well suited to statistical analysis, data visualization, and quantitative research.

In this article, Hadrien PUCHE (ESSEC Business School, Grande École Program, Master in Management, 2023-2027) will help you to:

  • Understand the core components of the R statistical ecosystem for finance
  • Compare development setups (RStudio Desktop vs. Visual Studio Code)
  • Install R alongside essential build tools (RTools / Xcode)
  • Set up RStudio Desktop as a purpose-built workspace
  • Install econometric packages via CRAN (like quantmod)
  • Run a test script

But first, what is R exactly?

Historically, R was created in 1993 as an open-source implementation of the S language, developed at Bell Labs for statistical computing.

Setting up your R workspace can be straightforward. We will rely on CRAN (the Comprehensive R Archive Network), R’s main public repository for packages, to install the packages required for our analysis and their dependencies. Let’s walk through deploying a professional quantitative workspace for R.

Quick vocabulary for beginners

Before we dive in, let’s define a few technical terms you will encounter frequently:

  • Package: A collection of reusable R functions, data, and documentation designed for a specific purpose. For example, quantmod provides tools for quantitative financial analysis and financial data retrieval.
  • Library: A directory on your computer, where your installed packages are stored. You will use the library() command in your code to load them. While developers often use the terms package and library interchangeably, technically you install a package into your library.
  • Dependency: A package that another package requires in order to work properly. R manages these dependencies automatically, so you do not have to take care of them, but do not be surprised if R installs many more packages than you initially requested.
  • Build Tools (Rtools / Xcode): Background software required by your computer to translate (or “compile”) raw source code into executable instructions. R frequently compiles financial packages directly on your machine, making these essential to prevent errors.

Choosing your development environment: RStudio or Visual Studio Code?

You generally have two choices when it comes to writing R code: RStudio Desktop and Visual Studio Code (VS Code).

  • RStudio Desktop: An Integrated Development Environment (IDE) built specifically for R. It features a 4-pane layout that lets you simultaneously view your scripts, console, environment variables (data frames loaded in memory), and charts.
  • Visual Studio Code: VS Code is a highly versatile code editor. You can run R in VS Code by installing the R extension and configuring the required R packages. This is a good choice if you plan to mix multiple programming languages in the same project, though configuring VS Code for R requires a bit more effort than RStudio.

RStudio Desktop 4-pane layout
RStudio Desktop Interface

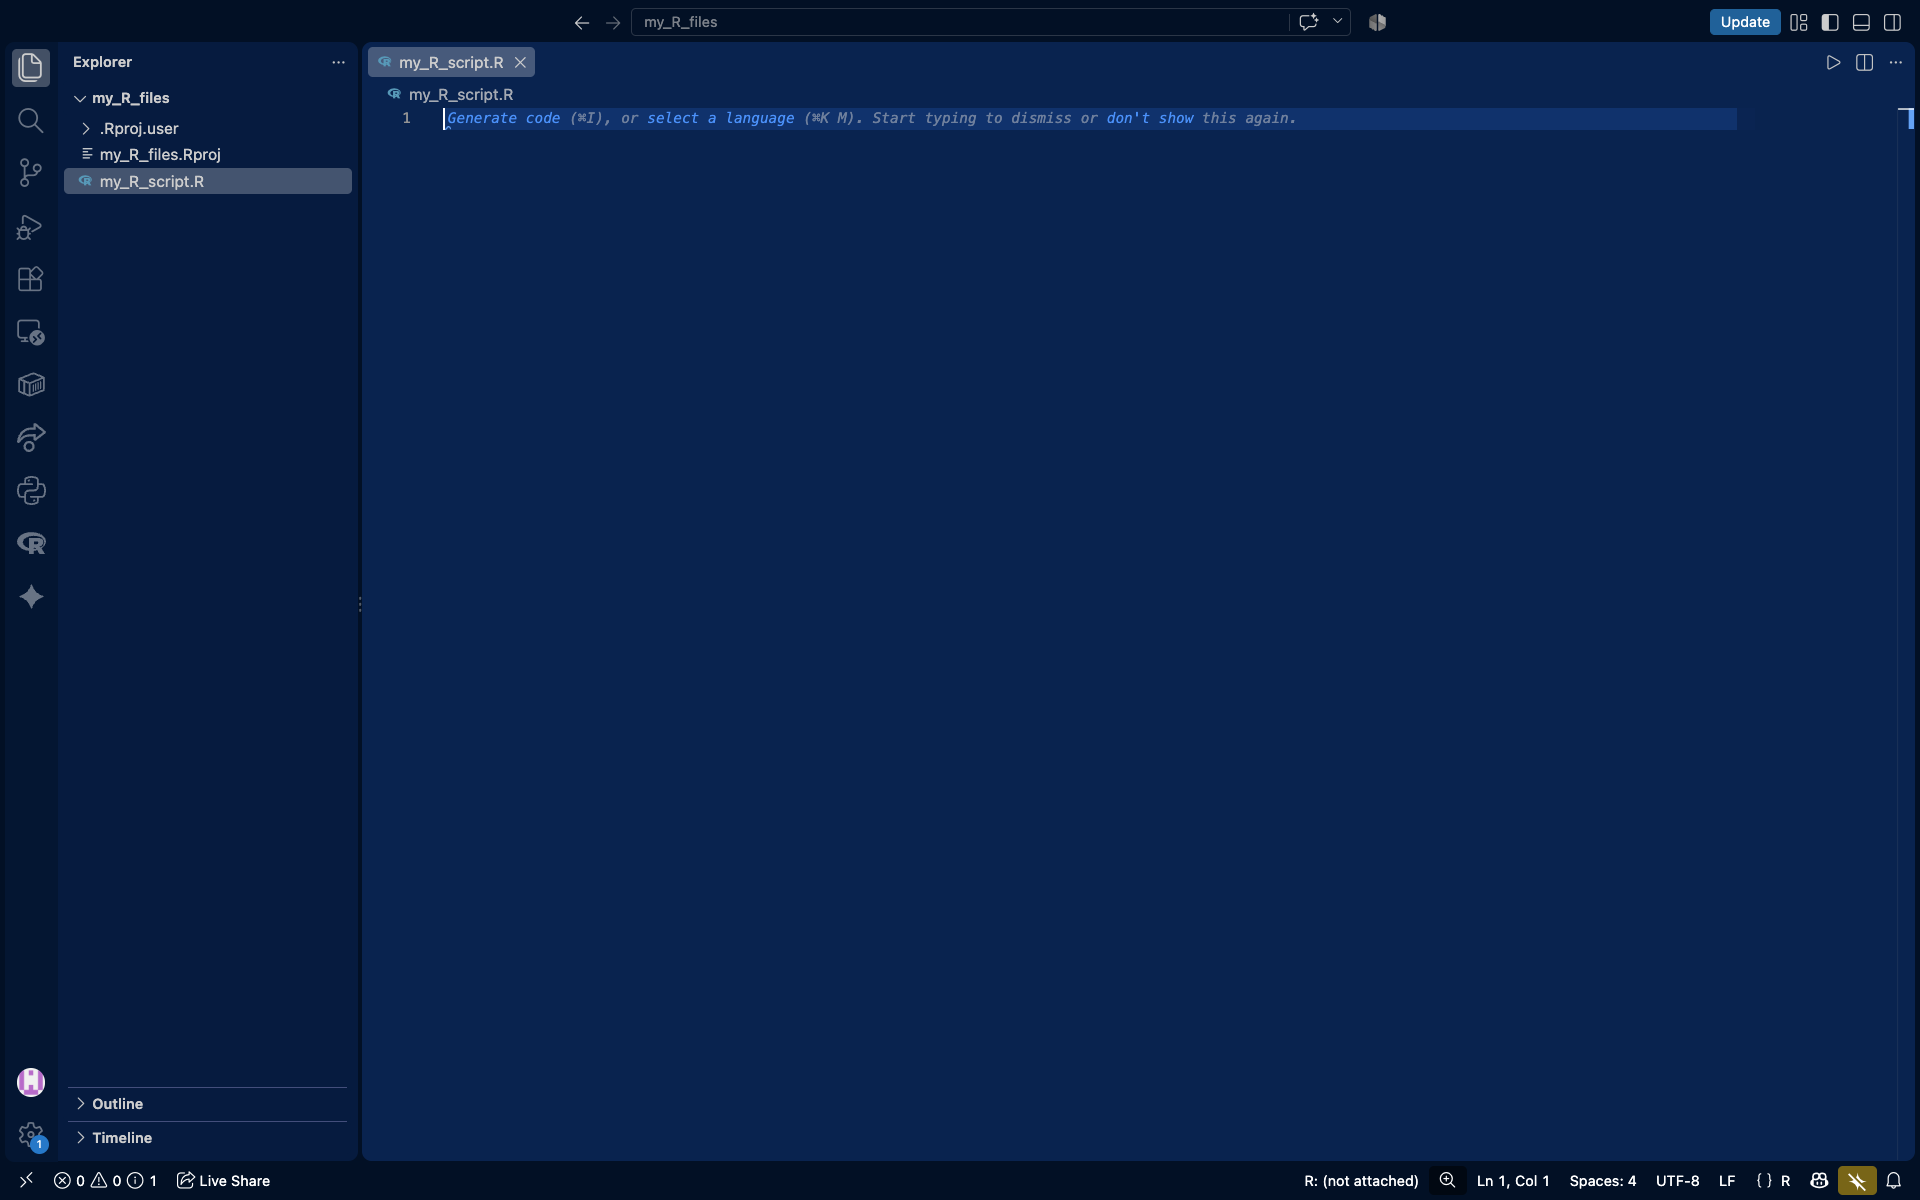
Visual Studio Code running R
Visual Studio Code configured for R

For this guide, we will focus on setting up R and integrating it with RStudio, as it offers a purpose-built user experience for R.

Understanding the R architecture

The R architecture operates as follows:

  • Base R: The underlying computational engine that calculates the math and runs the logic.
  • Build tools (RTools / Xcode):oftware required to compile R packages from source when precompiled binary versions are not available. Most beginners will install packages from binaries, but having these tools available can prevent installation problems with packages that require compilation.
  • CRAN: The Comprehensive R Archive Network. This is the centralized, strictly regulated global repository for R packages.

Step-by-step installation guide

Step 1: Install R and build tools

First, we must install R. RStudio will not function without it.

  1. Go to the official CRAN Download Page.
  2. For Windows:
    • Click Download R for Windows > base > Download the latest R executable and install it using default settings.
    • Go back to the Windows page, click Rtools, and install the version matching your R installation. This is critical for compiling quantitative packages later.
  3. For macOS:
    • Click Download R for macOS and select the .pkg matching your chip (Apple Silicon or Intel).
    • To ensure packages compile correctly, open your Mac Terminal and run xcode-select --install to get the necessary developer tools.

Step 2: Install RStudio

Now, we install the integrated development environment (IDE) that we will use to write and execute R code.

  1. Head to the Posit RStudio Desktop website.
  2. Download the free version corresponding to your operating system (Windows or macOS).
  3. Run the installer. RStudio will normally detect the R installation completed in Step 1 automatically.

Step 3: Install packages from CRAN

Because R uses centralized package repositories such as CRAN, we can install the packages required for our financial analysis directly from the R console in RStudio.

  1. Launch RStudio.
  2. In the Console pane (bottom-left), type the following command and press Enter. This will reach out to CRAN and download the essential tools for market data and time-series analysis:

# Install quantmod for data retrieval, xts for time-series, and PerformanceAnalytics for risk metrics
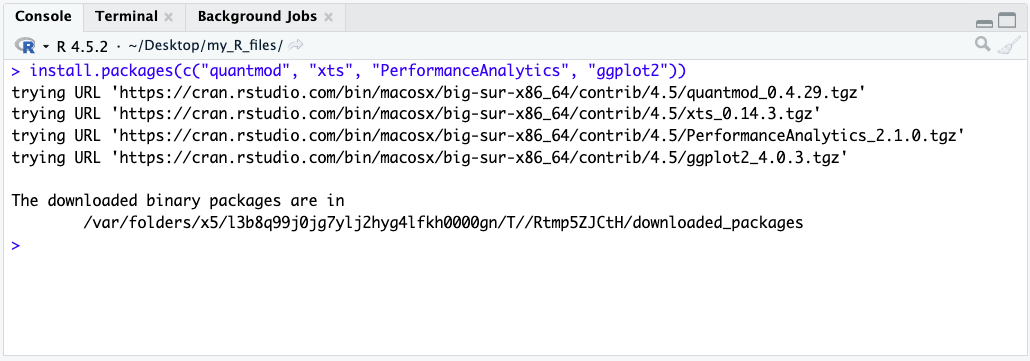
install.packages(c("quantmod", "xts", "PerformanceAnalytics", "ggplot2"))

💡 Quick fix tip: R may occasionally ask whether you want to install a package from source when a binary version is also available. For beginners, the binary version is usually the simplest option. Installing from source may require Rtools on Windows or the Xcode Command Line Tools on macOS.

a screenshot of the output of the script when downloading the packages

Checking that everything is working as intended

Let’s verify your infrastructure by writing a short script that pulls actual market data.

  1. In RStudio, go to File > New File > R Script.
  2. Paste the following quantitative code into the top-left editor pane.
  3. Highlight all the text and press Ctrl+Enter (Windows) or Cmd+Enter (macOS) to run it.
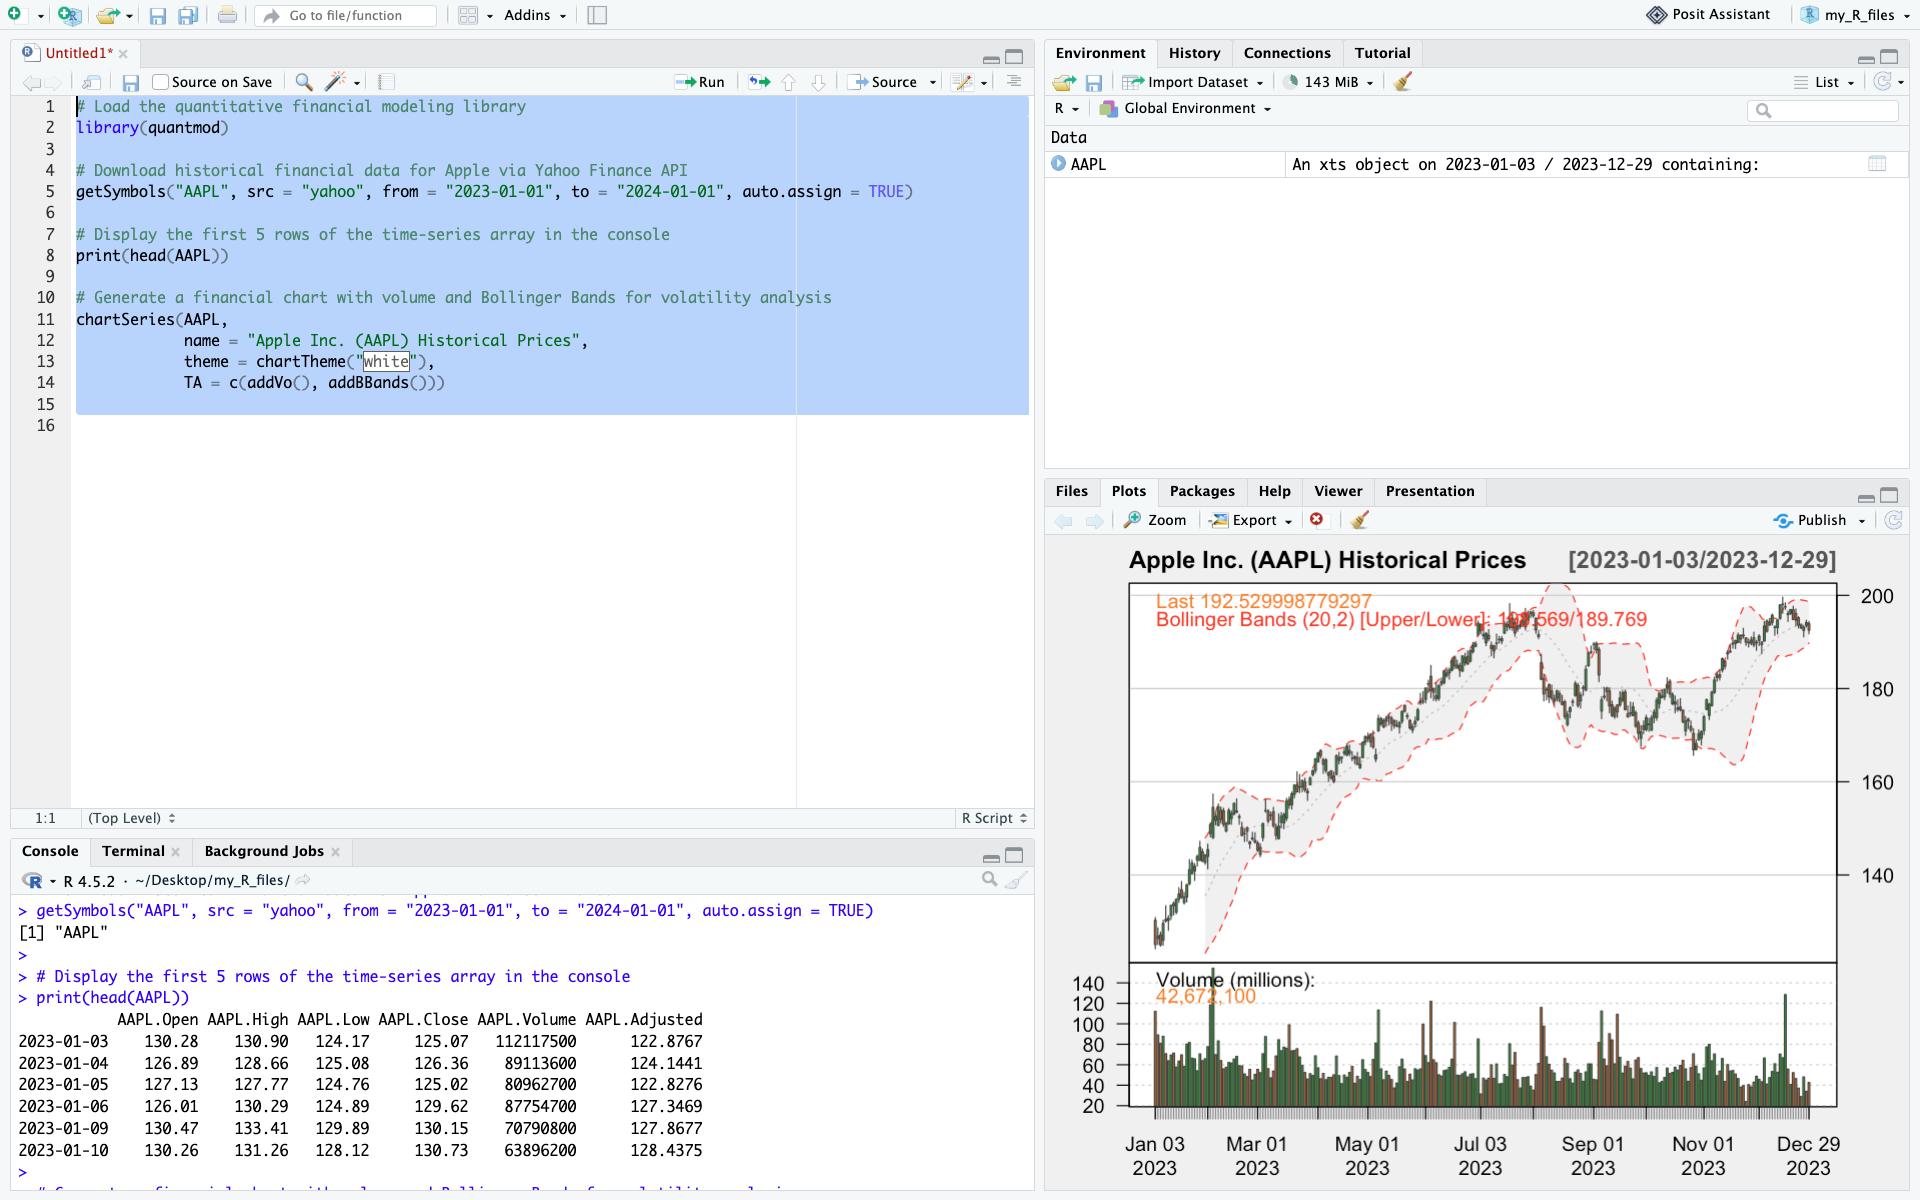
# Load the quantitative financial modeling library
library(quantmod)
 
# Download historical financial data for Apple via Yahoo Finance API
getSymbols("AAPL", src = "yahoo", from = "2023-01-01", to = "2024-01-01", auto.assign = TRUE)
 
# Display the first 5 rows of the time-series array in the console
print(head(AAPL))
 
# Generate a financial chart with volume and Bollinger Bands for volatility analysis
chartSeries(AAPL, 
            name = "Apple Inc. (AAPL) Historical Prices", 
            theme = chartTheme("white"), 
            TA = c(addVo(), addBBands()))

A screenshot of RStudio after running the test script
After running the script, your RStudio should look like this

If the AAPL dataset appears in your top-right Environment pane, the data prints in your Console, and a professional candlestick chart renders in your bottom-right Plots pane, your R setup is fully operational.

Next steps & use cases

With R correctly configured, you are now equipped to tackle complex econometric and financial challenges. A good next step would be to learn how to download financial data with R.

You can learn how to do so in this article: How to download financial data with R

Useful resources

   ▶ CRAN (The Comprehensive R Archive Network): The main public repository for R packages, R distributions, and documentation. CRAN provides a centralized infrastructure for distributing and maintaining thousands of R packages used in statistical computing, econometrics, and quantitative research.

About the author

This article was written in September 2026 by Hadrien PUCHE (ESSEC Business School, Grande École Program, Master in Management, 2023-2027).

   ▶ Discover all posts by Hadrien PUCHE
How to download and model financial data with Python

Hadrien Puche

Any financial analysis starts with data. Whether you want to analyze a stock, build a portfolio, measure risk, create a valuation model or develop trading strategies, the first step is always the same: obtaining financial data.

You could download data manually from websites such as Yahoo! Finance or Investing.com, but this quickly becomes tedious and time-consuming. It also limits the amount of data you can work with.

Python allows us to automate this process and retrieve large amounts of financial information in just a few lines of code.

In this article, Hadrien Puche (ESSEC Business School, Grande École Program, Master in Management, 2023-2027) will help you understand how to:

  • Download historical stock prices with Python
  • Explore and visualize market data
  • Compute basic statistics and historical distributions
  • Compare multiple securities
  • Learn more about the CAPM
  • Build the foundation needed for more advanced financial analysis

What financial data can we download?

Financial professionals use many different categories of data across individual assets as well as portfolios and funds.

Market data

  • Individual asset prices (e.g., individual stocks, corporate bonds)
  • Portfolios and funds (e.g., ETFs, mutual funds)
  • Currency exchange rates
  • Commodity prices
  • Bond yields

Company fundamentals

  • Revenue
  • Earnings
  • Margins
  • Cash flows

Macroeconomic data

  • Inflation
  • Interest rates
  • GDP growth
  • Unemployment

Alternative data

  • News
  • Social media sentiment
  • Satellite imagery
  • Credit card spending

Not all data sources are freely available. Many professional investors rely on paid platforms such as Bloomberg, FactSet, Capital IQ or Morningstar to access standardized, high-frequency, and point-in-time data.

Fortunately, stock market data specifically can easily be accessed for free using Python for research and learning purposes.

In this article, we will use the open-source yfinance library to download historical market data that you will then be able to model and use for any financial analysis project you may have.

A step-by-step guide

Follow the next steps to download your first financial data with Python 🙂

Step 1: Installing the required libraries

If you have not yet installed Python, refer to the setup guide to configure your execution environment (such as Jupyter Notebook or Anaconda).

Once your environment is ready, install the required packages:

pip install yfinance pandas numpy matplotlib

or inside Jupyter Notebook:

!pip install yfinance pandas numpy matplotlib

We will use:

  • yfinance to retrieve market data
  • pandas to manipulate data structures
  • numpy for financial and mathematical operations
  • matplotlib to create charts

Step 2: Import our Python packages

Most data analysis scripts begin by importing the packages required for the analysis. In Python, packages provide reusable code and functionality that extend Python’s core capabilities.

import yfinance as yf
import pandas as pd
import numpy as np
import matplotlib.pyplot as plt

The aliases (yf, pd, np, plt) make the code shorter and easier to read.

Step 3: Download our first data set

To download financial data, we use ticker symbols, which identify securities or market instruments within a given exchange or data provider. For example, AAPL represents Apple.

When calling a Python function, we can customize its behavior by passing arguments such as period (e.g., "5y" for 5 years) or specific start and end dates.

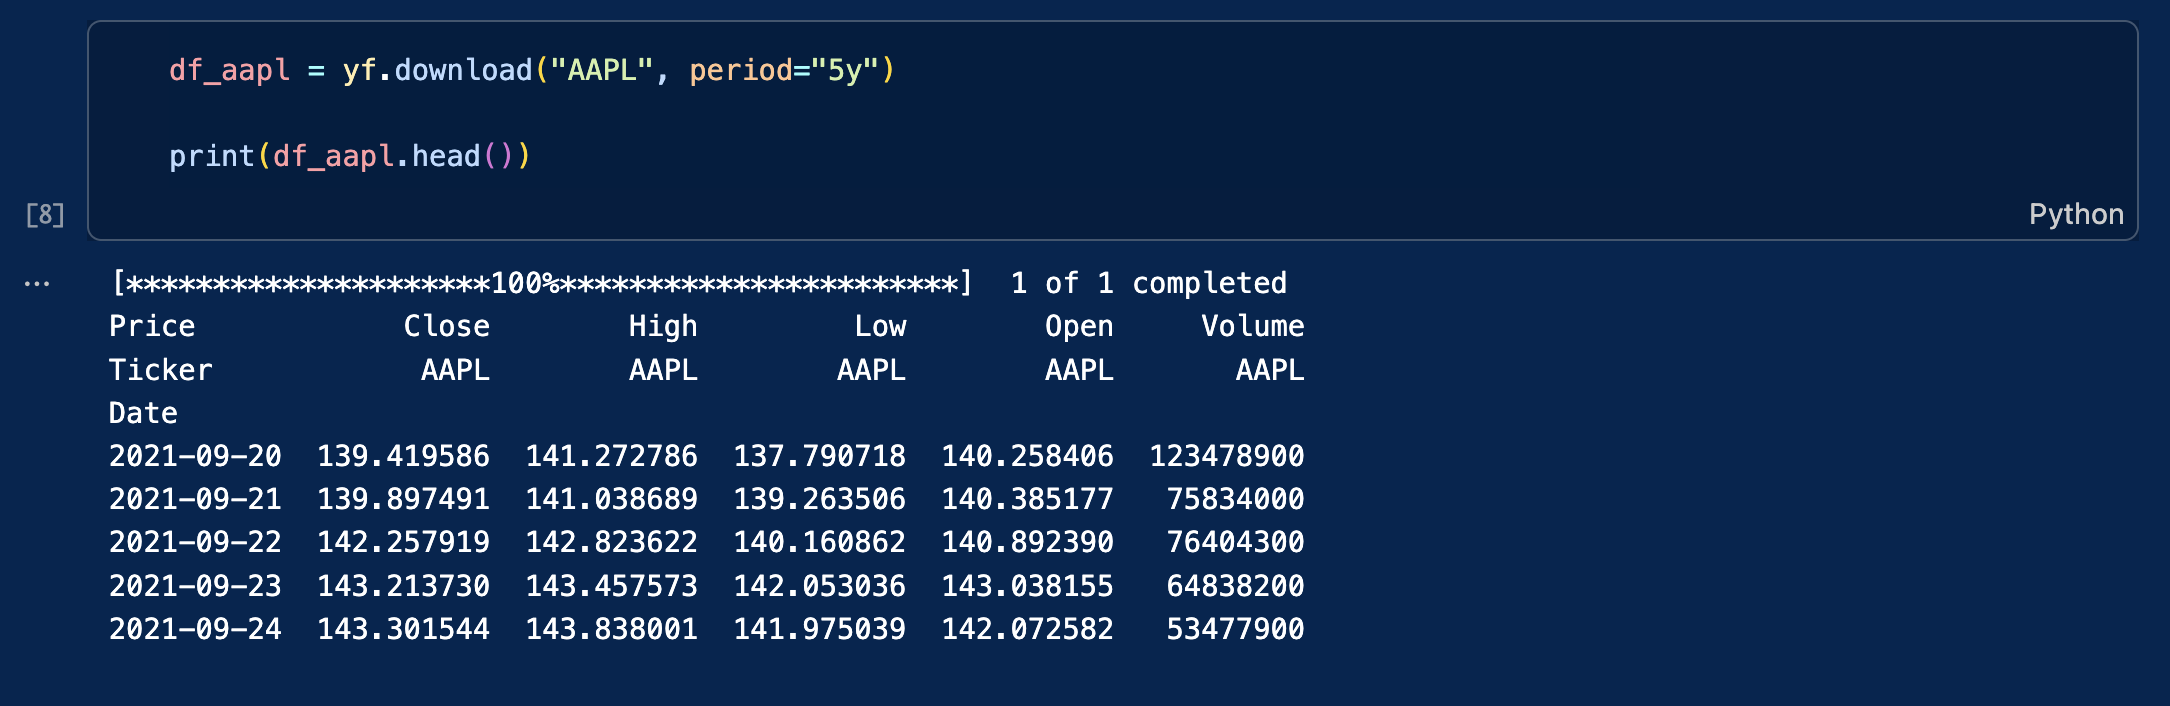
As an example, let us download daily data for Apple stock price over the last five years (Yahoo! Finance ticker: AAPL). The data will be stored in a data frame (df) that we can name df_apple.

df_aapl = yf.download("AAPL", period="5y")

print(df_aapl.head())

You will obtain this table with the following columns:

  • Close: closing price at the end of the trading day
  • High: highest price during the trading day
  • Low: lowest price during the trading day
  • Open: opening price at the beginning of the trading day
  • Volume: transaction volume during the trading day

An screenshot from VSC showing the output table of this Yfinance query

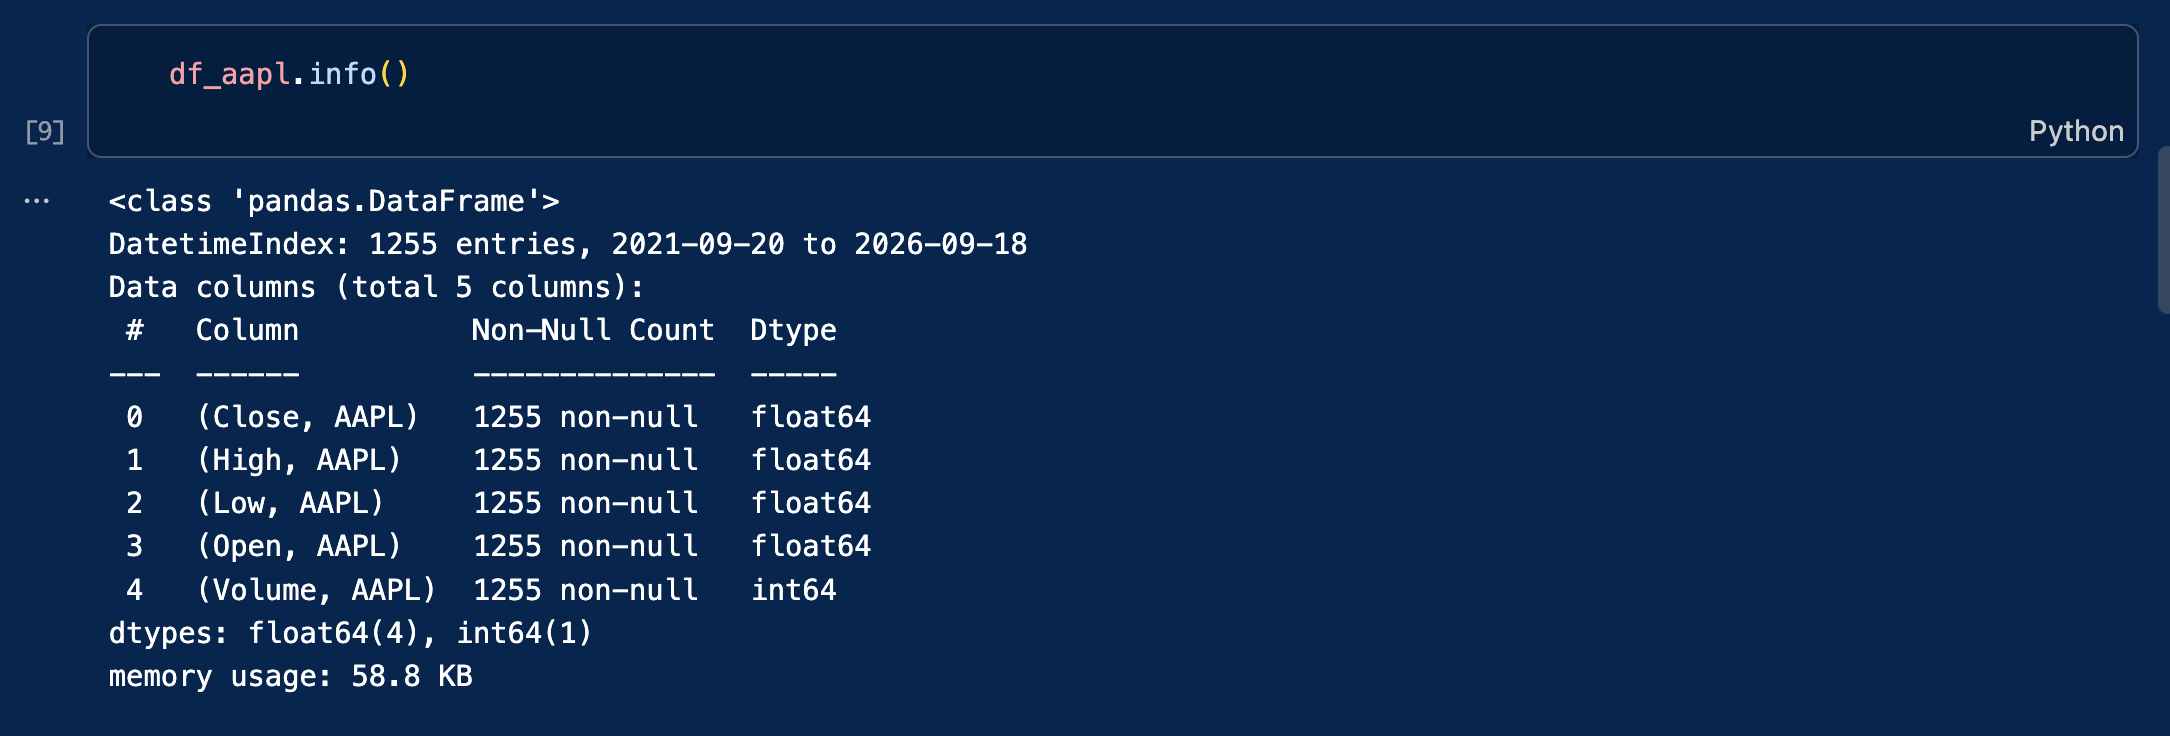
The data is stored in a Pandas DataFrame. This is a popular two-dimensional, tabular data structure with labeled axes (rows and columns).

To inspect its structure, type the following code:

df_aapl.info()

A screenshot from VSC showing the output of df_aapl.info()

Step 4: Using more precise queries for historical context

Instead of downloading a rolling period (like “5y”), we can isolate specific market events by passing exact start and end dates to the download function. As financial analysts, we routinely extract specific timeframes to understand how assets behave under macroeconomic stress.

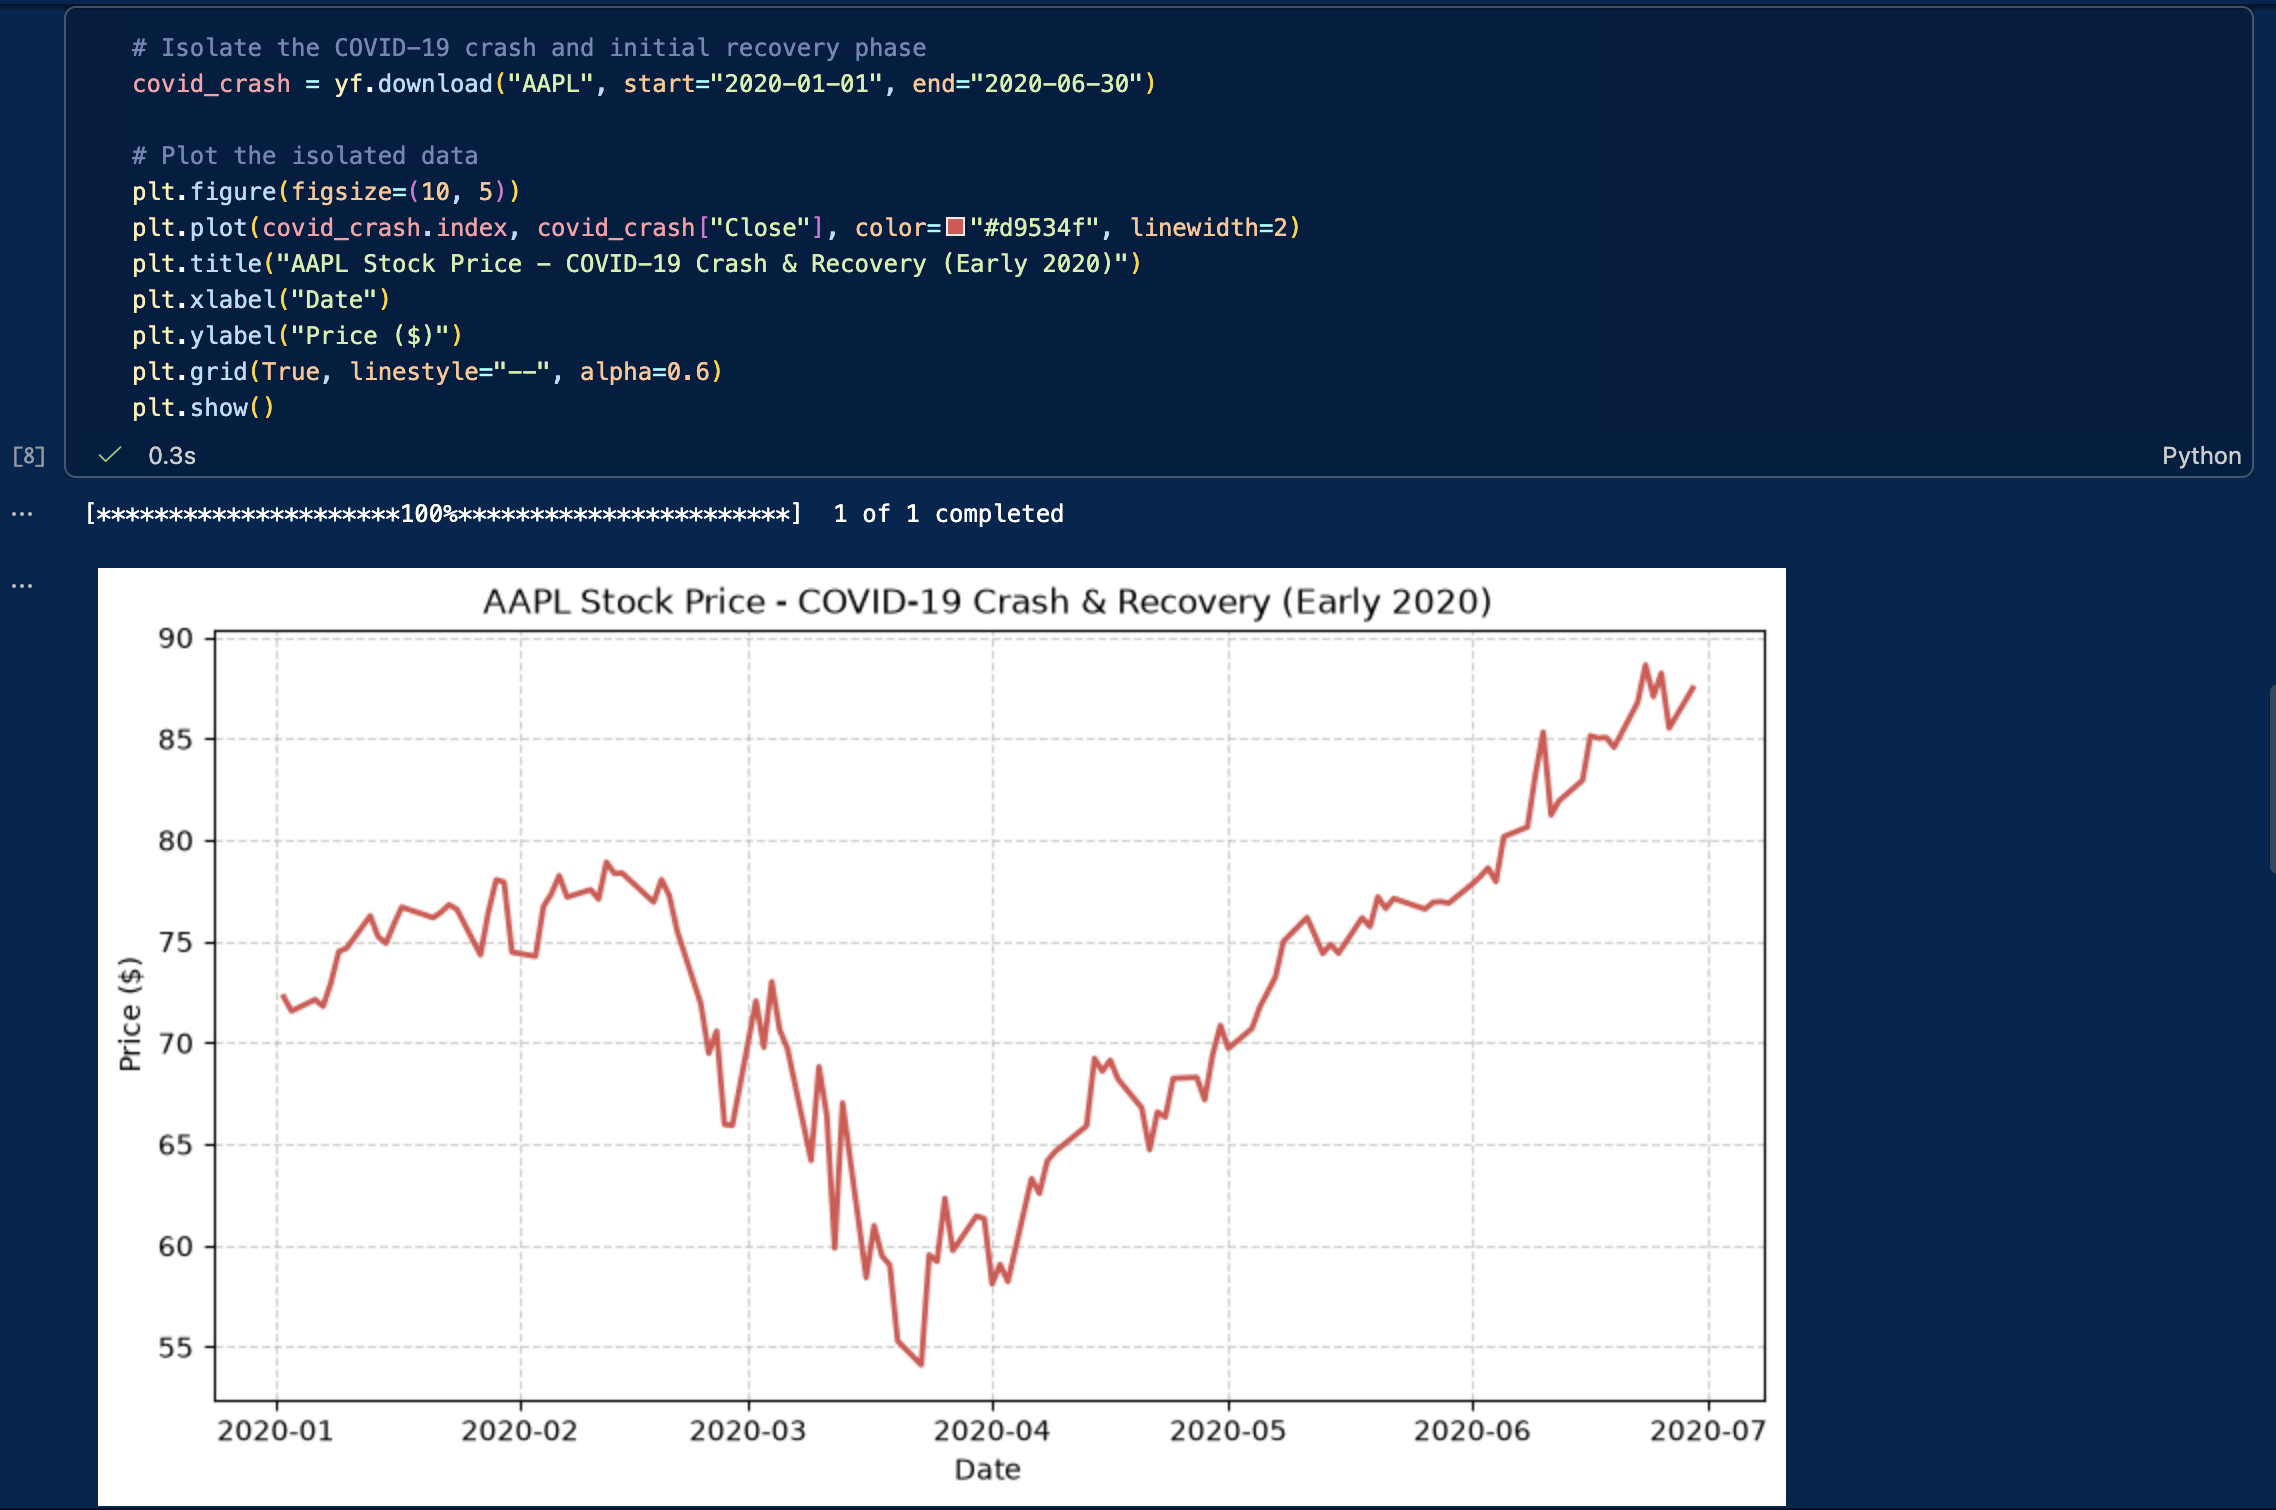
For example, analyzing the COVID-19 market crash in early 2020 offers invaluable insights into extreme volatility, liquidity crunches, and rapid V-shaped recoveries. Let’s download and plot Apple’s stock specifically during the height of the pandemic shock (January to June 2020):

# Isolate the COVID-19 crash and initial recovery phase
covid_crash = yf.download("AAPL", start="2020-01-01", end="2020-06-30")

# Plot the isolated data
plt.figure(figsize=(10, 5))
plt.plot(covid_crash.index, covid_crash["Close"], color="#d9534f", linewidth=2)
plt.title("AAPL Stock Price - COVID-19 Crash & Recovery (Early 2020)")
plt.xlabel("Date")
plt.ylabel("Price ($)")
plt.grid(True, linestyle="--", alpha=0.6)
plt.show()

The output of the previous code cell

We could use this same technique to analyze other pivotal periods, such as:

  • A central bank interest rate tightening cycle (e.g., the Fed’s 2022-2023 rate hikes)
  • The 2008 Global Financial Crisis (if analyzing older datasets)
  • Specific earnings announcement windows

Step 5: Downloading multiple stocks at the same time

Downloading multiple stocks is necessary for financial analysis that often requires comparing securities, building a portfolio, or testing trading strategies like pairs trading.

Instead of issuing separate requests for each stock (which risks hitting API rate limits or misaligning dates), it is far more efficient to fetch all tickers at once in a single batch query.

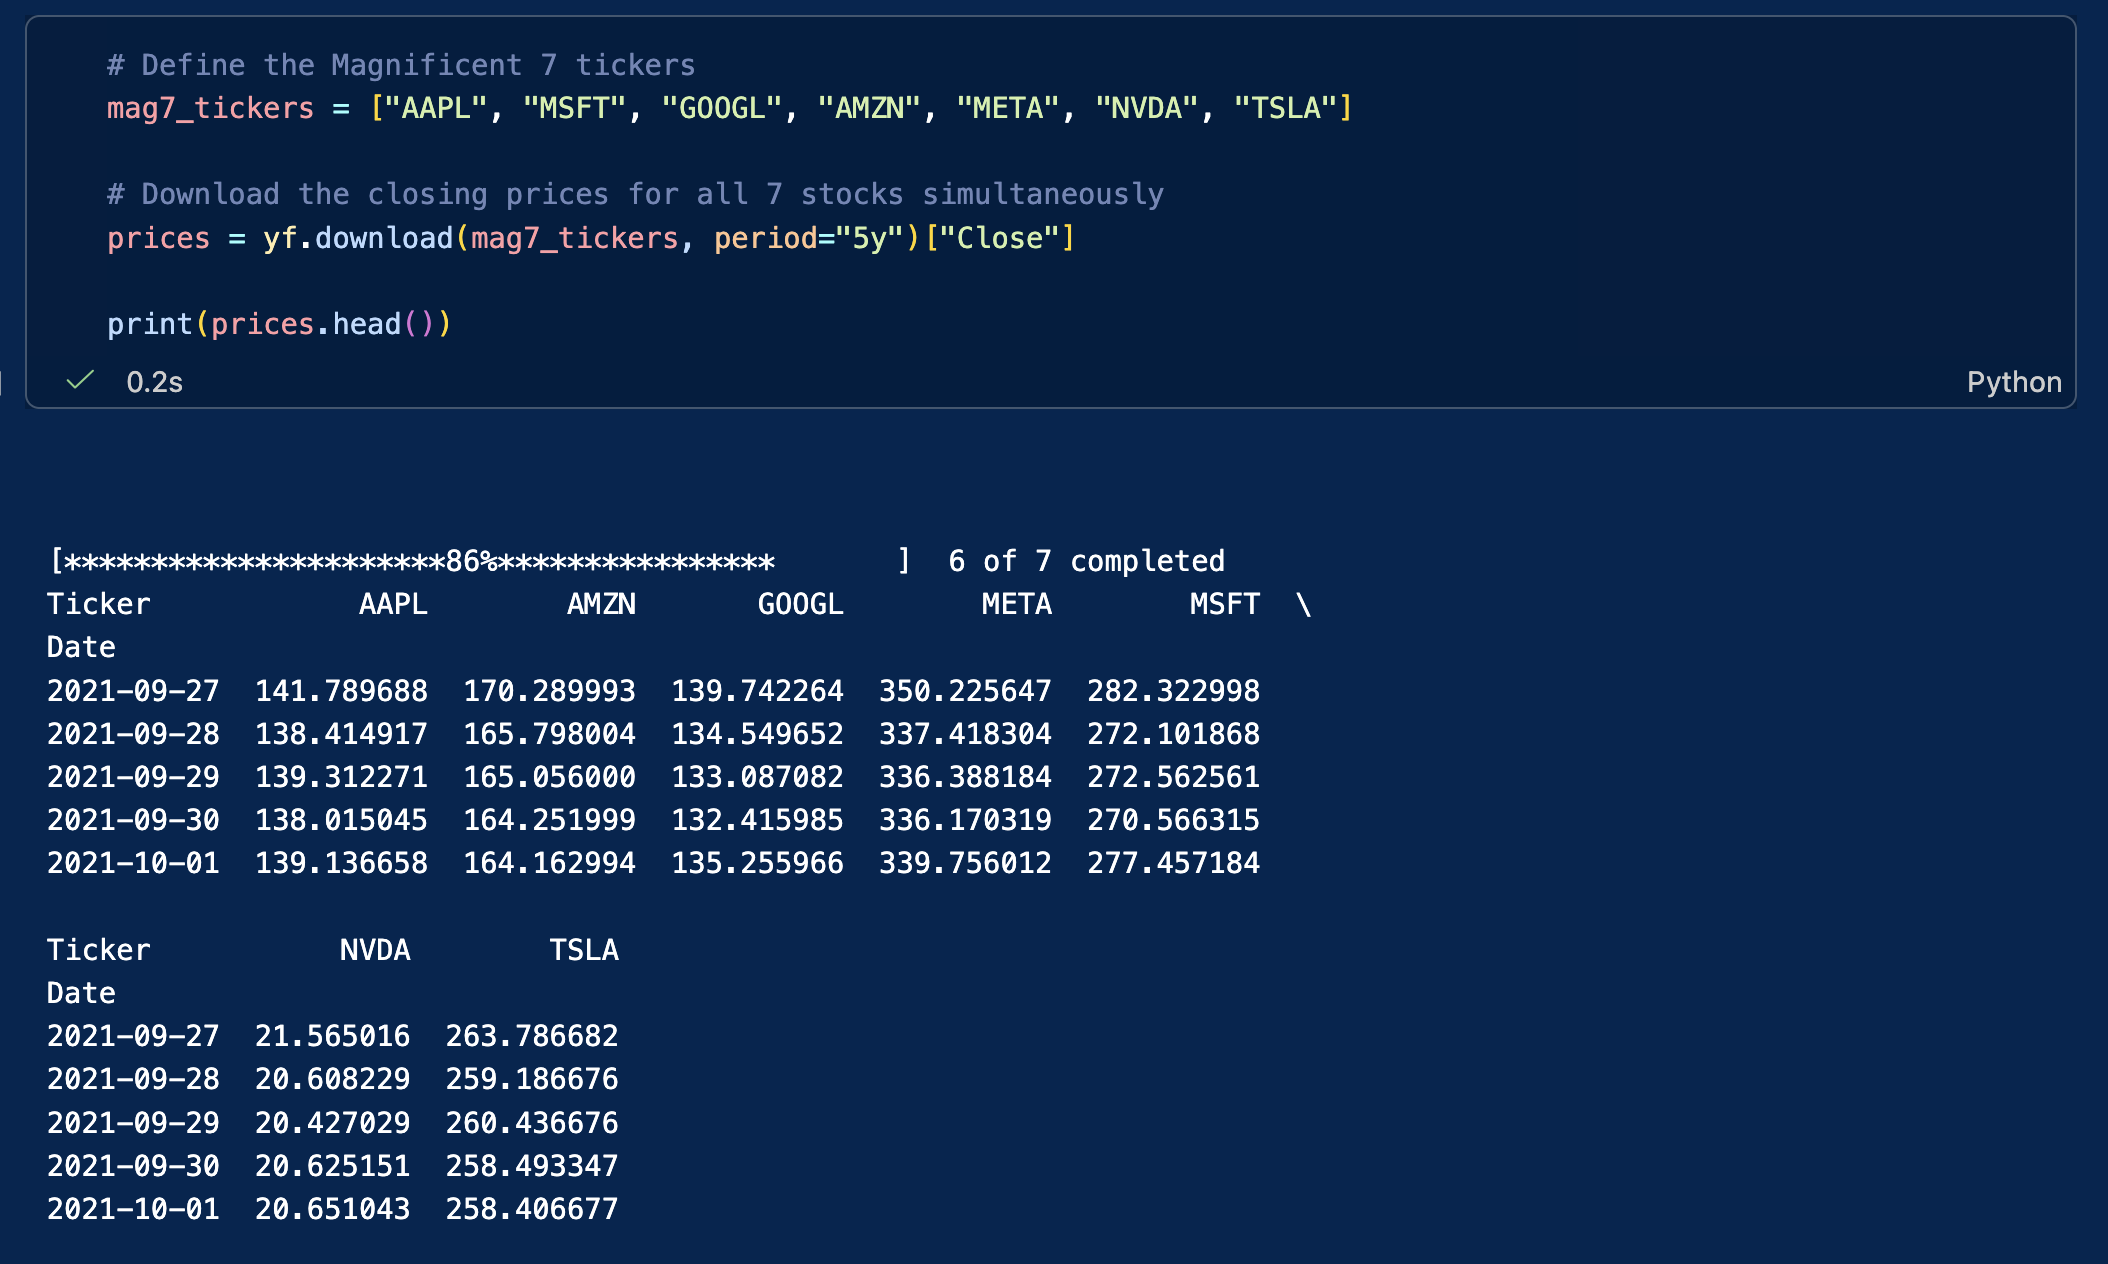
To make this practical, let’s download the data for the “Magnificent Seven”. These seven mega-cap tech companies (Apple, Microsoft, Alphabet, Amazon, Meta, Nvidia, and Tesla) have heavily dominated market capitalization and driven a massive portion of the S&P 500’s returns in recent years.

# Define the Magnificent 7 tickers
mag7_tickers = ["AAPL", "MSFT", "GOOGL", "AMZN", "META", "NVDA", "TSLA"]

# Download the closing prices for all 7 stocks simultaneously
prices = yf.download(mag7_tickers, period="5y")["Close"]
 
print(prices.head())

The result is now again a matrix where each column represents a stock, and each row represents a trading day.

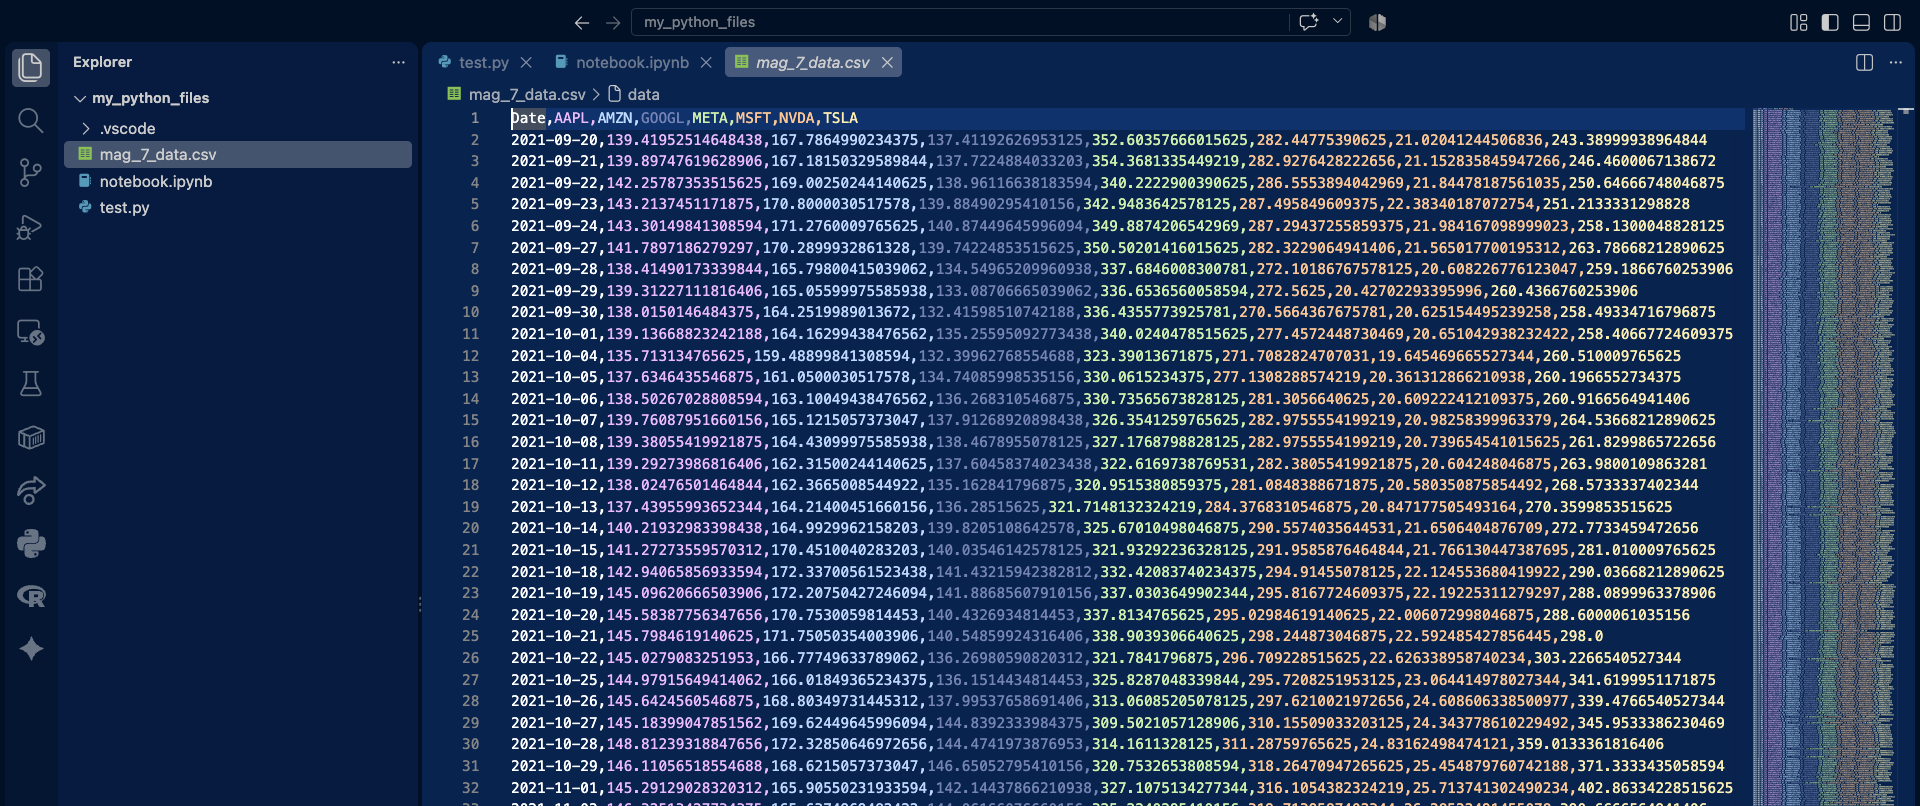
Screenshot of the output of the previous cell

This table format is ideal for portfolio analysis, benchmarking, and performance comparisons, and can be used to draw any kind of graphs.

Note that the table’s columns are displayed in two groups. Depending on the display width, Jupyter Notebook or VS Code may wrap or truncate wide DataFrames. You can export the DataFrame to a CSV file if you prefer to inspect the complete dataset in a spreadsheet application.

# save the dataframe as a csv
prices.to_csv('mag_7_data.csv')

Screenshot of the output of the previous cell

Now that you successfully downloaded your financial data, let’s see how you can clean it and then use it.

Inspecting and cleaning the dataset

Financial datasets may contain missing values (NaN) for various reasons, including differences in trading calendars, trading suspensions, listing dates, or data-provider issues. Missing observations should be identified before computing returns or risk measures. For this introductory example, we simply remove rows containing missing values. In applied financial analysis, however, the appropriate treatment depends on the source of the missing data and the objective of the analysis.

If left unaddressed, these missing data points will break your mathematical functions and severely distort your return and volatility calculations. The code below checks how many missing values exist in each column, and then removes (drops) any rows containing them. In some situations you might want to forward-fill these gaps to preserve the timeline, but dropping them is the safest thing to do for now.

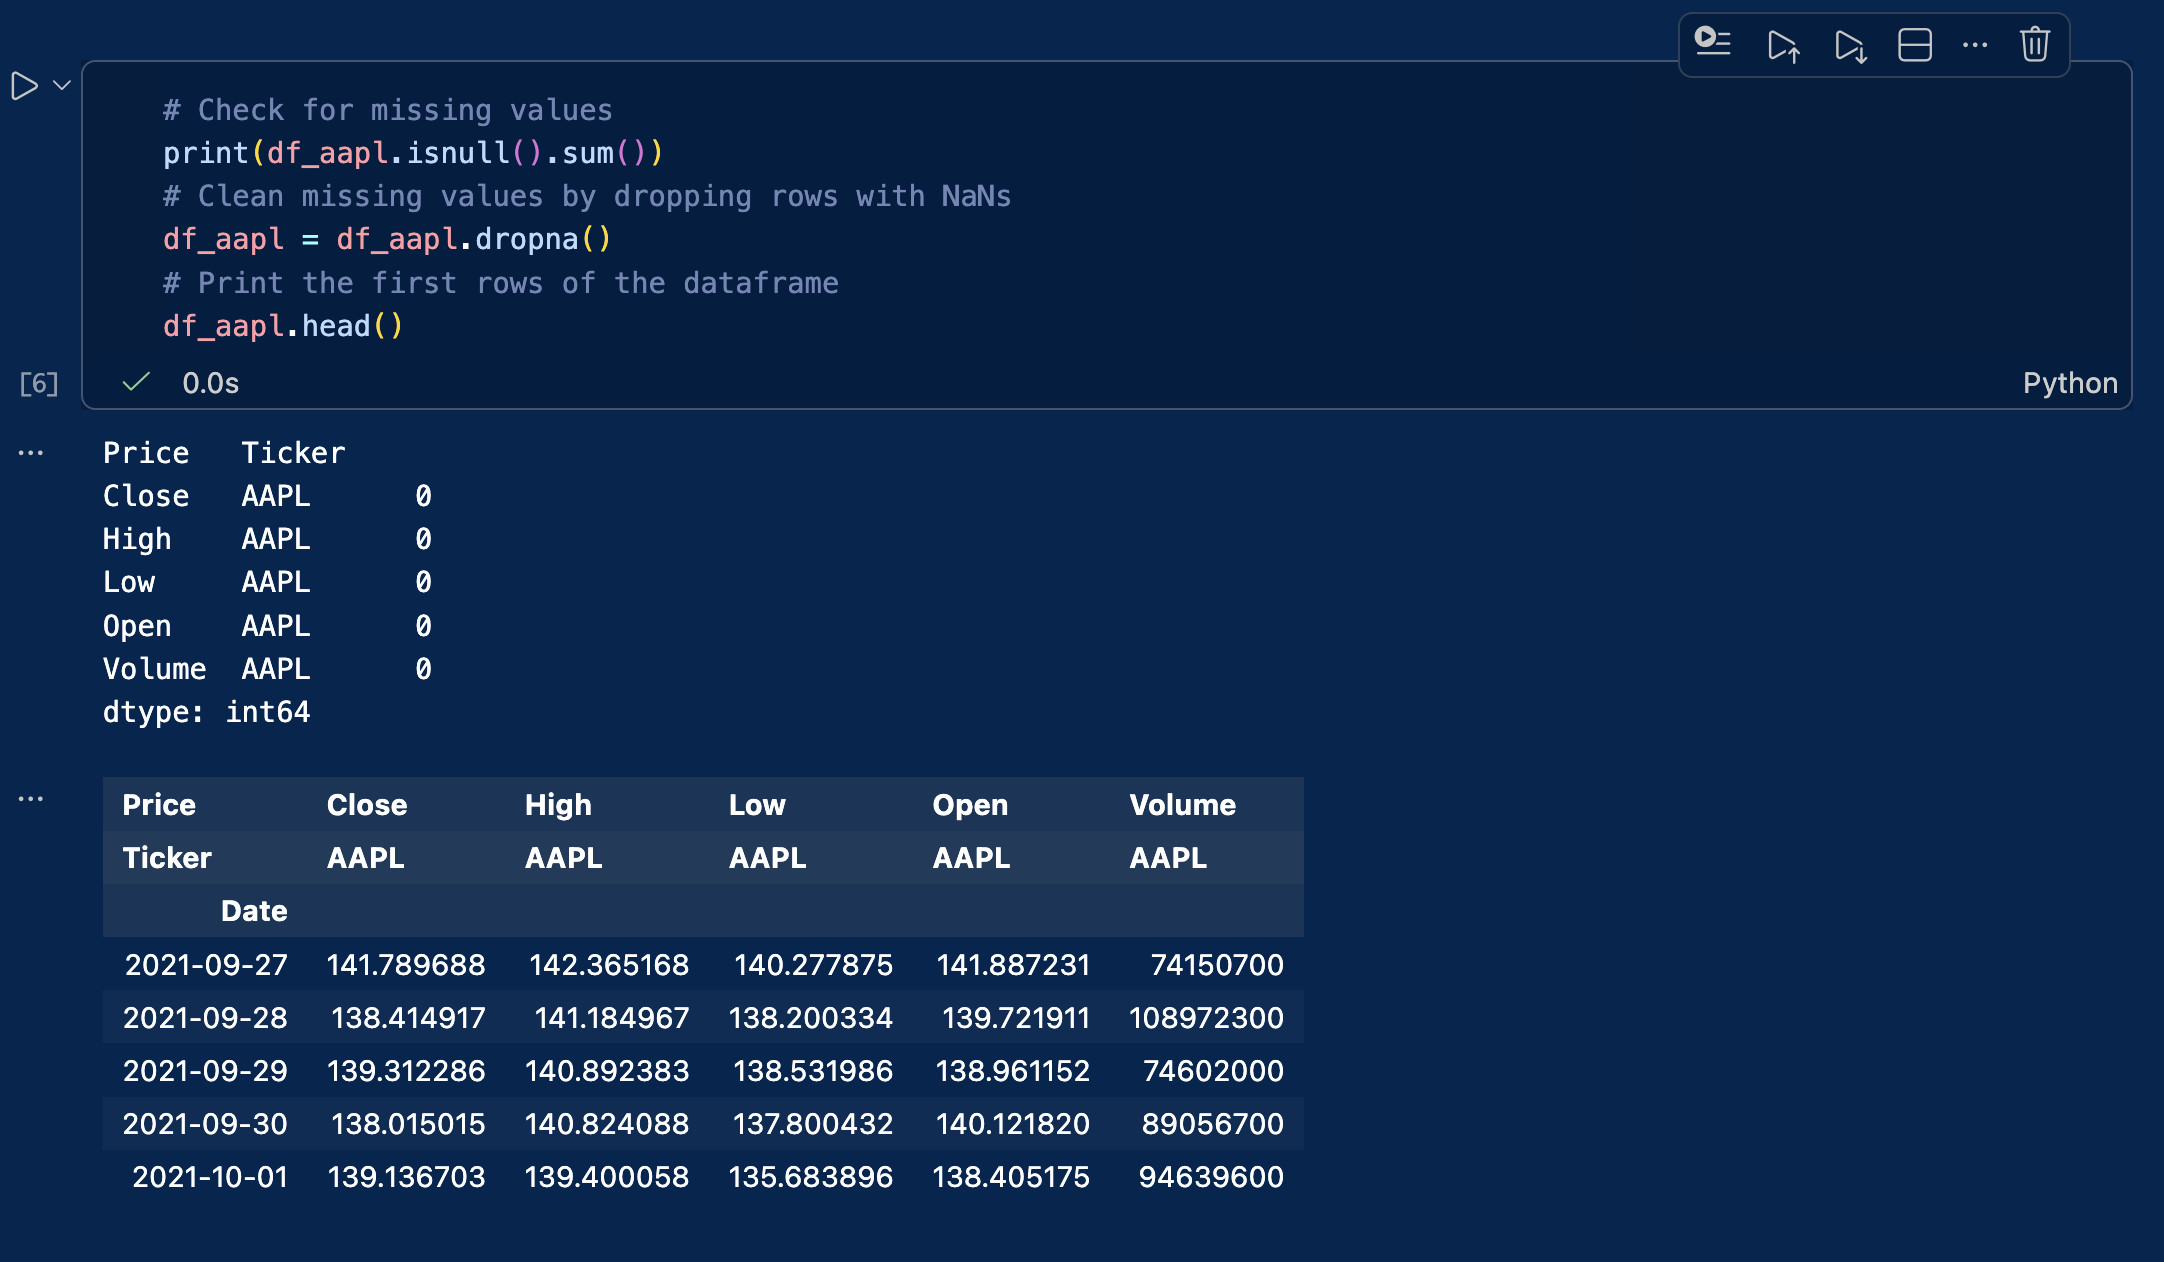
# Check for missing values
print(df_aapl.isnull().sum())
# Clean missing values by dropping rows with NaNs
df_aapl = df_aapl.dropna()
# Print the first rows of the dataframe
df_aapl.head()
df_aapl.head()

A screenshot from VSC showing the output of the cleaning code cell

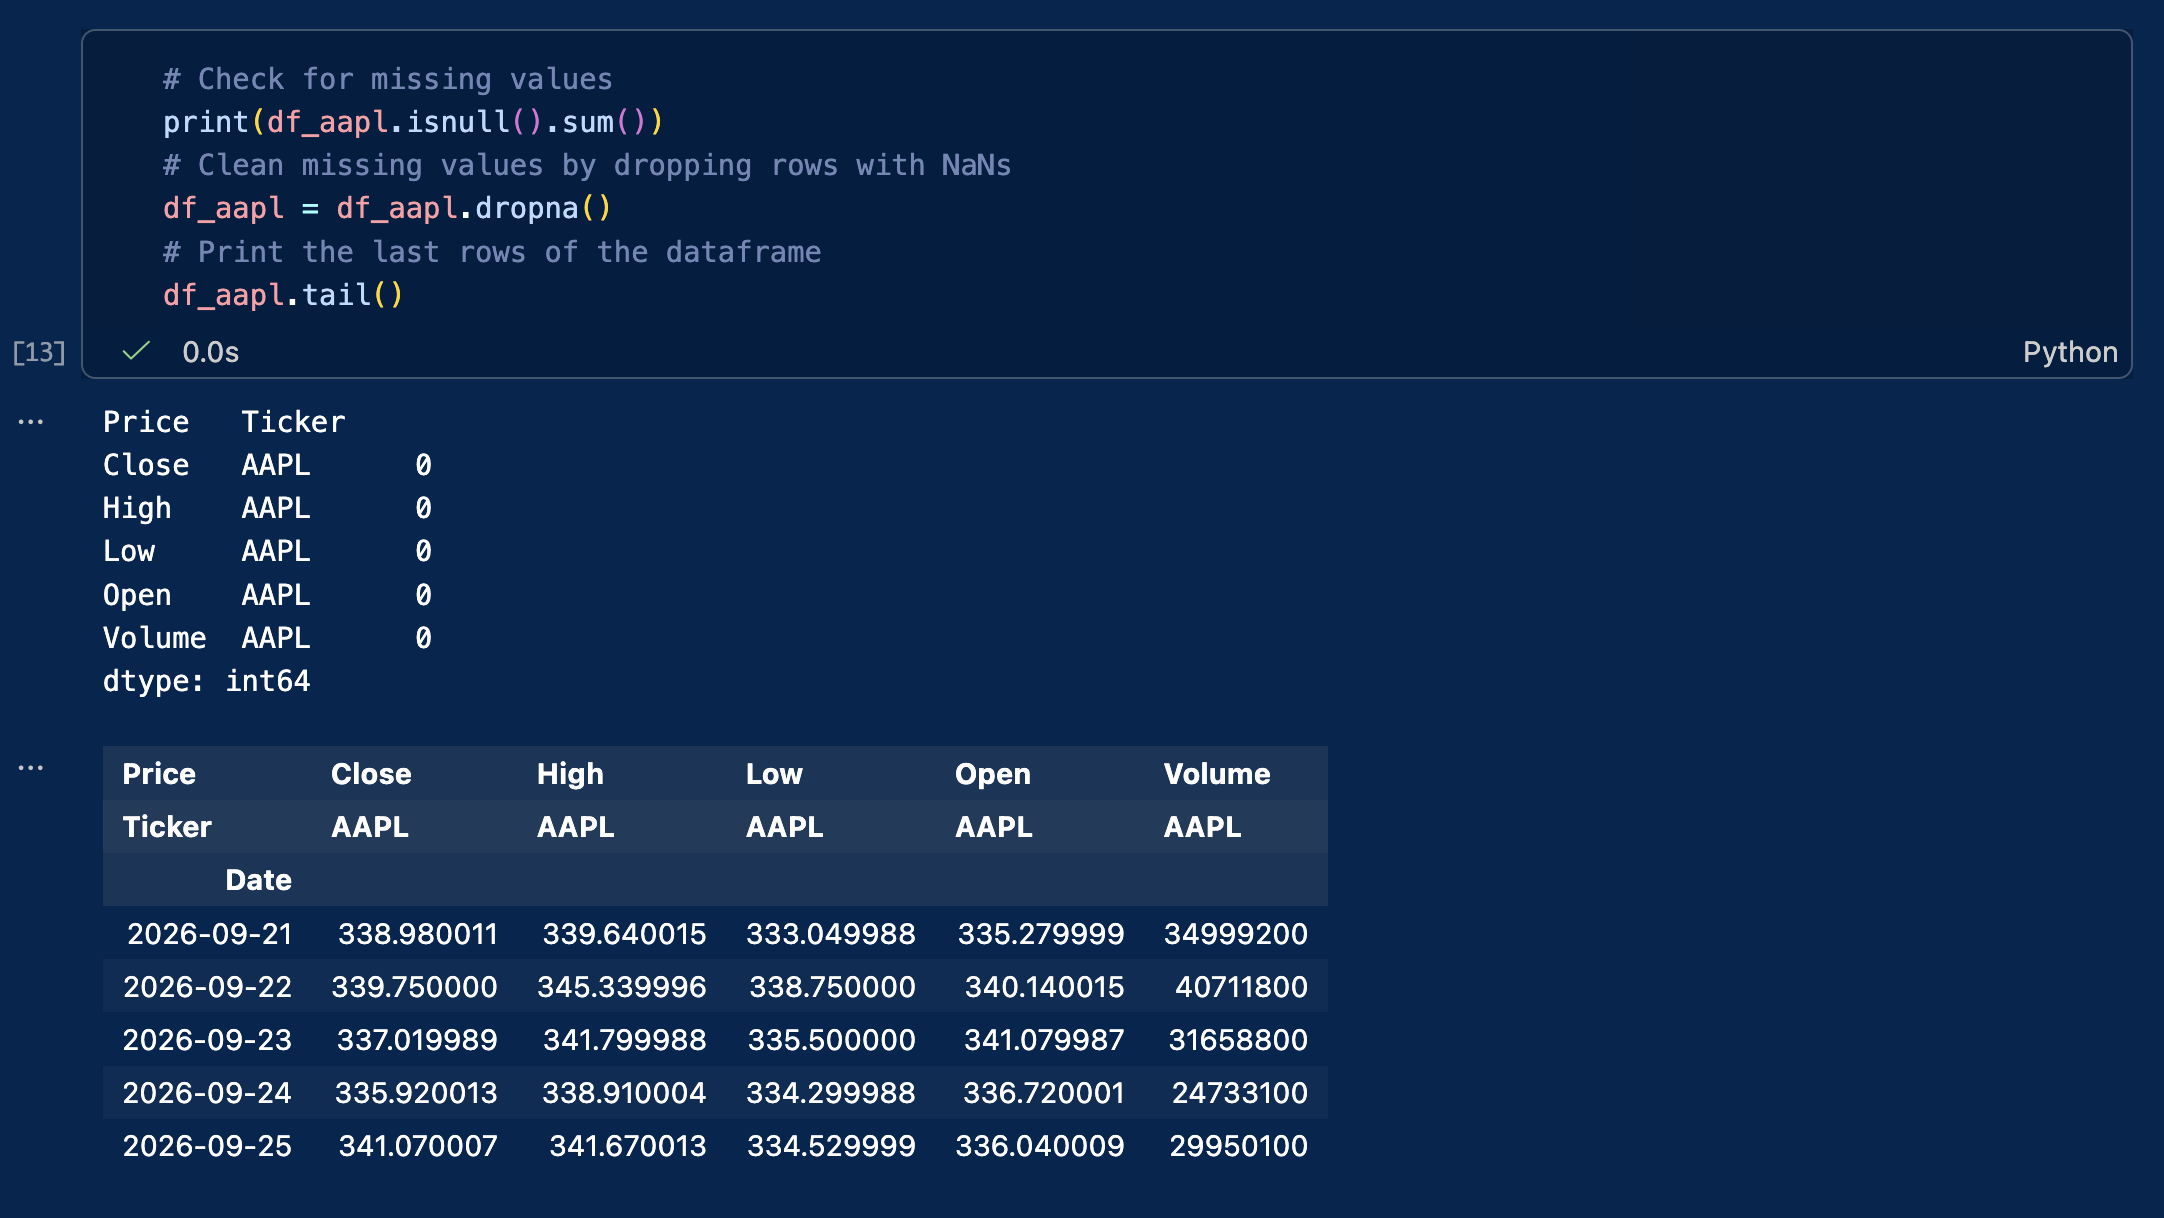
To view the last rows of the dataframe, replace head() by tail():

Output of the VSC cell when we switch to tail()

Visualizing the stock price with graphs or charts

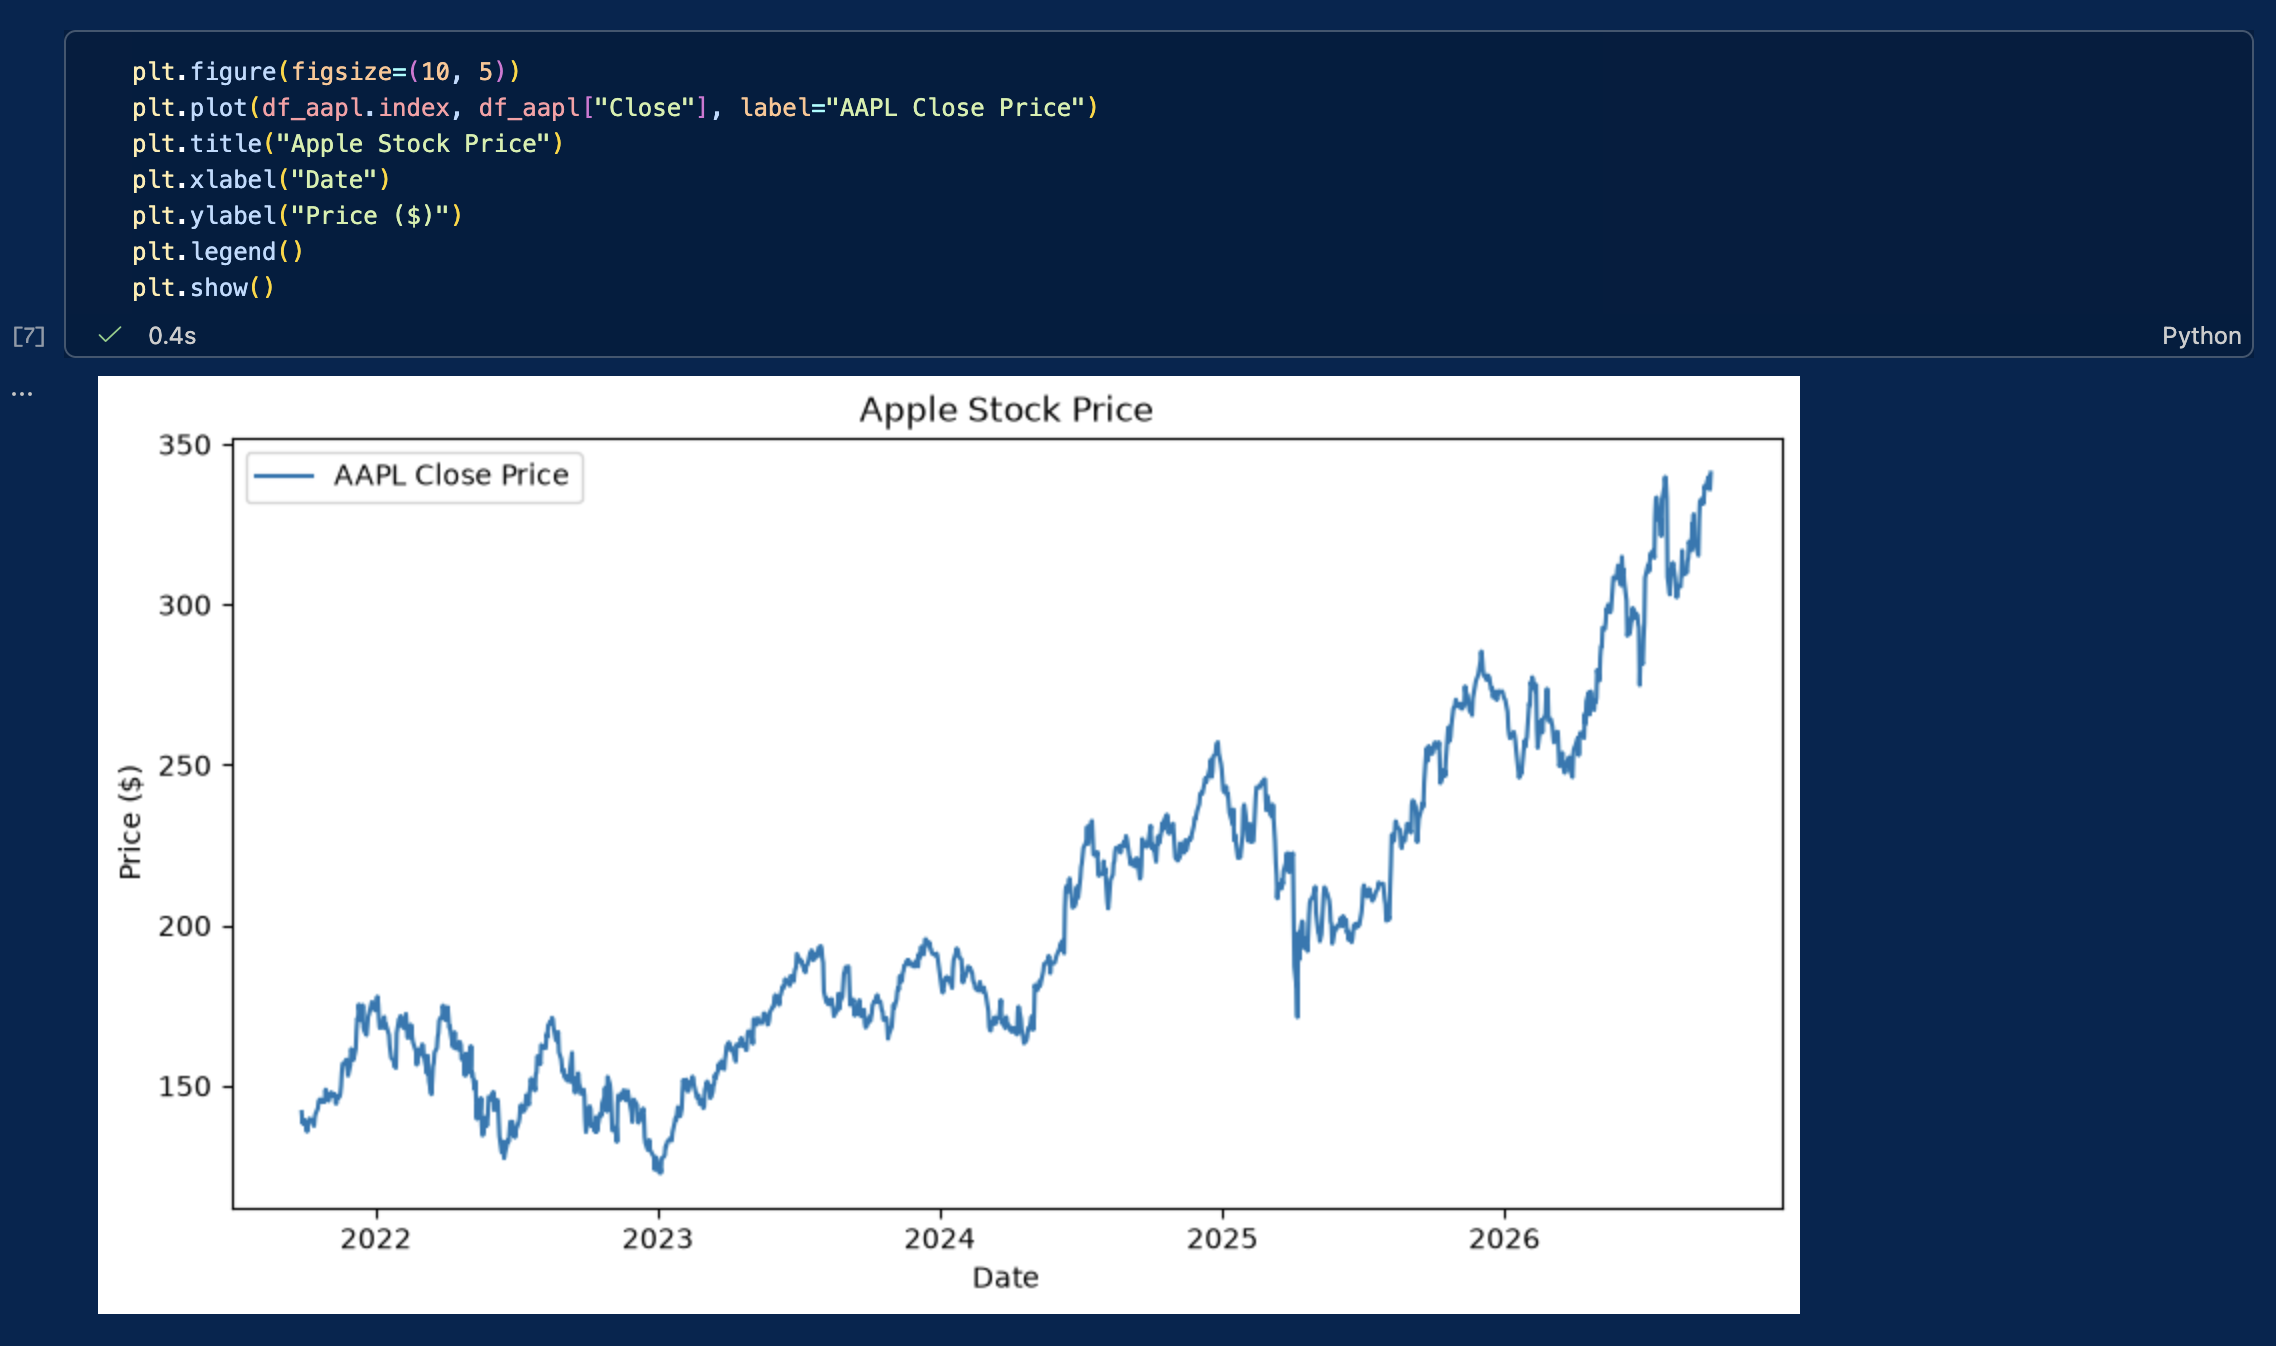
Let’s create our first graph to visualize the evolution of Apple’s stock price.

plt.figure(figsize=(10, 5))
plt.plot(df_aapl.index, df_aapl["Close"], label="AAPL Close Price")
plt.title("Apple Stock Price")
plt.xlabel("Date")
plt.ylabel("Price ($)")
plt.legend()
plt.show()

A screenshot of VSC with the stock price visualization cell output

We have now:

  • Downloaded market data from Yahoo! Finance
  • Stored and cleaned the data in a dataframe
  • Created a time-series plot to visualize stock prices

These core steps form the basis of empirical financial research and quantitative models.

Computing basic statistics & historical distributions

To evaluate stock performance and risk, we compute basic descriptive statistics for both prices and financial returns: minimum, maximum, mean, variance, standard deviation, skewness, and kurtosis. Although descriptive statistics can also be computed for price levels, risk analysis generally focuses on returns, whose distributions are more economically meaningful.

# Calculate daily percentage returns
df_aapl['Return'] = df_aapl['Close'].pct_change()

# Compute summary statistics for Price and Returns
stats_df = pd.DataFrame({
    'Metric': ['Min', 'Max', 'Mean', 'Variance', 'Std Dev', 'Skewness', 'Kurtosis'],
    'Price ($)': [
        df_aapl['Close'].min().item(),
        df_aapl['Close'].max().item(),
        df_aapl['Close'].mean().item(),
        df_aapl['Close'].var().item(),
        df_aapl['Close'].std().item(),
        df_aapl['Close'].skew().item(),
        df_aapl['Close'].kurtosis().item()
    ],
    'Daily Return': [
        df_aapl['Return'].min().item(),
        df_aapl['Return'].max().item(),
        df_aapl['Return'].mean().item(),
        df_aapl['Return'].var().item(),
        df_aapl['Return'].std().item(),
        df_aapl['Return'].skew().item(),
        df_aapl['Return'].kurtosis().item()
    ]
})

print(stats_df)

Plotting historical distributions

Histograms display the frequency distribution of prices and daily returns, helping us inspect price trends, distribution symmetry, and tail risks.

fig, axes = plt.subplots(1, 2, figsize=(14, 5))

# Price distribution
axes[0].hist(df_aapl['Close'].dropna(), bins=30, color='skyblue', edgecolor='black')
axes[0].set_title('Historical Price Distribution')
axes[0].set_xlabel('Price ($)')
axes[0].set_ylabel('Frequency')

# Return distribution
axes[1].hist(df_aapl['Return'].dropna(), bins=50, color='salmon', edgecolor='black')
axes[1].set_title('Historical Daily Return Distribution')
axes[1].set_xlabel('Daily Return')
axes[1].set_ylabel('Frequency')

plt.tight_layout()
plt.show()

Normalizing stock prices and computing returns

All stocks have different nominal prices. If Tesla trades at $350 and Nvidia at $220, it does not mean that Tesla is worth more than Nvidia or performed better.

To establish an accurate comparison across these assets, we must execute two fundamental computations:

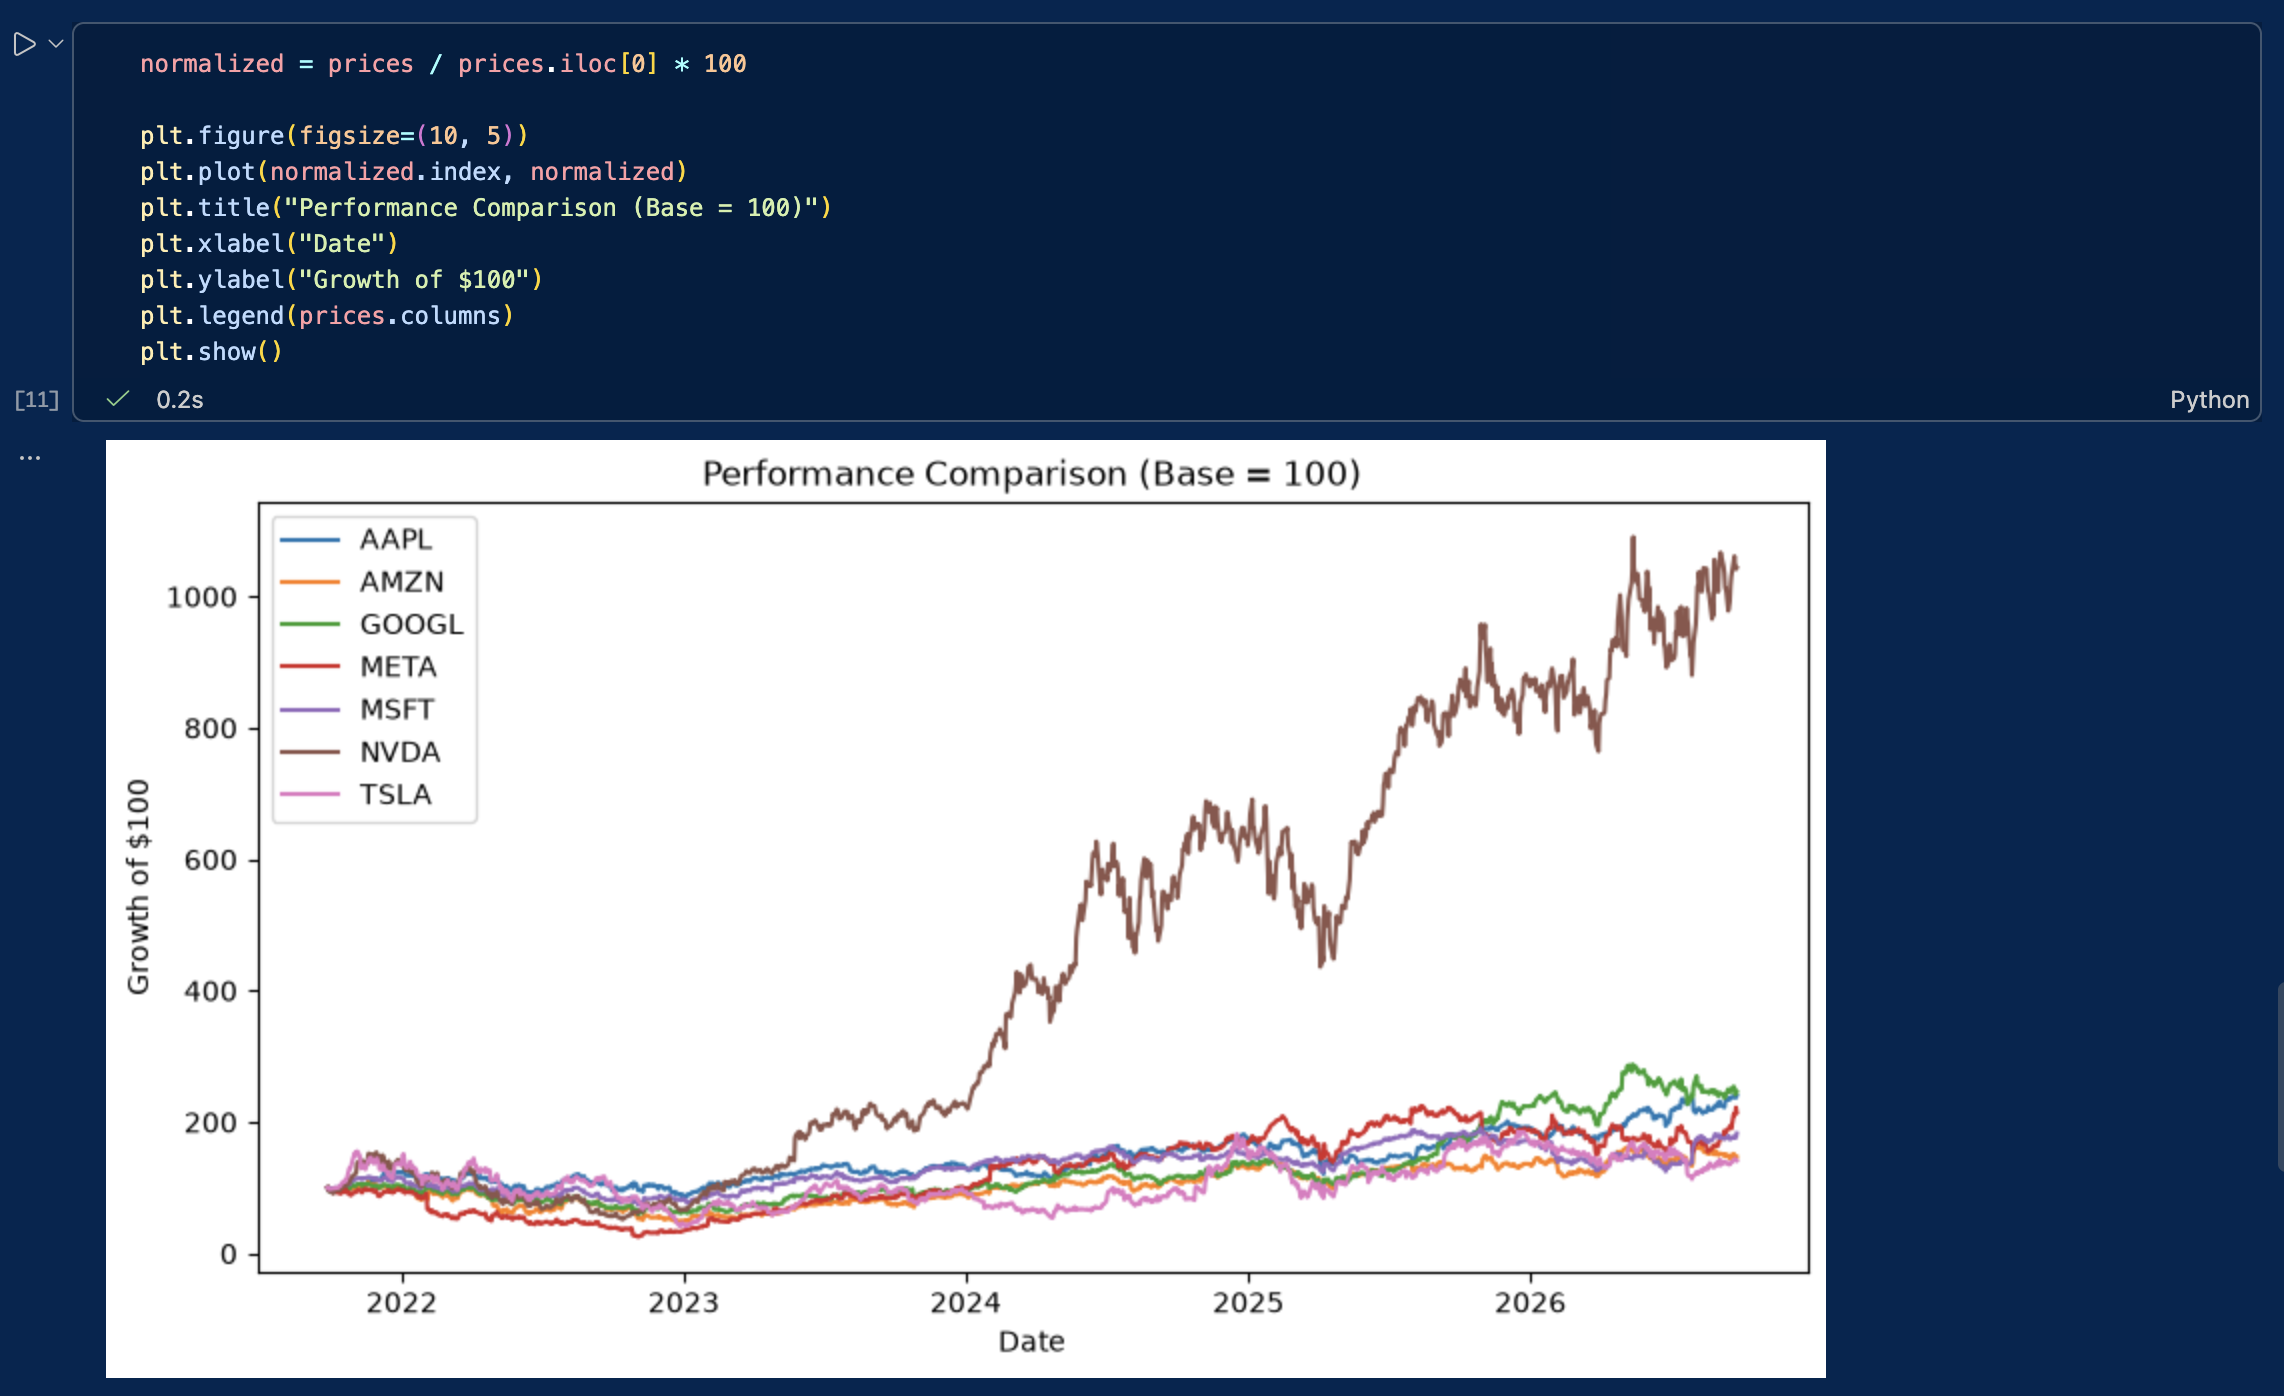
  1. Price harmonization: we normalize all historical time series to a base index of 100, to ensure a standardized starting point.
  2. Return calculation: we compute the periodic returns to get the actual performance in % rather than the absolute variation.
normalized = prices / prices.iloc[0] * 100

plt.figure(figsize=(10, 5))
plt.plot(normalized.index, normalized)
plt.title("Performance Comparison (Base = 100)")
plt.xlabel("Date")
plt.ylabel("Growth of $100")
plt.legend(prices.columns)
plt.show()

the output of the previous cell

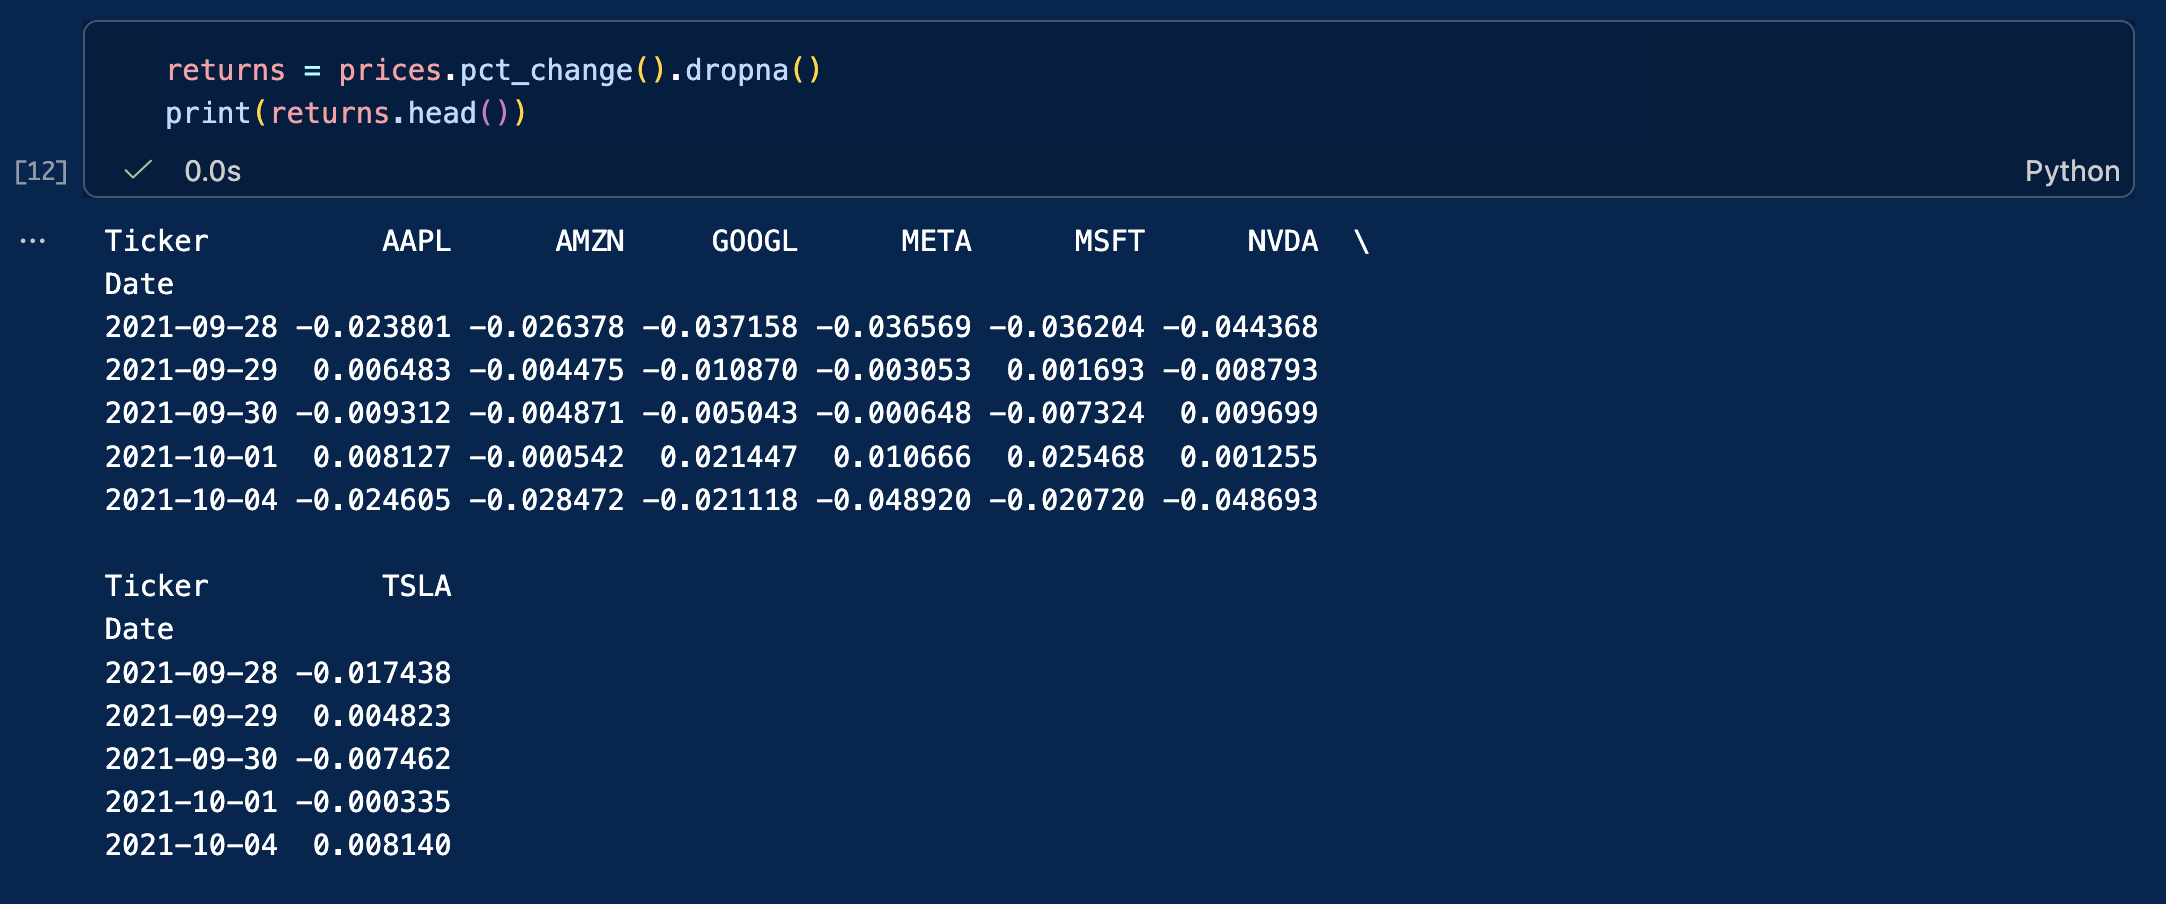
We can also compute daily returns across all stocks:

returns = prices.pct_change().dropna()
print(returns.head())

the output of the previous cell

The chart now shows how much each investment would have grown from the same starting value.

This is a standard technique used by portfolio managers and equity analysts.

Case study: the Capital Asset Pricing Model (CAPM)

In empirical finance, evaluating an individual asset requires isolating the return generated by the broader market from the return specific to the company itself. The Capital Asset Pricing Model (CAPM) provides the foundational framework to decompose this risk.

The model decomposes the return of an individual asset over a given time period into three components: the risk-free rate, a market systematic factor and a firm-specific factor. The model is expressed through the following equation:

rt = rf + β(rm – rf) + εt

Where:

  • rt is the return of the stock (e.g., Apple).
  • rf is the risk-free interest rate (e.g., the 13-week Treasury Bill, ^IRX).
  • β (Beta) represents the stock’s sensitivity to market movements (systematic risk).
  • rm – rf is the excess return of the market index (e.g., the S&P 500, ^GSPC).
  • εt (Epsilon) represents the idiosyncratic return associated with firm-specific risk not explained by the market.

By downloading these three time series simultaneously, we can calculate the stock’s Beta and isolate its firm-specific residual risk.

# Download asset (AAPL), market benchmark (S&P 500), and risk-free rate (13-week T-Bill)
market_data = yf.download(["AAPL", "^GSPC", "^IRX"], start="2022-01-01", end="2024-12-31")["Close"].dropna()

# Compute daily percentage returns for the stock and the market
returns_df = market_data[["AAPL", "^GSPC"]].pct_change().dropna()
 
# Convert the annualized risk-free yield (^IRX) to a daily rate
daily_rf = (market_data["^IRX"] / 100) / 252
returns_df["Rf"] = daily_rf
 
# Calculate the excess returns: (r_t - r_f) and (r_m - r_f)
excess_aapl = returns_df["AAPL"] - returns_df["Rf"]
excess_market = returns_df["^GSPC"] - returns_df["Rf"]
 
# Compute Market Beta: Covariance(stock, market) / Variance(market)
cov_matrix = np.cov(excess_aapl, excess_market)
beta = cov_matrix[0, 1] / cov_matrix[1, 1]
 
# Isolate Epsilon (the firm-specific residual risk)
# Rearranging the CAPM equation: epsilon = (r_t - r_f) - beta * (r_m - r_f)
epsilon = excess_aapl - (beta * excess_market)
 
print(f"Calculated Beta: {beta:.4f}")
print(f"Mean Firm-Specific Return (Epsilon): {epsilon.mean():.6f}")
print(f"Idiosyncratic Risk (Epsilon Std Dev): {epsilon.std():.4f}")

Common pitfalls

When working with market data, beginners often run into the same issues:

  • Using the wrong ticker symbol
  • Comparing stocks without normalizing prices
  • Forgetting that markets are closed on weekends and holidays
  • Failing to clean and handle missing values (NaN) in the dataset
  • Failing to check whether price series are raw or adjusted for stock splits and dividends

Overall, always inspect and clean your data before starting your analysis.

Exercises

Exercise 1: Basic data retrieval and price visualization (MSFT)

Microsoft is a mature mega-cap technology company, and a cornerstone of most global equity portfolios. Retrieving and inspecting its historical data is a perfect starting point to practice basic YFinance commands.

Using the ticker symbol MSFT, download the last five years of daily market data.

Your tasks:

  • Use the appropriate pandas functions to display the first 5 rows and the last 5 rows of the dataset to verify data integrity (checking for correct start/end dates).
  • Generate a line chart plotting the closing price over the entire 5-year period to visualize its long-term market trend.

Exercise 2: time-series extraction and volume analysis on Tesla (TSLA)

Tesla is renowned for its high historical volatility and massive retail trading interest. The 2022-2024 window was particularly eventful for growth and electric vehicle stocks, marked by shifting supply chains and a rapid rise in interest rates. Isolating this exact timeframe allows us to analyze the stock’s behavior under changing macroeconomic conditions.

Using the ticker symbol TSLA, extract the market data for the precise calendar period from January 1, 2022, to December 31, 2024 (using the start and end parameters).

Your tasks:

  • Identify the peak (highest closing price) and the trough (lowest closing price) over this period to grasp the magnitude of the stock’s price swings.
  • Calculate the average daily trading volume, a fundamental metric used by analysts to assess market liquidity and ongoing investor interest.

Exercise 3: Comparative performance and risk profiling on Chinese tech companies

Chinese technology stocks often experience unique market cycles driven by distinct domestic regulatory environments and macroeconomic factors. Using their US-listed ADRs (American Depositary Receipts), compare the performance and risk characteristics of three major players over the last five years:

  • Alibaba (BABA)
  • Baidu (BIDU)
  • PDD Holdings (PDD)

Questions:

  1. Which stock achieved the highest total cumulative return?
  2. Which stock was most volatile (highest standard deviation of daily returns)?
  3. Which one offered the best risk-adjusted profile (e.g., highest Sharpe ratio) over the period?

Download the solutions

To help you check your work and experiment further, you can download the complete Jupyter Notebook containing the full code, charts, and commentary for all exercises.

Download Solutions (.ipynb)

Once downloaded, change the file’s extension from .txt to .ipynb and open it in Visual Studio code.

What’s next?

Now that you know how to download financial data, perform basic computations, and control for market risk, you are ready to delve into advanced quantitative and corporate finance topics.

About the author

This article was written in September 2026 by Hadrien PUCHE (ESSEC Business School, Grande École Program, Master in Management, 2023-2027).

   ▶ Discover all posts by Hadrien PUCHE
How to install and run Python on your computer (a step-by-step guide)

Hadrien Puche

In finance, the ability to rapidly acquire, clean, and manipulate data is a key skill that can help you gain an edge over other students and job applicants. While Excel (with VBA) remains widely used and is sufficient for most basic financial modeling, such as a DCF valuation, Python offers far more scalability, automation, and mathematical power than Excel.

In this article, Hadrien PUCHE (ESSEC Business School, Grande École Program, Master in Management, 2023-2027) will help you to:

  • Understand the core components of a Python environment for finance
  • Choose the most secure and efficient development setup for financial data
  • Install Miniconda and manage isolated virtual environments
  • Set up Visual Studio Code (VS Code) as your primary coding workspace
  • Run a test script to download and visualize real stock market data

No computer science background is required to start using Python.

Quick vocabulary for beginners

Before we dive in, let’s demystify a few technical terms you will encounter frequently:

  • Python: A popular, high-level programming language created in 1991 by Guido van Rossum (and named after the BBC comedy series Monty Python’s Flying Circus). Today, Python is widely used in quantitative finance and data science because of its simple syntax and vast ecosystem of financial tools.
  • Library / Package: A collection of pre-written code created by other developers so you don’t have to reinvent the wheel (e.g., pandas for data tables, yfinance for downloading stock market prices).
  • Dependency: A package that another package needs in order to work properly.
  • Environment: An isolated “sandbox” on your computer containing a specific version of Python and specific libraries, preventing projects from interfering with one another.
  • IDE (Integrated Development Environment): The visual software app where you write, edit, and test your code (e.g., Visual Studio Code).
  • Extension: An add-on (like an app from an App Store) that adds extra features to your IDE.

In this first article, we will focus on helping you set up Python on your computer so that you can start learning how to use it. We will guide you step by step through setting up a professional local workspace and testing that everything is working properly. Once that is done, you will find a list of follow-up articles at the end to explore real-world financial use cases.

Choosing your development environment

A development environment is simply the ecosystem of software tools you use to write, manage, and execute your code. When selecting a workspace for Python, you have three main choices:

  • Local workspaces (like Visual Studio Code): The standard choice for finance. Running your code locally (on your own computer) gives you full control over your local file systems, execution speed, and (most importantly) data privacy. In finance, working with proprietary trading algorithms or confidential client data means you cannot upload sensitive information to unvetted third-party servers.
  • Cloud notebooks (like Google Colab): Cloud platforms are convenient for quick experiments because they require zero installation. However, they are generally unsuitable for professional financial workflows. You do not have full control over code execution or environment stability, and uploading confidential financial datasets or proprietary logic to public cloud infrastructure poses significant security and compliance risks.
  • AI-native code editors (like Cursor or Windsurf): These editors heavily integrate AI to generate code automatically. While powerful for experienced developers, relying on AI tools too early prevents beginners from learning core programming logic, syntax, and debugging skills. It is far better to understand the core mechanics manually first.

In this article, we will focus exclusively on establishing a local workspace using Visual Studio Code (VS Code),which is a widely used tool to get comfortable with professional Python coding.

We will also use Jupyter Notebooks (files ending in .ipynb). Unlike traditional Python scripts (files ending in .py) that execute the entire code at once, Jupyter Notebooks allow you to write and run code in individual “cells.” This block-by-block structure is especially powerful in finance for several reasons:

  • Isolating code: You can work on and execute specific parts of your code independently (e.g., downloading data once, then tweaking the math in a separate cell without re-downloading).
  • Immediate feedback: Data tables, charts, and outputs are displayed directly below the specific cell you just ran, and you do not have to execute the entire code each time.
  • Easier debugging: By testing your logic piece-by-piece, identifying and fixing errors becomes significantly faster.
  • Better examples, tutorials, or exercises: You can mix executable code with explanatory text and financial formulas, making it the perfect format for case studies and tutorials.

As your code grows, using a Jupyter Notebook will be more and more useful.

What you need to install (and why)

Before installing anything, let’s understand how the different components of your workspace fit together:

  • Miniconda (which includes Python & Conda): Python comes with a comprehensive standard library, but financial and data analysis typically require additional packages such as pandas, NumPy, matplotlib, and yfinance. To perform financial analysis, you need external packages/libraries like pandas or yfinance. Conda is a tool that manages these packages and isolates them into dedicated virtual environments.
    Note on Anaconda vs. Miniconda: Anaconda is a big download that comes bundled with hundreds of packages you may never use. I suggest using Miniconda because it is a lightweight version, containing only Conda and Python, allowing us to keep your setup clean and fast.
  • Virtual Environments: Why do we need them? If you install every package into one single base Python installation, different projects will eventually require conflicting versions of the same library (a “dependency collision”), causing your scripts to crash. Virtual environments keep each project’s tools safely separated.
  • Visual Studio Code (VS Code): A clean user interface where you write, edit, and debug your code. VS Code connects seamlessly to your Conda virtual environment to execute your scripts.

How the architecture works

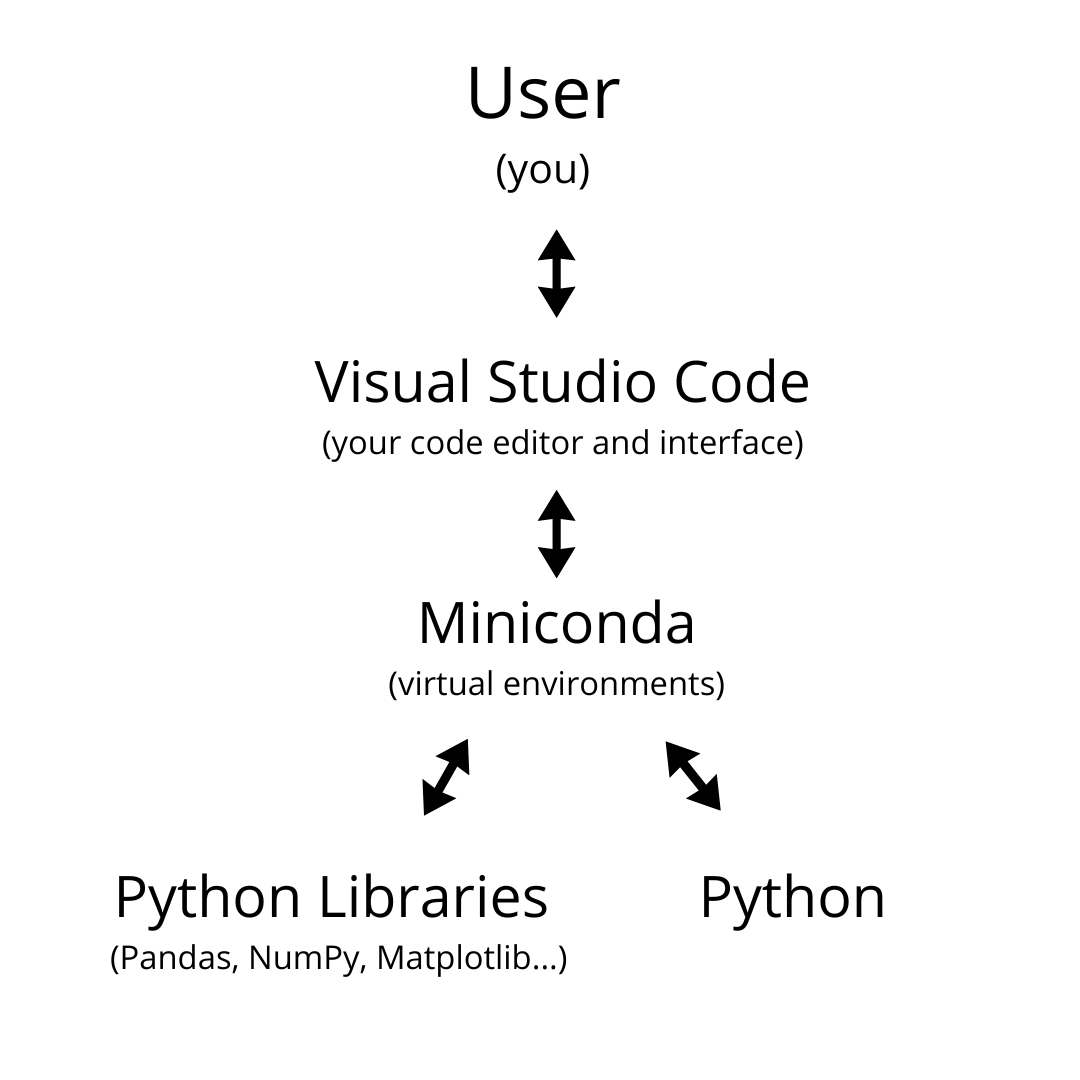
The diagram below illustrates how your development setup functions:

A graph showing the links between the user, VS Code, Miniconda, and Python.
Figure 1: How the User, VS Code, Miniconda Environment, and Python Engine interact.

  • You (the User) interact directly with VS Code to write commands and inspect results.
  • VS Code sends your code to your isolated Miniconda Virtual Environment (e.g., my_environment that you can create to store the packages that you will use in your own code).
  • Inside this environment, the Python Engine processes the math and logic, drawing upon the installed financial libraries (like yfinance and pandas).
  • The execution results (tables, charts, output logs) are sent back to VS Code for you to view.

As a fun side note: you can technically write code in almost any text editor! For a fun take on how far you could take this, check out this video.

Step-by-step installation guide

Step 1: Install Miniconda (Python + Conda)

Conveniently, downloading and installing Miniconda automatically installs Python, so this will be our first step.

Head to the official Miniconda Download Page, select the installer for your operating system (Windows or macOS), and complete the installation using the recommended default settings.

Step 2: Install Visual Studio Code and Extensions

Visual Studio Code (VS Code) will serve as your Integrated Development Environment (IDE). As a quick reminder, an IDE is the main visual software application, where you will actually write, edit, test, and debug your code. You can think of it as the central command dashboard for all your financial programming projects.

  1. Download & Install: Go to the official VS Code website, download the installer for Windows or macOS, and follow the standard installation instructions.
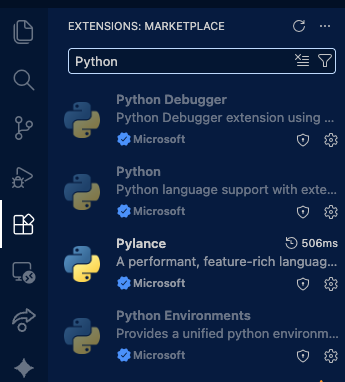
  2. Install Essential Extensions: Launch VS Code. Click on the Extensions icon on the left-hand Activity Bar (or press Ctrl+Shift+X on Windows / Cmd+Shift+X on Mac). Think of extensions as add-ons from an app store that give VS Code superpowers. Search for and install:
    • Python (by Microsoft) – Provides syntax highlighting, code completion, and interpreter selection.
    • Jupyter (by Microsoft) – Enables interactive execution of code cells inside .ipynb notebook files.

VS Code Extensions Marketplace showing Python extension by Microsoft
Make sure to install the official Python and Jupyter extensions in VS Code.

Step 3: Create your virtual environment via the Terminal

Now, we will create a clean, isolated Conda environment named my_environment where our financial packages will live.

  1. Open your command line interface:
    • Windows 11 / 10: Open the Start menu, search for Anaconda Prompt, and click to open it. (Alternatively, you can open Windows Terminal / PowerShell, but Anaconda Prompt automatically initializes Conda for you).
    • macOS: Open the Terminal app (press Cmd + Space, type “Terminal”, and press Enter).
  2. Run the following Conda & pip commands one by one:
# 1. Create an isolated environment named ‘my_environment’ with Python 3.11 conda create –name my_environment python=3.11 -y # 2. Activate your new environment conda activate my_environment # 3. Upgrade pip and install core financial analysis libraries pip install –upgrade yfinance pandas numpy matplotlib notebook –no-cache-dir

Pro-tip: Whenever you need to install additional packages in the future, open your terminal, activate your environment (conda activate my_environment), and run pip install [package_name].

Step 4: Connect VS Code to your environment

Now that your environment and libraries are ready, you need to tell VS Code to use my_environment to run your code.

  1. Open a workspace folder: In VS Code, go to File > Open Folder… and select or create a dedicated folder on your computer (e.g., finance_python). It does not matter where it is, you simply need somewhere to store your code files.
  2. Create your files: Click the New File icon in the Explorer sidebar to create two files:
    • test.py (.py file is to store Python code)
    • notebook.ipynb (.ipynb is the file extension name used for Jupyter notebooks)
  3. Select the Python interpreter: Open test.py. Press Ctrl+Shift+P (Windows) or Cmd+Shift+P (macOS) to open the Command Palette, type Python: Select Interpreter, and press Enter.
    • VS Code should automatically list my_environment. Click on it.
    • If it doesn’t appear automatically: Click Enter interpreter path… > Find… and navigate directly to the executable file:
      • Windows: C:\Users\YourUsername\miniconda3\envs\my_environment\python.exe
      • macOS: /Users/YourUsername/miniconda3/envs/my_environment/bin/python3
  4. Select Jupyter Kernel: Open notebook.ipynb. Click Select Kernel in the top-right corner of the window, choose Python Environments…, and select your my_environment path.

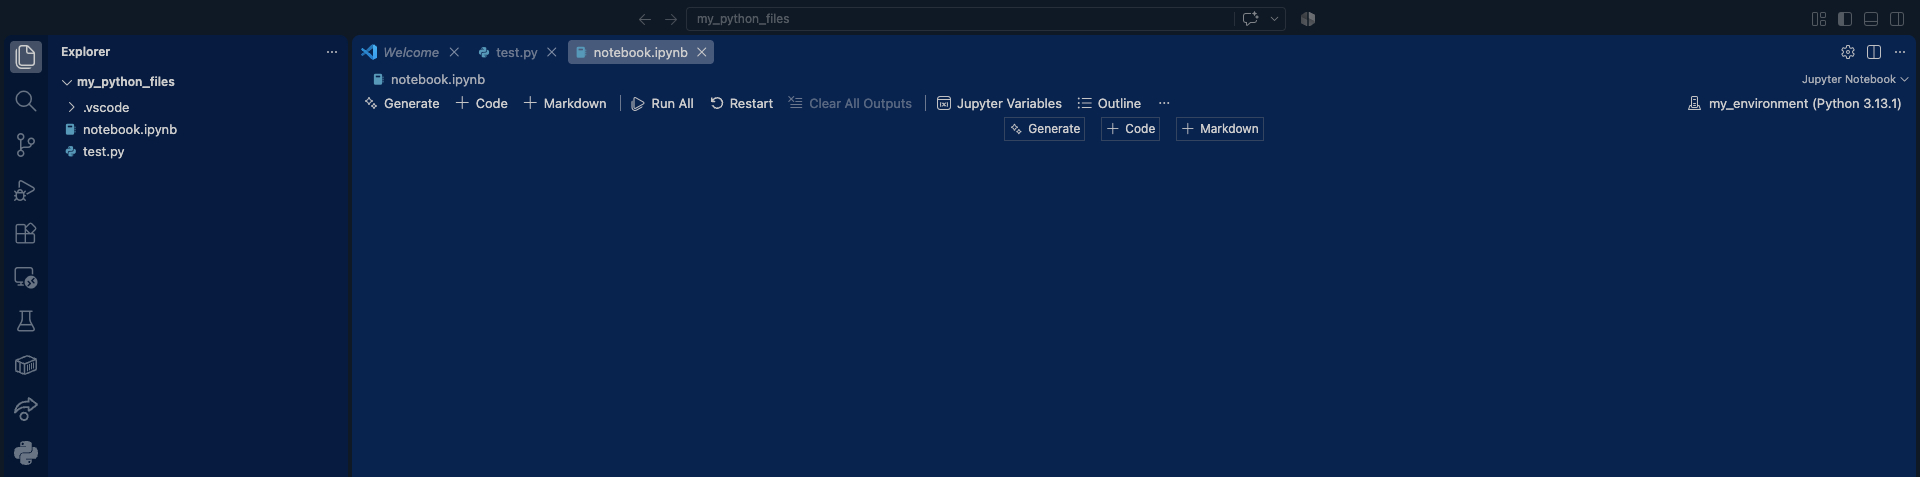
An image of the VS Code menu with notebook.ipynb and test.py created
Once this is done, your IDE should look just like this.

Quick Troubleshooting Tips:
  • “No matching commands” error: If typing Python: Select Interpreter gives no results, click inside the test.py editor window first to wake up the Python extension, or click Select Python Interpreter in the bottom-right status bar.
  • Environment missing from the list: Make sure you activated the environment in terminal at least once, or use the direct path navigation detailed above.

Testing your installation

Now that VS Code is connected to my_environment, let’s run a simple test script to confirm that our setup can successfully fetch market data and display a stock chart. Open test.py or notebook.ipynb, paste the code below, and execute it:

# Import yfinance to download stock market data directly from Yahoo Finance
import yfinance as yf

# Import matplotlib.pyplot (aliased as 'plt') to create financial charts and plots
import matplotlib.pyplot as plt

# Download historical stock data for Apple Inc. (AAPL)
print("Fetching financial data from Yahoo Finance using yfinance...")
df = yf.download('AAPL', start='2023-01-01', end='2024-01-01')

# Display the first 5 rows of the downloaded data in the terminal / output window
print("\nFirst 5 rows of AAPL market data:")
print(df.head())

# Plot historical closing prices
plt.figure(figsize=(10, 5))
plt.plot(df['Close'], label='AAPL Close Price', color='#1d4ed8', linewidth=1.5)
plt.title('Apple Inc. (AAPL) Historical Close Prices - 2023')
plt.xlabel('Date')
plt.ylabel('Price ($)')
plt.grid(True, linestyle='--', alpha=0.5)
plt.legend()
plt.show()

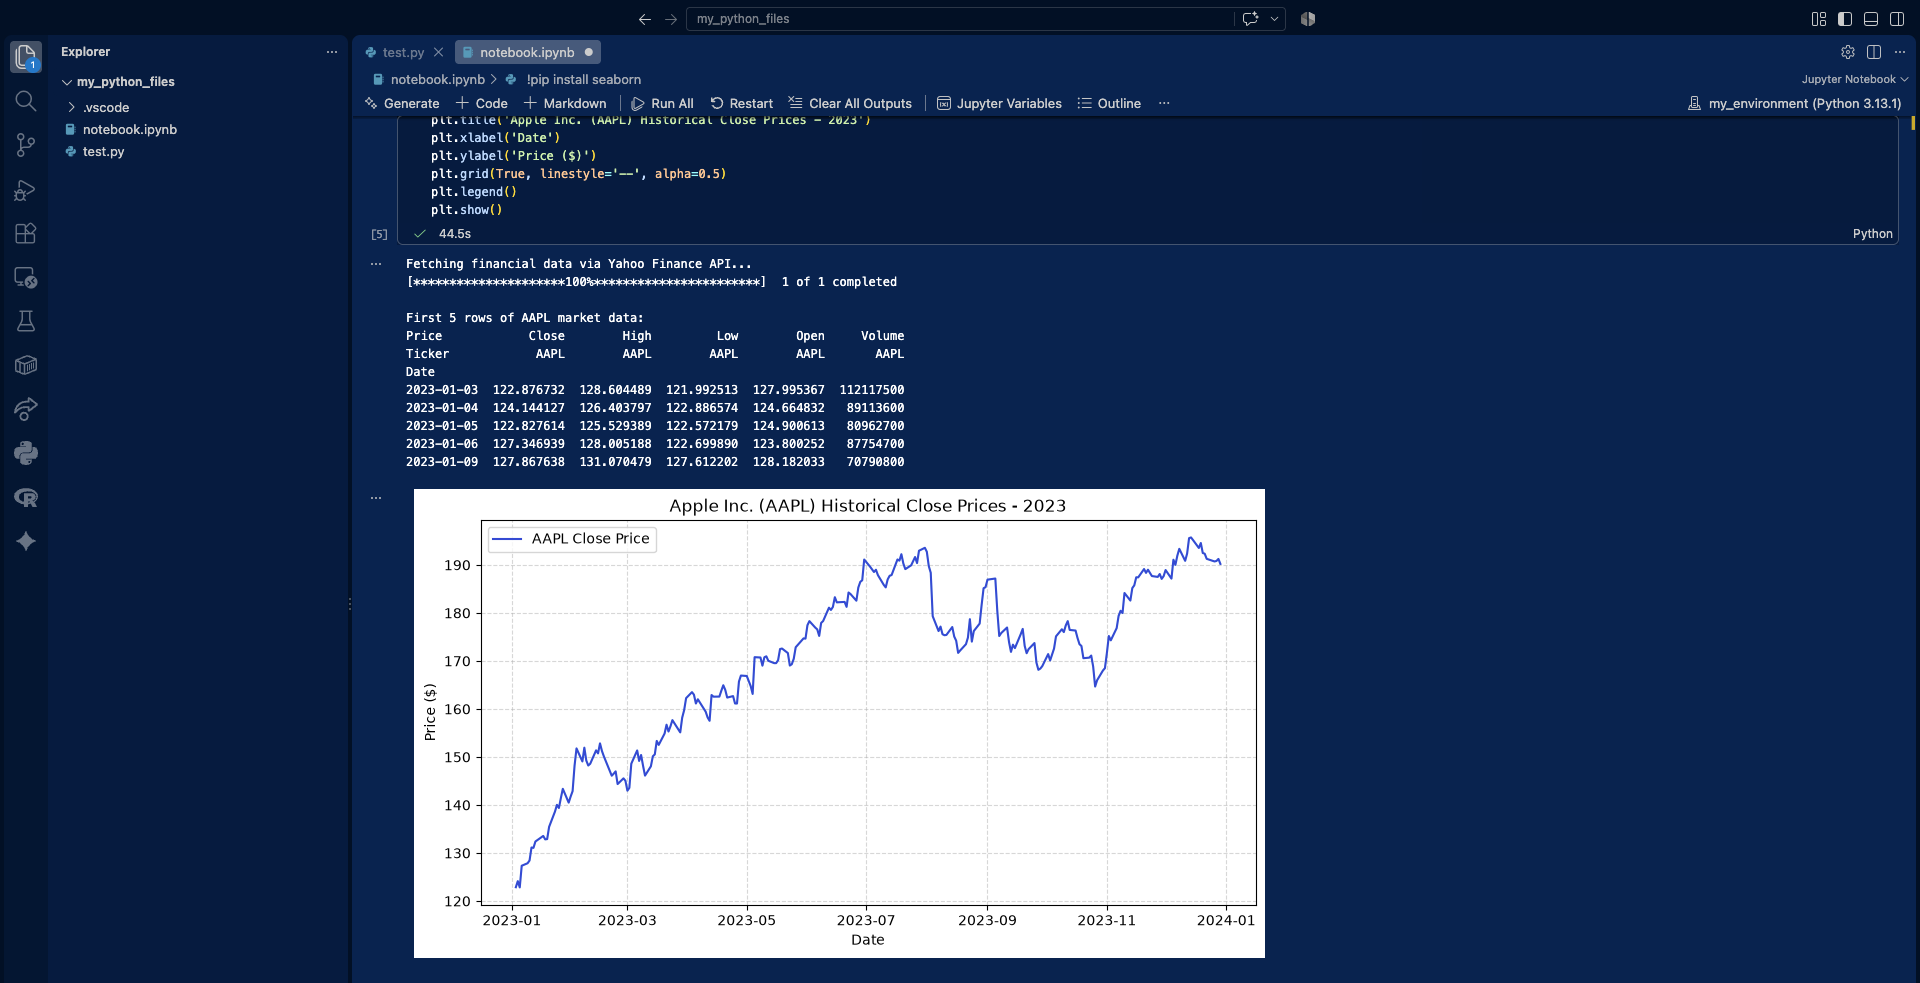
If the market dataset downloads and a clean line chart of Apple’s stock price appears, congratulations! You have successfully configured a professional, local Python environment for financial engineering.

This is how the output should look like if everything is working correctly:

An image of the VS Code menu with notebook.ipynb and test.py created

Congratulations! You have successfully configured a professional, local Python environment, ready for financial engineering

A quick tip for installing additional packages

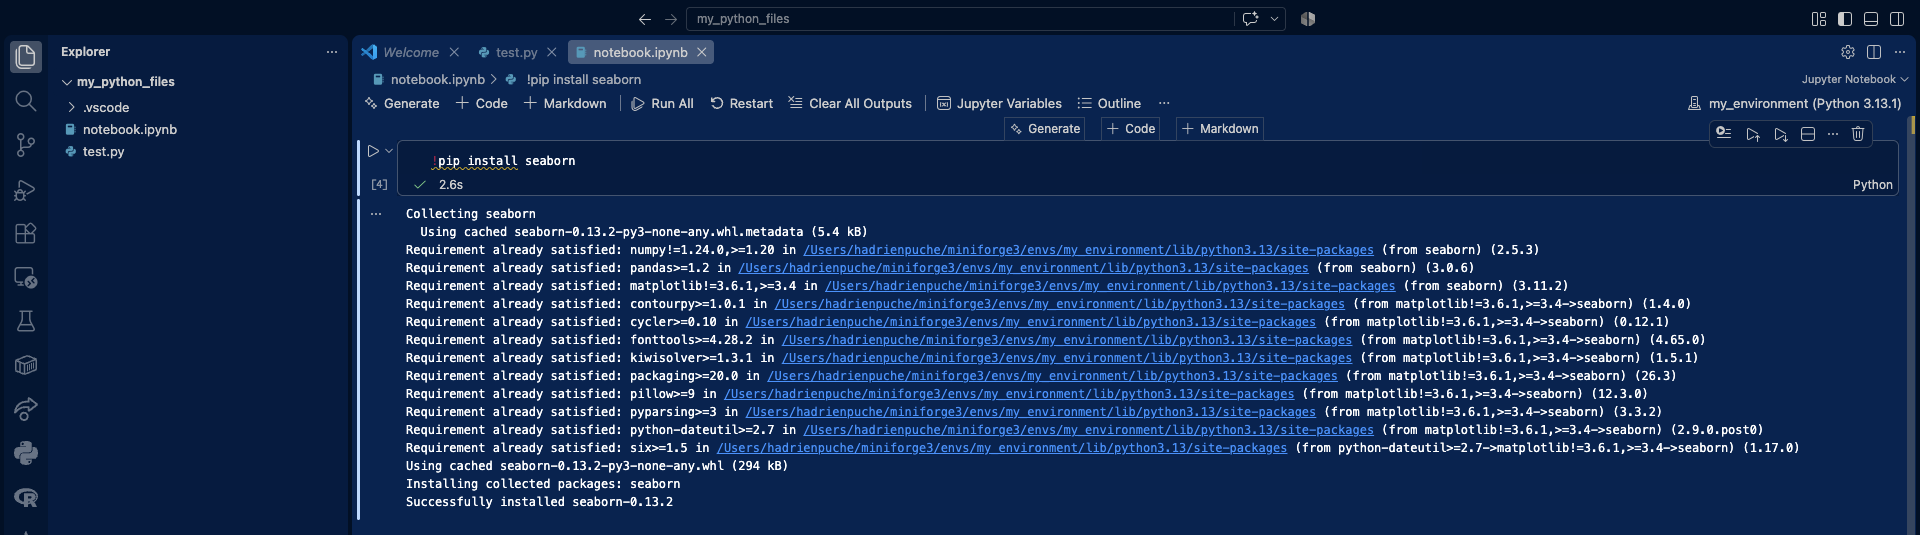
As you have seen, packages such as yfinance, matplotlib, and pandas extend Python with useful functionality for financial analysis. If you need to install an additional package while working in a Jupyter Notebook, you can use the %pip command directly in a notebook cell, provided that the appropriate Python environment is selected as the active kernel. For example, the following command installs seaborn, a high-level statistical data visualization library built on top of Matplotlib:

%pip install seaborn

An image of the VS Code menu with notebook.ipynb and test.py created

Next steps & financial use cases

Now that your environment is fully operational, you are ready to start applying Python to quantitative finance. Explore this article to learn how to use Python to download and use financial market data.

   ▶ Hadrien Puche How to download and model financial data with Python

If you are interested in programming languages and would like to learn another useful skill, explore these two articles about how you could use the programming language R to help you in your financial analysis:

   ▶ Hadrien Puche How to install and run R on your computer (A step-by-step guide)

   ▶ Hadrien Puche How to download financial data with R

About the Author

This article was written in September 2026 by Hadrien PUCHE (ESSEC Business School, Grande École Program, Master in Management, 2023-2027).

   ▶ Discover all posts by Hadrien PUCHE
AMM: Market Making in Decentralized Finance

Calculateur AMM

Constant-Product Automated Market Maker (AMM): Price Calculator

This application calculates the average transaction price and the final price (marginal price after the transaction) for a constant-product AMM defined by x × y = k. The following convention is used: buy means that the user buys asset x and pays with asset y, while sell means that the user sells asset x and receives asset y.

Pool Parameters

Transaction

Results

Chart

VIX Data and Statistical Properties

Saral BINDAL

In this article, Saral BINDAL (Indian Institute of Technology Kharagpur, Metallurgical and Materials Engineering, 2024-2028 & Research assistant at ESSEC Business School) examines the statistical properties of historical VIX data and applies statistical methods to model its dynamics.

Introduction

The Chicago Board Options Exchange (CBOE) Volatility Index, or VIX, is a real-time market index designed to measure the market’s expectation of 30-day forward-looking annualized volatility in the US equity market. It is option-based, calculated using the market prices of S&P 500 index options to gauge expected volatility. The VIX construction methodology can be found in the article CBOE Volatility Index

In this article, we analyze the VIX index using historical market data to study its statistical properties, and discuss the methods used to model its dynamics in quantitative finance.

Historical Data

The VIX Index Historical data is publicly available from the Chicago Board Options Exchange (CBOE) and is updated on a daily basis. The analysis in this article is based on daily closing values of the VIX obtained from this data.

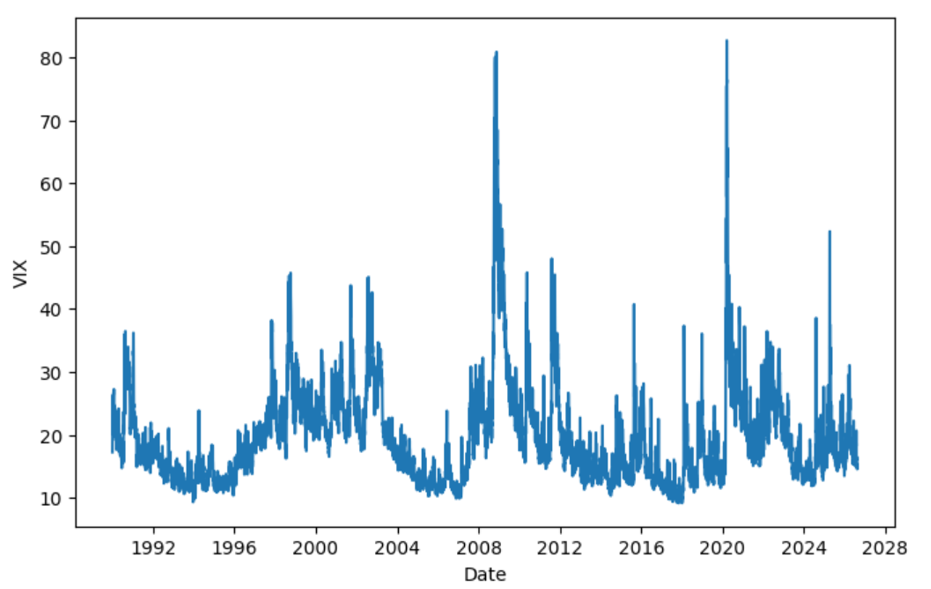
Figure 1 below illustrates the time series plot of VIX daily closing values from January 1990 to August 2026. From the figure, we can observe that during periods of high uncertainty, the VIX tends to rise significantly, as seen during the Global Financial Crisis (2007–2009) and the COVID-19 pandemic (2019–2020). We can also see the VIX rising as of now amid the ongoing Middle East crisis, although not to the same extent as observed during previous periods of heightened uncertainty.

Figure 1. VIX Index Historical Data (1990-2026)
VIX Index Historical Data (1990-2026)
Source: computation by the author.

Distributional Characteristics

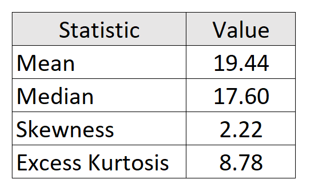
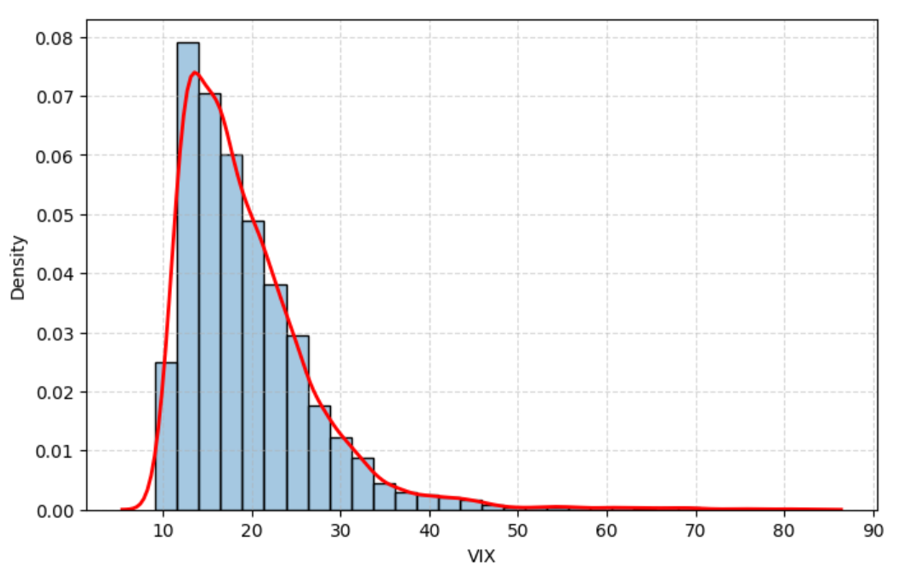
Using historical VIX data from 1990 to 2026, Figure 2 illustrates the empirical distribution of daily VIX closing values. The histogram, overlaid with a kernel density estimate (KDE), provides a visual representation of the distribution’s underlying probability density. The corresponding first four moments of the distribution are reported below:

Table 1. VIX Distribution Statistics
Table of VIX Distribution Statistics
Source: computation by the author.

From the above table, we can observe that the data is right-skewed, which indicates that volatility tends to remain relatively low under normal market conditions but can rise sharply during periods of financial stress. The long right tail therefore reflects the occurrence of volatility shocks and tail-risk events, such as the Global Financial Crisis (2007–2009), the COVID-19 market shock (2020), and other episodes of significant financial or geopolitical uncertainty. Moreover, a high excess kurtosis indicates fatter tails compared to a normal distribution, implying a higher probability of observing extreme VIX levels. From the histogram, we observe that the VIX is concentrated around a level of 15 for a large proportion of the sample. This suggests that, under normal market conditions, the VIX tends to fluctuate around this level, which can be interpreted as its long-term level of the market uncertainty

Figure 2. Historical Distribution and Kernel Density Estimation of the Daily VIX levels
Historical Distribution of the Daily VIX levels
Source: computation by the author.

Time-Series Properties

The VIX exhibits several well-documented time-series properties that distinguish it from traditional financial asset prices. Unlike equity prices, whose levels are generally characterized by non-stationary dynamics, the VIX exhibits pronounced mean reversion and persistence, together with sharp spikes during episodes of market stress. The mean-reverting behaviour of the VIX is particularly noteworthy because it resembles a fundamental feature of interest-rate dynamics, which has long been incorporated into models such as the Vasicek (1977) and Cox, Ingersoll, and Ross (1985). The mean-reverting specifications have similarly been used to capture the tendency of volatility to return toward a long-run level.

However, the two processes differ substantially in their temporal dynamics. Interest-rate persistence typically reflects gradual adjustments in response to macroeconomic conditions and monetary policy, with mean reversion occurring over relatively longer horizons. In contrast, the VIX responds rapidly to changes in market expectations: episodes of financial stress can trigger abrupt upward spikes, followed by relatively rapid mean reversion toward lower levels. Thus, while both exhibit persistent and mean-reverting dynamics, the VIX is distinguished by its faster adjustment, pronounced asymmetry, and sharp responses to market stress.

Methods to Model VIX Dynamics

VIX dynamics exhibit several distinctive characteristics, particularly mean reversion and persistence, which require different modelling approaches. This section examines how various econometric models capture these features, ranging from mean-reverting and Log-VIX models to HAR, ARCH/GARCH, and stochastic volatility models.

Mean-Reverting Models

Early approaches to modelling volatility indices treated volatility as a mean-reverting stochastic process. A commonly used specification is the Cox-Ingersoll-Ross (CIR) process, originally developed for interest-rate modelling by Cox, Ingersoll and Ross (1985) and subsequently applied to volatility derivatives by Grünbichler and Longstaff (1996). Grünbichler and Longstaff modelled the volatility index using a mean-reverting square-root process and derived pricing formulas for volatility futures and options.

The dynamics are given by


CIR Formula

  • Vt represents the volatility index at time t
  • κ is the speed of mean reversion
  • θ is the long-run level towards which the process tends to revert
  • σ is the diffusion parameter controlling the magnitude of random fluctuations
  • Wt is a standard Brownian motion

The term κ(θ − Vt)dt represents the mean-reverting component, which pulls the process towards its long-run level θ, while σ√VtdWt represents the diffusion component, capturing random fluctuations in the volatility index.

The CIR framework was subsequently examined empirically in the context of VIX futures by Zhang and Zhu (2006). They estimated a stochastic variance model using historical VIX data and used it to derive and evaluate VIX futures prices.

An alternative mean-reverting modelling approach is the Ornstein-Uhlenbeck (OU) process (Uhlenbeck and Ornstein, 1930), which assumes a constant diffusion coefficient:


OU Formula

Unlike the CIR process, the OU process is Gaussian and can theoretically take negative values. This makes the OU process unsuitable for modelling the VIX level directly, since the VIX is strictly positive. A common way to retain the mean-reverting OU structure while ensuring a positive VIX is therefore to model log(VIX) rather than the VIX level itself.

Log-VIX Models

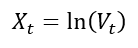
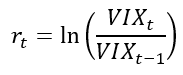
A natural way to address the possibility of negative values is to model the logarithm of the VIX. Let


VIX Log-Change Formula

A mean-reverting logarithmic process can then be written as


Mean Reverting Log Formula

or equivalently,


Mean Reverting Log Formula

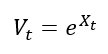
Since


VIX Formula

the resulting modelled VIX is strictly positive. The logarithmic transformation therefore preserves the mean-reverting structure while avoiding the negative-value problem associated with modelling the VIX level using a Gaussian process.

Mean-reverting in the log models were studied by Detemple and Osakwe (2000) in the context of volatility option valuation. Their model provides an early theoretical foundation for modelling volatility through a log-normal mean-reverting process. The approach was subsequently applied directly to the VIX by Bao (2013), who developed a mean-reverting logarithmic model for the spot VIX and extended it to incorporate jumps and stochastic volatility.

Heterogeneous Autoregressive Model

Although continuous-time mean-reverting models capture the tendency of volatility to move towards a long-run level, empirical evidence indicates that the VIX also exhibits substantial persistence across different time horizons. Fernandes, Medeiros and Scharth (2014) conducted a detailed analysis of the time-series properties of the VIX and found evidence of long-range dependence. They therefore employed Heterogeneous Autoregressive (HAR) models to model and forecast the VIX.

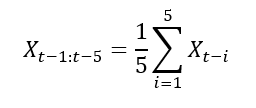
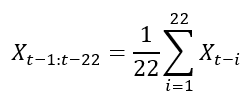
The HAR framework captures persistence by allowing past VIX observations over different horizons to affect the current value. A simplified HAR model can be expressed as


HAR Formula

where


HAR Weekly Component Formula

and


HAR Monthly Component Formula

The three components represent information from daily, weekly, and monthly horizons, respectively. This allows the HAR-VIX model to capture the persistence of the VIX across different time horizons while remaining relatively simple and parsimonious. The HAR framework was originally introduced by Corsi (2009) to model the heterogeneous dynamics of realized volatility. Fernandes, Medeiros and Scharth (2014) adapted this framework to the VIX and showed that its multi-horizon structure provides a useful representation of the strong persistence and long-range dependence in the VIX.

Stochastic Variance of the VIX

The volatility of the VIX itself can vary over time. Rather than assuming that the diffusion coefficient is constant, stochastic-volatility models allow the volatility governing VIX fluctuations to evolve as a separate stochastic process.

Kaeck and Alexander (2013) investigate continuous-time models of VIX dynamics that explicitly incorporate stochastic volatility of volatility. Their analysis considers several one- and two-factor continuous-time models, including affine and non-affine specifications and models with jumps, using VIX data over an extended period.

Conceptually, the model can be represented as


Stochastic Volatility VIX Formula

where

  • VIXt represents the VIX index
  • Vt represents the instantaneous variance governing movements in log-VIX and is itself stochastic
  • κ controls the mean-reversion speed of log-VIX
  • θ represents the long-run level of log-VIX
  • Wt is a Brownian motion driving log-VIX
  • Zt represents the size of a jump in log-VIX
  • Jt is a jump-counting process, with dJt representing the occurrence of jumps


Stochastic Variance Formula

  • κv controls the mean-reversion speed of the variance process
  • θv represents the long-run level of the variance process
  • σv controls the volatility of the variance process, representing the volatility-of-volatility
  • Wtv is a Brownian motion driving the variance process

The key distinction is therefore that the variance of VIX fluctuations is no longer constant. It becomes a state variable that evolves over time.

This additional source of randomness allows the model to capture changes in the intensity of VIX fluctuations and provides a more flexible representation of the sharp and persistent movements observed during periods of financial stress. Kaeck and Alexander’s analysis specifically examines whether stochastic volatility of volatility improves the ability of continuous-time models to describe VIX dynamics.

ARCH and GARCH Models

The VIX also exhibits volatility clustering, where periods of high volatility tend to be followed by high volatility, while periods of low volatility tend to be followed by low volatility. This suggests that the variance of log change in VIX is not constant over time. ARCH and GARCH models capture this feature by allowing the conditional variance of log change in VIX to evolve over time.

Let the log change in the VIX be defined as


VIX Log Change Formula

An ARCH or GARCH model can then be used to model the conditional variance of these changes. The standard GARCH(1,1) specification is


GARCH Formula

where

  • rt represents the log change in the VIX at time t
  • μ represents the conditional mean of the VIX log change
  • εt represents the innovation or shock at time t
  • σt2 represents the conditional variance of the VIX log change
  • ω represents the long-run variance component
  • α measures the immediate effect of new shocks on conditional variance
  • β measures the persistence of conditional variance over time

The αεt−12 term captures the immediate impact of a new shock, while the βσt−12 term captures the persistence of previously elevated variance. A high value of β therefore indicates that periods of high variation in the VIX tend to persist.

The ARCH model was introduced by Engle (1982), while Bollerslev (1986) extended it to the more general GARCH framework. For the VIX, these models are useful for studying time-varying conditional variance and volatility clustering in VIX changes, rather than the mean-reverting behaviour of the VIX level itself.

Empirical Analysis of VIX

We use the complete historical daily VIX closing values (1990 – 2026) to estimate the parameters of the CIR model described above. Since the CIR model is specified in continuous time while the data are observed at daily intervals, the process is first discretized using the Euler-Maruyama approximation:


Discretized CIR Formula

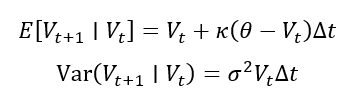
where Δt; = 1/252 for daily observations and εt+1 ∼ N(0,1). This discretization implies that, conditional on the previous day’s VIX value, the expected value and variance of the next observation are:


Conditional Expected Value and Variance Formula

Assuming the discretized process is conditionally normally distributed, these expressions allow us to construct a likelihood for the observed VIX data. The log-likelihood is:


Log Likelihood Formula

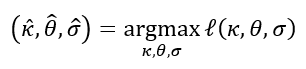
The CIR parameters are then estimated by choosing the values that maximize this log-likelihood:


Maximum Likelihood Estimator Formula

This gives an estimated mean-reversion speed of κ = 4.8618, a long-run VIX level of θ = 19.4237, and a diffusion parameter of σ = 5.1952.

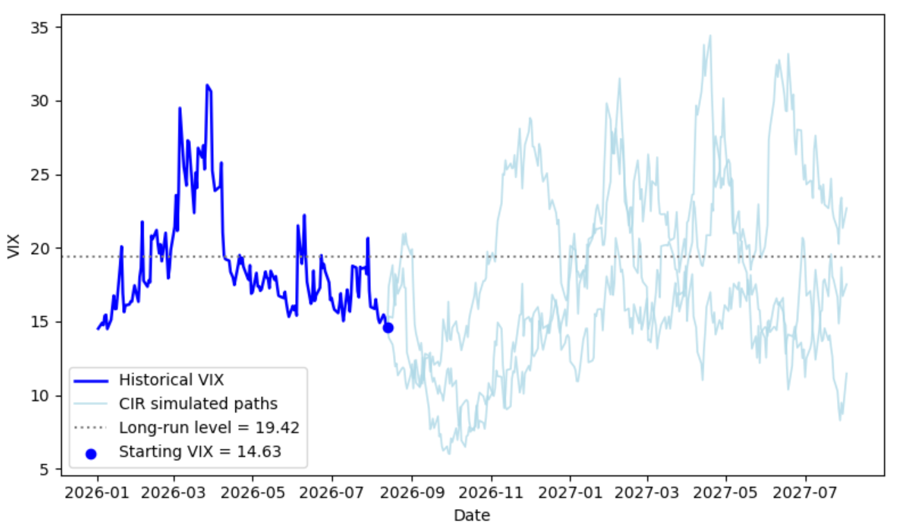
These estimated parameters are then used to simulate a possible future path of the VIX. The simulation starts from the observed VIX value of 14.63 on 13th August 2026 and projects the VIX forward over 252 trading days using the CIR dynamics. The mean-reverting component pulls the process towards the estimated long-run level, while the diffusion component introduces random fluctuations around this tendency.

Figure 3 compares the historical VIX with one simulated path generated by the estimated CIR model. The historical series shows the large fluctuations and sharp spikes observed in the VIX over the sample period, while the simulated path represents one possible future realization starting from the current VIX level of 14.63. The dotted line at 19.42 represents the estimated long-run level of the VIX. The simulated path fluctuates around this level and exhibits a tendency to move towards it, illustrating the mean-reverting behavior implied by the CIR model.

You can download the Excel file with complete historical data used for the above calculations below.

Download the Excel file with complete historical VIX data

Figure 3. Historical Path and Multiple CIR Simulated Paths for the VIX
CIR Simulated Paths
Source: computation by the author.

You can download the Python code below to reproduce the CIR parameter estimation and simulated VIX paths presented above.

Download the Python to simulate the CIR paths.

Alternatively, you can download the R code below with the same functionality as in the Python file.

Download the R code to simulate the CIR paths.

Why should I be interested in this post?

For anyone interested in finance or a career in trading, understanding the statistical properties of VIX and how it is modelled is very important. As one of the most widely used measures of market uncertainty and expected volatility, it serves as an important tool for market analysis, risk assessment and numerous volatility-based trading strategies.

Related posts on the SimTrade blog

   ▶ Akshit GUPTA Options

   ▶ Jayati WALIA Black-Scholes-Merton Option Pricing Model

   ▶ Jayati WALIA Implied Volatility

   ▶ Saral BINDAL Implied Volatility and Option Prices

   ▶ Saral BINDAL Volatility curves: smiles and smirks

   ▶ Youssef LOURAOUI VIX index

Useful resources

Academic research on option pricing

Black F. and M. Scholes (1973) The pricing of options and corporate liabilities. Journal of Political Economy, 81(3), 637-654.

Black, F. (1976), “Studies of Stock Price Volatility Changes”, Proceedings of the Business and Economics Section of the American Statistical Association, 177-181.

Cox J. C., J. E. Ingersoll and S. A. Ross (1985) A theory of the term structure of interest rates. Econometrica, 53(2), 385-407.

Hull J.C. (2022) Options, Futures, and Other Derivatives, 11th Global Edition, Chapter 15 – The Black-Scholes-Merton model, 338-365.

Merton R.C. (1973) Theory of rational option pricing. The Bell Journal of Economics and Management Science, 4(1), 141-183.

Uhlenbeck G. E. and L. S. Ornstein (1930) On the theory of the Brownian motion. Physical Review, 36(5), 823-841.

Academic research on VIX

Bao Q. (2013) Mean-Reverting Logarithmic Modelling of VIX. MPRA Paper, No. 46413.

Bollerslev T. (1986) Generalized autoregressive conditional heteroskedasticity. Journal of Econometrics, 31(3), 307-327.

Corsi F. (2009) A simple approximate long-memory model of realized volatility. Journal of Financial Econometrics, 7(2), 174-196.

Cox J. C., J. E. Ingersoll and S. A. Ross (1985) A theory of the term structure of interest rates. Econometrica, 53(2), 385-407.

Detemple J. and C. Osakwe (2000) The valuation of volatility options. European Finance Review, 4(1), 21-50.

Engle R. F. (1982) Autoregressive conditional heteroscedasticity with estimates of the variance of United Kingdom inflation. Econometrica, 50(4), 987-1007.

Fernandes M., M. C. Medeiros and M. Scharth (2014) Modelling and predicting the CBOE market volatility index. Journal of Banking & Finance, 40, 1-10.

Grünbichler A. and F. A. Longstaff (1996) Valuing futures and options on volatility. Journal of Banking & Finance, 20(6), 985-1001.

Jiang G. J. and Y. S. Tian (2005) The model-free implied volatility and its information content. The Review of Financial Studies, 18(4), 1305-1342.

Kaeck A. and C. Alexander (2013) Continuous-time VIX dynamics: On the role of stochastic volatility of volatility. International Review of Financial Analysis, 28, 46-56.

Uhlenbeck G. E. and L. S. Ornstein (1930) On the theory of the Brownian motion. Physical Review, 36(5), 823-841.

Whaley R. E. (2009) Understanding the VIX. Journal of Portfolio Management, 35(3), 98-105.

Zhang J. E. and Y. Zhu Y. (2006) VIX futures. Journal of Futures Markets, 26(6), 521-531.

VIX Data

CBOE Global Markets (2026) VIX Historical Data.

About the author

The article was written in September 2026 by Saral BINDAL (Indian Institute of Technology Kharagpur, Metallurgical and Materials Engineering, 2024-2028 & Research assistant at ESSEC Business School). His interests include tracking geopolitical developments and analyzing their direct impact on macroeconomic factors such as inflation, trade balances, and currency volatility, with a focus on using data to quantify these global economic ripple effects.

Discover all posts written by Saral BINDAL.

Volkswagen in China: How Localization Strategy Built Success and Created New Challenges

Bochen LIU

In this article, Bochen LIU (Queen’s Smith School of Business, BCom 2023–2027; ESSEC BBA Exchange Program, Fall 2025) explains how Volkswagen’s localization strategy has become a key marketing approach for maintaining competitiveness in the Chinese automobile market. By adapting products, branding, digital communication, and consumer engagement to local preferences, Volkswagen demonstrates how international companies can strengthen their market position through localization rather than standardization.

Volkswagen in China

Volkswagen has been one of the most successful foreign automobile brands in China since entering the market in the 1980s. Through joint ventures with SAIC and FAW, Volkswagen developed a strong business presence by combining its global automotive expertise with local market knowledge. Rather than simply exporting global models, Volkswagen adopted a localization strategy by adapting its products, production processes, and marketing activities to better meet the needs and preferences of Chinese consumers. This approach allowed Volkswagen to establish a strong market position and become one of the leading international automobile brands in China.

The success of Volkswagen in China was highly dependent on its ability to make products that could suit the taste of the Chinese market. For instance, one of the first successful products made by Volkswagen in China was the Santana, which had high reliability and suitability for use by the Chinese consumers. Later, another model known as Lavida was designed specifically for the Chinese market. This model was made taking into consideration the needs of the Chinese consumers for spaciousness and comfort. This shows that the company managed to localize its global brand in the local market by making products that could suit the needs of the Chinese customers.

The Chinese automobile market has been transformed in recent years. In the past, VW could take advantage of its global reputation, engineering skills, and reliability to gain success in the Chinese market. However, today, the customers give more attention to electric cars, intelligent systems, and digital products. The development of Chinese companies producing electric cars, such as BYD and NIO, is posing new challenges for the company. In conclusion, while Volkswagen’s localization strategy has been successful in helping the company enter the Chinese market, it needs to adapt constantly.

From Localization to Competitive Advantage in China

Volkswagen’s localization strategy is important because Chinese consumers increasingly evaluate vehicles based on factors beyond traditional brand reputation. While Volkswagen previously benefited from its global reputation for reliability and engineering quality, the Chinese automotive market has shifted toward digital technology, intelligent driving features, and user experience. Therefore, adapting products and marketing communication to local preferences has become essential for maintaining customer relevance.

For example, Volkswagen has invested in localized technology and product development to better respond to Chinese consumers’ expectations for intelligent vehicles. Features such as intelligent cockpit systems, localized infotainment functions, and digital services allow Volkswagen to compete with domestic brands that have strong technological advantages. Without these adaptations, Volkswagen risks losing younger Chinese consumers who increasingly prioritize innovation and connectivity over traditional brand value.

Consulting: structuring and reducing uncertainty

Market localization requires market analysis procedures. As part of its business strategy, the company constantly gathers consumer data, analyzes competitors, and tracks shifts in consumer demands. Tools like the STP model (segmentation, targeting, and positioning), SWOT analysis, and consumer journey mapping make this easier.

As a result, Volkswagen uses market analysis tools to identify potential customer groups and create more relevant marketing campaigns.

Financial analysis: measuring and pricing risk

The effectiveness of localization can be evaluated through measurable business indicators, including market share, customer acquisition, sales growth, and brand preference. These metrics allow managers to determine whether localized marketing investments generate sustainable returns.

Improved localization often increases customer satisfaction and strengthens long-term brand loyalty, ultimately reducing marketing costs while improving overall business performance.

Challenges in China’s Changing Automotive Market

The Chinese automotive market has experienced significant uncertainty due to the rapid development of electric vehicles, government support for new energy vehicles, and changing consumer expectations. Unlike traditional market risks that can be estimated through historical data, these changes have created new competitive conditions that Volkswagen could not fully predict based on its previous success.

These changes require Volkswagen to continuously adapt its marketing strategy rather than relying only on its previous competitive advantages. For decades, Volkswagen benefited from its strong reputation for quality and reliability in China. However, the rise of domestic EV manufacturers has shifted competition toward technology, connectivity, and user experience. Therefore, Volkswagen’s future competitiveness depends on its ability to localize not only its products but also its digital and innovation strategies.

From managing risk to building resilience

Volkswagen builds long-term resilience by making localization an ongoing strategic capability rather than a temporary marketing campaign. Continuous investment in local research and development, partnerships with Chinese technology companies, and localized communication channels enable the company to respond more quickly to changing market conditions.

This adaptive approach allows Volkswagen to strengthen customer relationships while maintaining competitiveness in an increasingly dynamic automotive industry.

Why should I be interested in this post?

Volkswagen’s experience demonstrates that successful international marketing requires more than global brand recognition. Companies must understand local consumers, adapt their value proposition, and continuously refine their marketing strategy to remain competitive.

For business and marketing students, this case illustrates how localization, consumer insight, and strategic positioning can transform global brands into locally relevant market leaders, providing valuable lessons for international marketing and brand management.

Related posts on the SimTrade blog

   ▶ Mathis HOUROU Client Segmentation and Private Banking: Marketing Strategy or Risk Shield?

   ▶ Guylan ABBOU My Personal Experience in Marketing, and How It Links to Finance

   ▶ Emmanuel CYROT My Internship as a Junior Consultant in Marketing & Finance Studies at Eres Gestion

Useful resources

Volkswagen Newsroom

Volkswagen Group China

American Marketing Association (AMA)

About the author

The article was written in August 2026 by Bochen LIU (Queen’s Smith School of Business, BCom 2023–2027; ESSEC BBA Exchange Program, Fall 2025).

▶ Discover all posts by Bochen LIU