

In finance, the ability to rapidly acquire, clean, and manipulate data is a key skill that can help you gain an edge over other students and job applicants. While Excel (with VBA) remains widely used and is sufficient for most basic financial modeling, such as a DCF valuation, Python offers far more scalability, automation, and mathematical power than Excel.
In this article, Hadrien PUCHE (ESSEC Business School, Grande École Program, Master in Management, 2023-2027) will help you to:
- Understand the core components of a Python environment for finance
- Choose the most secure and efficient development setup for financial data
- Install Miniconda and manage isolated virtual environments
- Set up Visual Studio Code (VS Code) as your primary coding workspace
- Run a test script to download and visualize real stock market data
No computer science background is required to start using Python.
Quick vocabulary for beginners
Before we dive in, let’s demystify a few technical terms you will encounter frequently:
- Python: A popular, high-level programming language created in 1991 by Guido van Rossum (and named after the BBC comedy series Monty Python’s Flying Circus). Today, Python is widely used in quantitative finance and data science because of its simple syntax and vast ecosystem of financial tools.
- Library / Package: A collection of pre-written code created by other developers so you don’t have to reinvent the wheel (e.g.,
pandasfor data tables,yfinancefor downloading stock market prices). - Dependency: A package that another package needs in order to work properly.
- Environment: An isolated “sandbox” on your computer containing a specific version of Python and specific libraries, preventing projects from interfering with one another.
- IDE (Integrated Development Environment): The visual software app where you write, edit, and test your code (e.g., Visual Studio Code).
- Extension: An add-on (like an app from an App Store) that adds extra features to your IDE.
In this first article, we will focus on helping you set up Python on your computer so that you can start learning how to use it. We will guide you step by step through setting up a professional local workspace and testing that everything is working properly. Once that is done, you will find a list of follow-up articles at the end to explore real-world financial use cases.
Choosing your development environment
A development environment is simply the ecosystem of software tools you use to write, manage, and execute your code. When selecting a workspace for Python, you have three main choices:
- Local workspaces (like Visual Studio Code): The standard choice for finance. Running your code locally (on your own computer) gives you full control over your local file systems, execution speed, and (most importantly) data privacy. In finance, working with proprietary trading algorithms or confidential client data means you cannot upload sensitive information to unvetted third-party servers.
- Cloud notebooks (like Google Colab): Cloud platforms are convenient for quick experiments because they require zero installation. However, they are generally unsuitable for professional financial workflows. You do not have full control over code execution or environment stability, and uploading confidential financial datasets or proprietary logic to public cloud infrastructure poses significant security and compliance risks.
- AI-native code editors (like Cursor or Windsurf): These editors heavily integrate AI to generate code automatically. While powerful for experienced developers, relying on AI tools too early prevents beginners from learning core programming logic, syntax, and debugging skills. It is far better to understand the core mechanics manually first.
In this article, we will focus exclusively on establishing a local workspace using Visual Studio Code (VS Code),which is a widely used tool to get comfortable with professional Python coding.
We will also use Jupyter Notebooks (files ending in .ipynb). Unlike traditional Python scripts (files ending in .py) that execute the entire code at once, Jupyter Notebooks allow you to write and run code in individual “cells.” This block-by-block structure is especially powerful in finance for several reasons:
- Isolating code: You can work on and execute specific parts of your code independently (e.g., downloading data once, then tweaking the math in a separate cell without re-downloading).
- Immediate feedback: Data tables, charts, and outputs are displayed directly below the specific cell you just ran, and you do not have to execute the entire code each time.
- Easier debugging: By testing your logic piece-by-piece, identifying and fixing errors becomes significantly faster.
- Better examples, tutorials, or exercises: You can mix executable code with explanatory text and financial formulas, making it the perfect format for case studies and tutorials.
As your code grows, using a Jupyter Notebook will be more and more useful.
What you need to install (and why)
Before installing anything, let’s understand how the different components of your workspace fit together:
- Miniconda (which includes Python & Conda): Python comes with a comprehensive standard library, but financial and data analysis typically require additional packages such as
pandas,NumPy,matplotlib, andyfinance. To perform financial analysis, you need external packages/libraries likepandasoryfinance. Conda is a tool that manages these packages and isolates them into dedicated virtual environments.
Note on Anaconda vs. Miniconda: Anaconda is a big download that comes bundled with hundreds of packages you may never use. I suggest using Miniconda because it is a lightweight version, containing only Conda and Python, allowing us to keep your setup clean and fast. - Virtual Environments: Why do we need them? If you install every package into one single base Python installation, different projects will eventually require conflicting versions of the same library (a “dependency collision”), causing your scripts to crash. Virtual environments keep each project’s tools safely separated.
- Visual Studio Code (VS Code): A clean user interface where you write, edit, and debug your code. VS Code connects seamlessly to your Conda virtual environment to execute your scripts.
How the architecture works
The diagram below illustrates how your development setup functions:
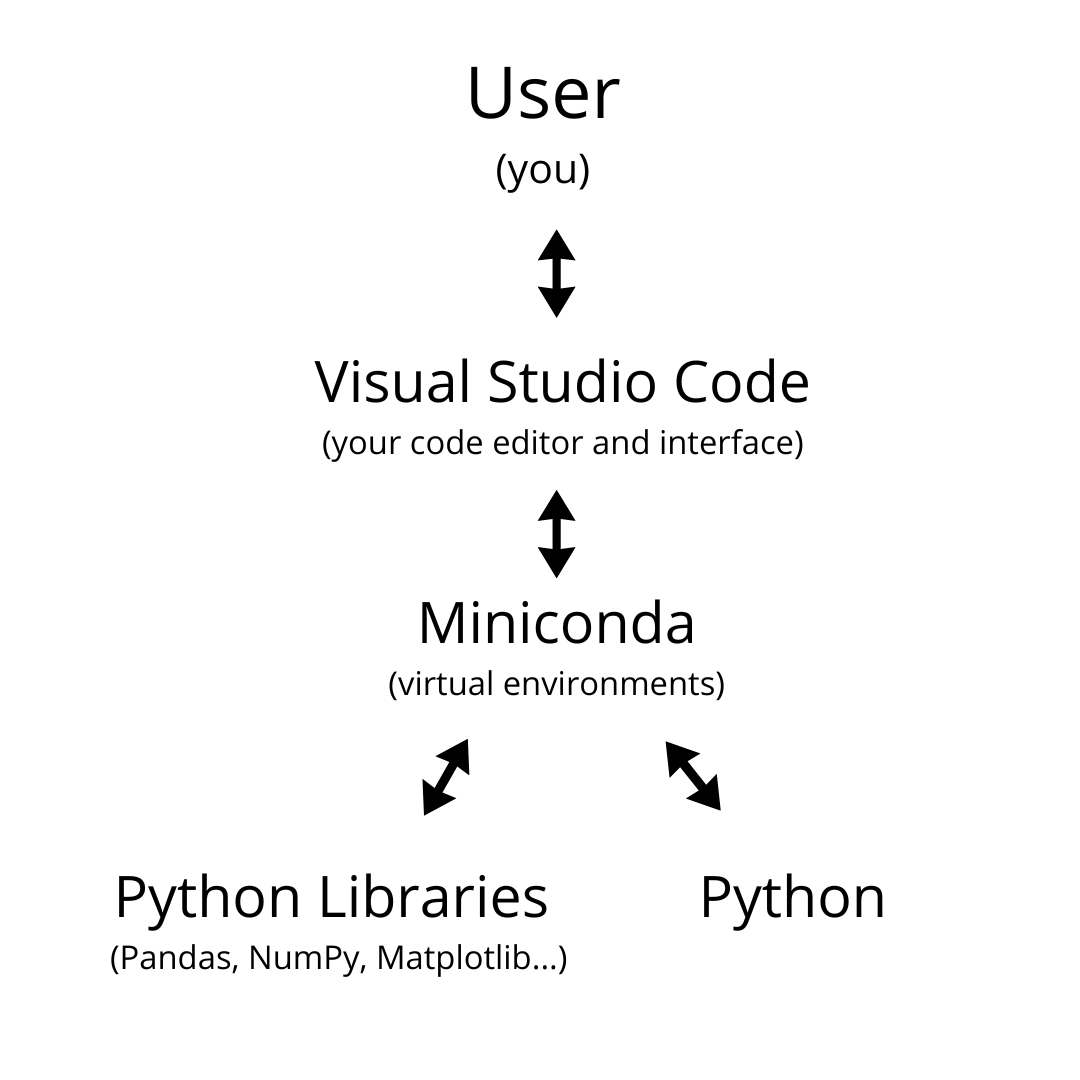
Figure 1: How the User, VS Code, Miniconda Environment, and Python Engine interact.
- You (the User) interact directly with VS Code to write commands and inspect results.
- VS Code sends your code to your isolated Miniconda Virtual Environment (e.g.,
my_environmentthat you can create to store the packages that you will use in your own code). - Inside this environment, the Python Engine processes the math and logic, drawing upon the installed financial libraries (like
yfinanceandpandas). - The execution results (tables, charts, output logs) are sent back to VS Code for you to view.
As a fun side note: you can technically write code in almost any text editor! For a fun take on how far you could take this, check out this video.
Step-by-step installation guide
Step 1: Install Miniconda (Python + Conda)
Conveniently, downloading and installing Miniconda automatically installs Python, so this will be our first step.
Head to the official Miniconda Download Page, select the installer for your operating system (Windows or macOS), and complete the installation using the recommended default settings.
Step 2: Install Visual Studio Code and Extensions
Visual Studio Code (VS Code) will serve as your Integrated Development Environment (IDE). As a quick reminder, an IDE is the main visual software application, where you will actually write, edit, test, and debug your code. You can think of it as the central command dashboard for all your financial programming projects.
- Download & Install: Go to the official VS Code website, download the installer for Windows or macOS, and follow the standard installation instructions.
- Install Essential Extensions: Launch VS Code. Click on the Extensions icon on the left-hand Activity Bar (or press
Ctrl+Shift+Xon Windows /Cmd+Shift+Xon Mac). Think of extensions as add-ons from an app store that give VS Code superpowers. Search for and install:- Python (by Microsoft) – Provides syntax highlighting, code completion, and interpreter selection.
- Jupyter (by Microsoft) – Enables interactive execution of code cells inside
.ipynbnotebook files.
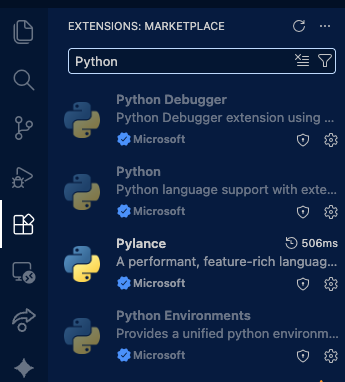
Make sure to install the official Python and Jupyter extensions in VS Code.
Step 3: Create your virtual environment via the Terminal
Now, we will create a clean, isolated Conda environment named my_environment where our financial packages will live.
- Open your command line interface:
- Windows 11 / 10: Open the Start menu, search for Anaconda Prompt, and click to open it. (Alternatively, you can open Windows Terminal / PowerShell, but Anaconda Prompt automatically initializes Conda for you).
- macOS: Open the Terminal app (press
Cmd + Space, type “Terminal”, and press Enter).
- Run the following Conda & pip commands one by one:
Pro-tip: Whenever you need to install additional packages in the future, open your terminal, activate your environment (conda activate my_environment), and run pip install [package_name].
Step 4: Connect VS Code to your environment
Now that your environment and libraries are ready, you need to tell VS Code to use my_environment to run your code.
- Open a workspace folder: In VS Code, go to File > Open Folder… and select or create a dedicated folder on your computer (e.g.,
finance_python). It does not matter where it is, you simply need somewhere to store your code files. - Create your files: Click the New File icon in the Explorer sidebar to create two files:
test.py(.py file is to store Python code)notebook.ipynb(.ipynb is the file extension name used for Jupyter notebooks)
- Select the Python interpreter: Open
test.py. PressCtrl+Shift+P(Windows) orCmd+Shift+P(macOS) to open the Command Palette, typePython: Select Interpreter, and press Enter.- VS Code should automatically list
my_environment. Click on it. - If it doesn’t appear automatically: Click Enter interpreter path… > Find… and navigate directly to the executable file:
- Windows:
C:\Users\YourUsername\miniconda3\envs\my_environment\python.exe - macOS:
/Users/YourUsername/miniconda3/envs/my_environment/bin/python3
- Windows:
- VS Code should automatically list
- Select Jupyter Kernel: Open
notebook.ipynb. Click Select Kernel in the top-right corner of the window, choose Python Environments…, and select yourmy_environmentpath.
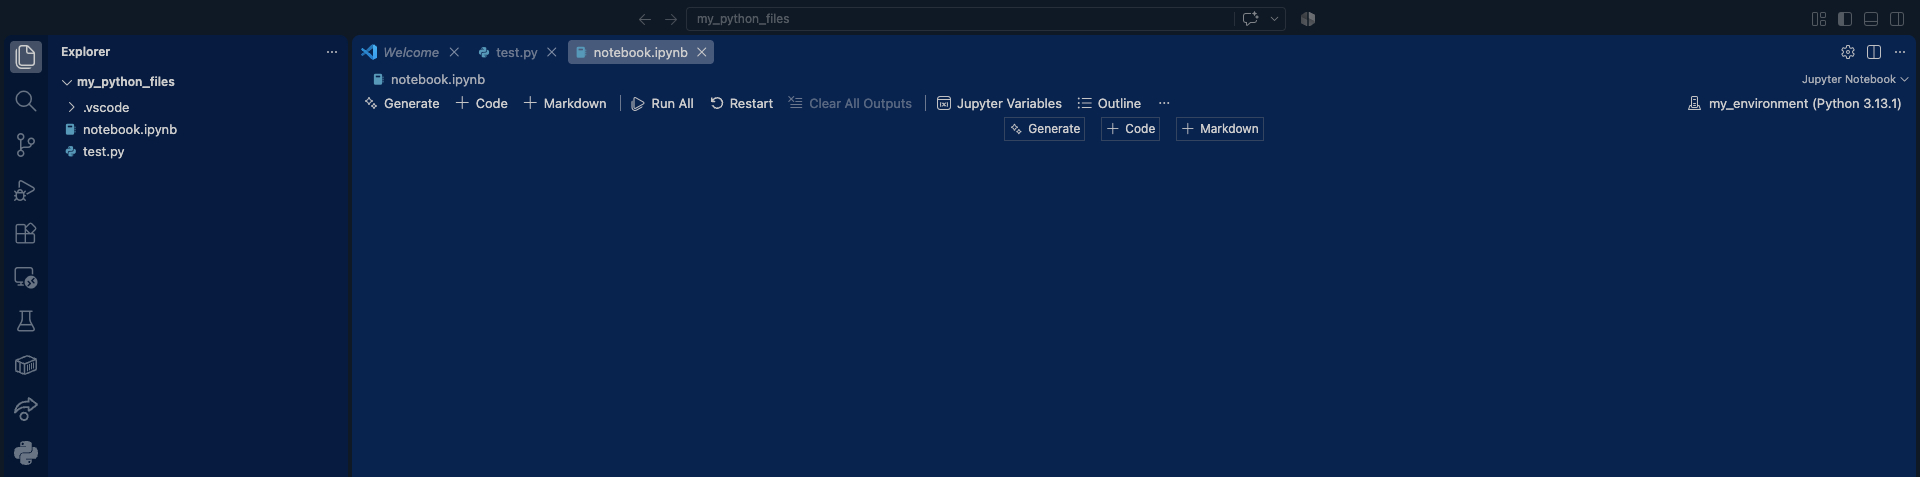
Once this is done, your IDE should look just like this.
- “No matching commands” error: If typing
Python: Select Interpretergives no results, click inside thetest.pyeditor window first to wake up the Python extension, or click Select Python Interpreter in the bottom-right status bar. - Environment missing from the list: Make sure you activated the environment in terminal at least once, or use the direct path navigation detailed above.
Testing your installation
Now that VS Code is connected to my_environment, let’s run a simple test script to confirm that our setup can successfully fetch market data and display a stock chart. Open test.py or notebook.ipynb, paste the code below, and execute it:
# Import yfinance to download stock market data directly from Yahoo Finance
import yfinance as yf

# Import matplotlib.pyplot (aliased as 'plt') to create financial charts and plots
import matplotlib.pyplot as plt

# Download historical stock data for Apple Inc. (AAPL)
print("Fetching financial data from Yahoo Finance using yfinance...")
df = yf.download('AAPL', start='2023-01-01', end='2024-01-01')

# Display the first 5 rows of the downloaded data in the terminal / output window
print("\nFirst 5 rows of AAPL market data:")
print(df.head())

# Plot historical closing prices
plt.figure(figsize=(10, 5))
plt.plot(df['Close'], label='AAPL Close Price', color='#1d4ed8', linewidth=1.5)
plt.title('Apple Inc. (AAPL) Historical Close Prices - 2023')
plt.xlabel('Date')
plt.ylabel('Price ($)')
plt.grid(True, linestyle='--', alpha=0.5)
plt.legend()
plt.show()
If the market dataset downloads and a clean line chart of Apple’s stock price appears, congratulations! You have successfully configured a professional, local Python environment for financial engineering.
This is how the output should look like if everything is working correctly:
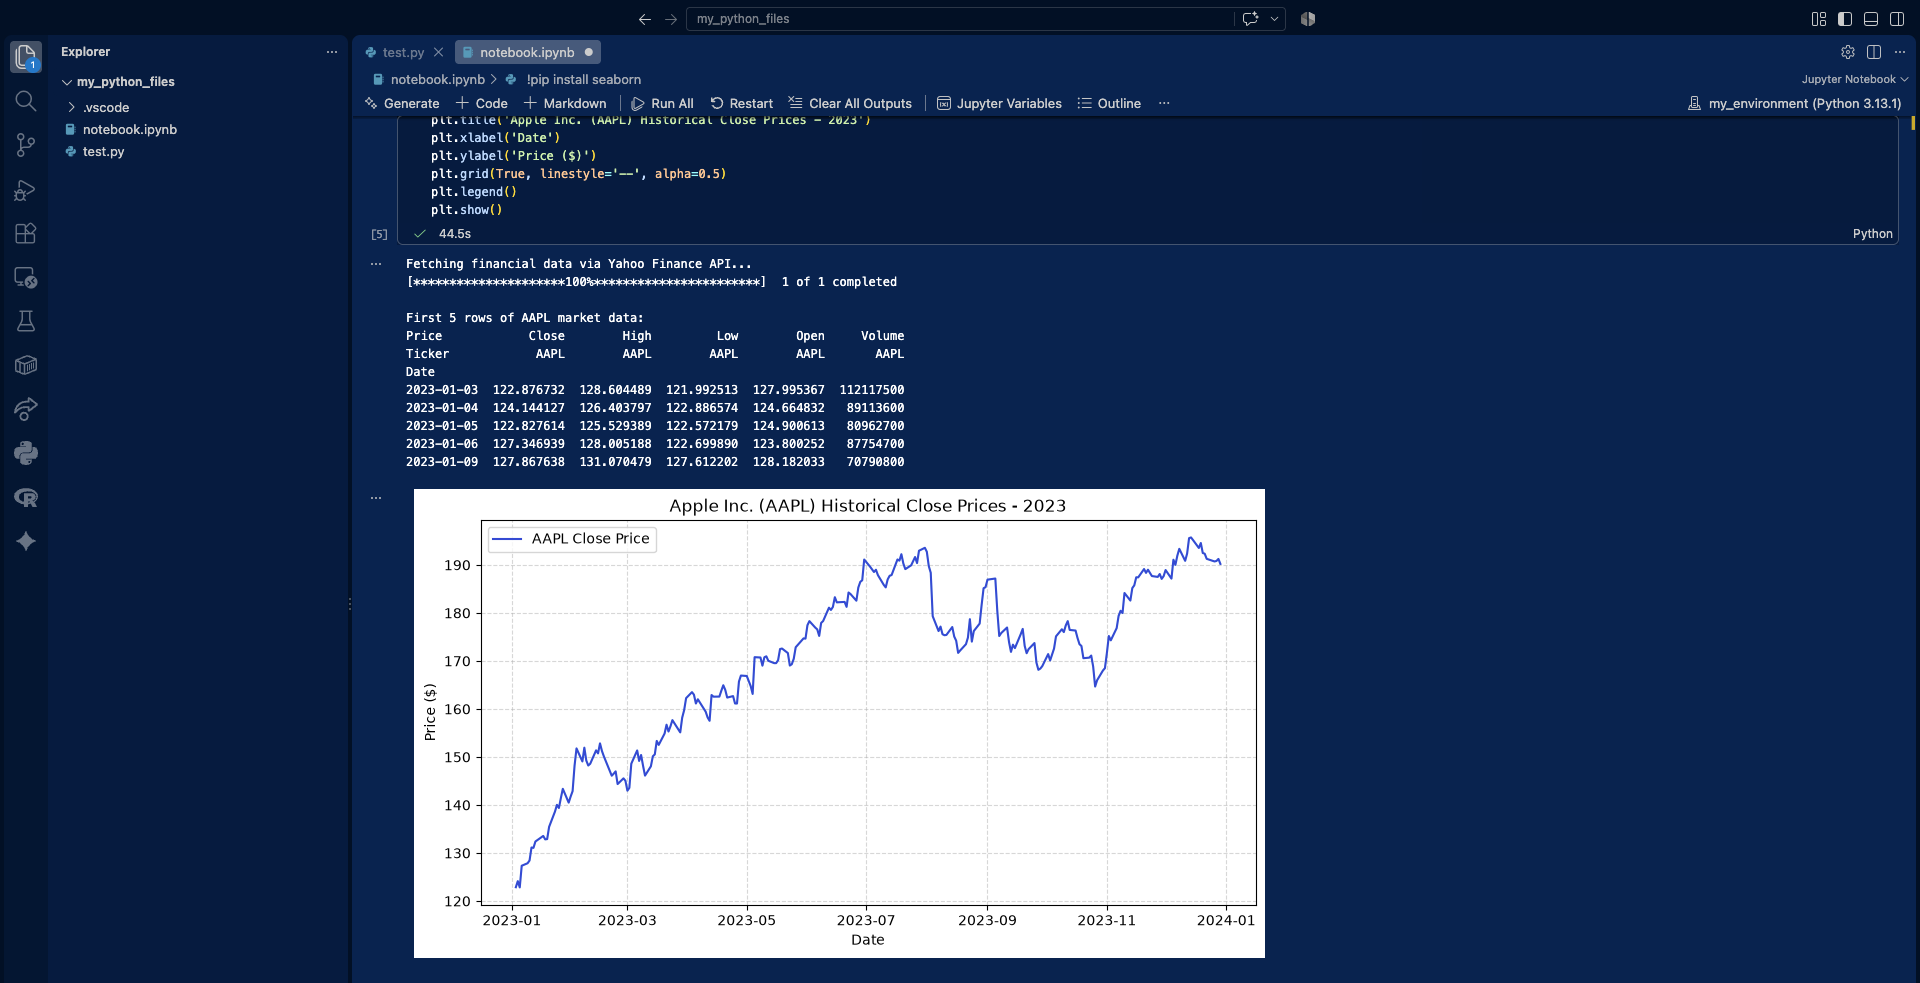
Congratulations! You have successfully configured a professional, local Python environment, ready for financial engineering
A quick tip for installing additional packages
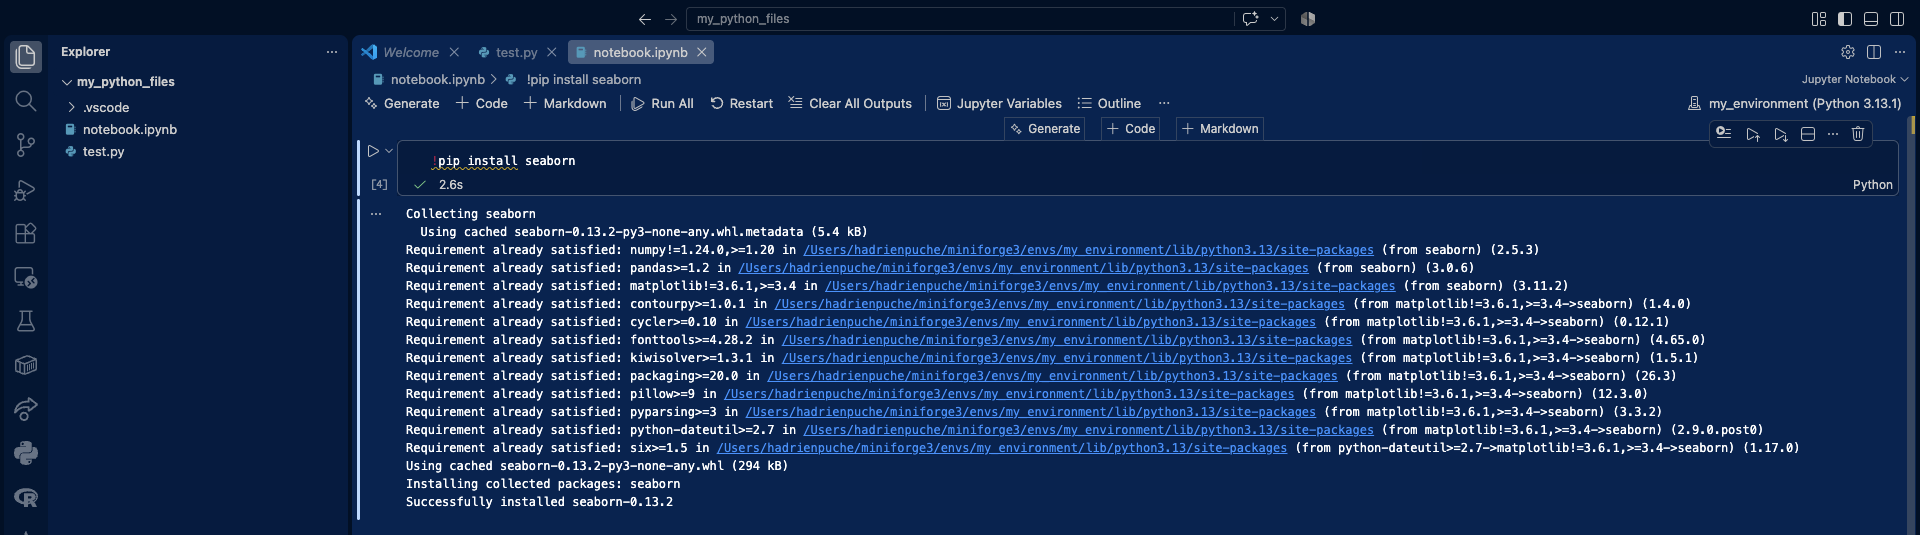
As you have seen, packages such as yfinance, matplotlib, and pandas extend Python with useful functionality for financial analysis. If you need to install an additional package while working in a Jupyter Notebook, you can use the %pip command directly in a notebook cell, provided that the appropriate Python environment is selected as the active kernel. For example, the following command installs seaborn, a high-level statistical data visualization library built on top of Matplotlib:
%pip install seaborn
Next steps & financial use cases
Now that your environment is fully operational, you are ready to start applying Python to quantitative finance. Explore this article to learn how to use Python to download and use financial market data.
▶ Hadrien Puche How to download and model financial data with Python
If you are interested in programming languages and would like to learn another useful skill, explore these two articles about how you could use the programming language R to help you in your financial analysis:
▶ Hadrien Puche How to install and run R on your computer (A step-by-step guide)
▶ Hadrien Puche How to download financial data with R
About the Author
This article was written in September 2026 by Hadrien PUCHE (ESSEC Business School, Grande École Program, Master in Management, 2023-2027).
▶ Discover all posts by Hadrien PUCHE
2 thoughts on “How to install and run Python on your computer (a step-by-step guide)”
Comments are closed.